ASSET MANAGEMENT
Asset management
Welcome to the era of optimal inventory management with CDESK! Our innovative solution opens the door to easy and quick inventories that will improve the efficiency and organization of your business. Forget about lengthy and demanding inventory processes – now is the time to switch to a revolutionary solution that will save you time, money and reduce the stress associated with inventories.
With an intuitive user interface and advanced features, you’ll be able to inventory your assets quickly and easily. As a result, losses will be minimized and profit maximized. We have also prepared a mobile application for you, through which you can access your assets and their inventories. The advantage of using the application is the possibility of high-speed RFID scanning.
The Asset management module is an extension of the CMDB configuration database, so in this manual you may encounter the terms of items by which you understand assets.
Recommended scenario for using Asset management
We recommend following this scenario for the most effective use of Asset management.
- Preparation of item types – turn on Asset management, fill in the default format of the DHIM Inventory Number.
- Import assets into CDESK via XLS import in the Configuration Database or Asset management
- Export the XLSX table with the assigned DHIM Inventory numbers.
- Print RFID/QR tags using the exported file.
- Create inventory and inventory orders.
- Execution of an inventory order using a mobile scanning application.
- Inventory approval.
Configuration
Enabling
After turning on Asset management in Global Settings with the switch and refreshing the page, the Asset management module will be displayed in the navigation menu. If the module does not appear in the navigation menu, check the permissions in Users and Groups -> Users -> select a specific user -> the Permissions tab -> the Asset management section. Other Asset management settings from the Global Settings are described in the sections to which they apply.

Branches and Places
Since a company can have multiple branches in several locations or separate warehouses and offices, it is necessary to define all places and branches at the beginning. In the CMDB configuration database, as well as Asset management, Branches stand above Places.
It is not necessary to use a two-level division of places in Asset management. All you must do is define, for example, Branches as the cities in which your premises are located, where you want to register assets. However, if you need to divide the premises into several parts for the needs of your business, use branches as well. For example, Branches: Bratislava, Nitra… and Places: office, warehouse…
To define Branches and Places, you must first define the Main Item Group of the Branches/Places category in the CMDB -> Main Item Groups. For Branches, you only need to enter the Title in the main group. For simplicity, we recommend using the title Branches/Places.
If you are using two-level division of locations, you need to have the Required option selected in the Link to Branch field in the settings of the Places main group.

To define individual branches and Places, it is necessary to enter the CMDB -> List of items. Click +Add an Item to add individual Branches or Places. After selecting the appropriate Main Item Group, you need to select the Item Type. We recommend using a system-generated type here, but you can define your own item type in CMDB -> Item Types.
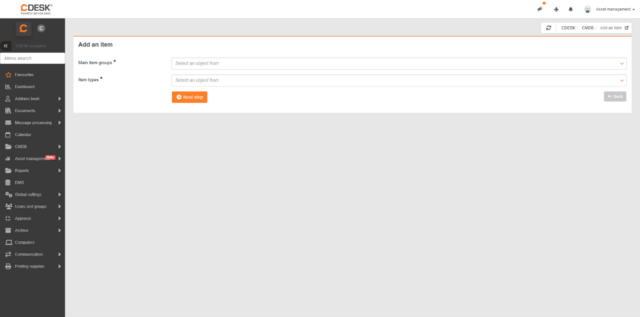
In the details of the Branches/Places, it is enough to select only the Company and Title for the purposes of Asset management. Once you have filled in these fields, be sure to save the Branch/Place by clicking the Save button.
For a more detailed description of the fields or functions of the CMDB, go to the manual CMDB: https://www.cdesk.eu/documentation/configuration-database-cmdb-features-overview/ .
Type of item in the Asset management
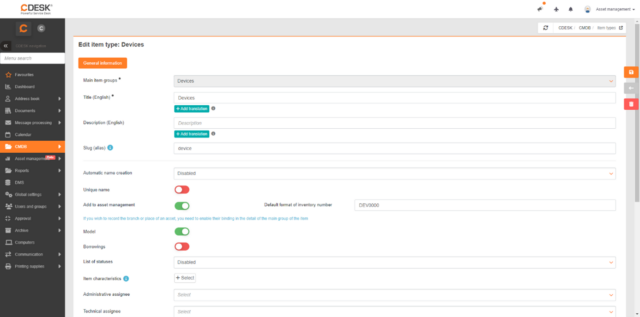
To use an item type in the Asset management, it is necessary to enable its use in the settings of the given type, i.e. CMDB -> Item Types -> a specific type. Toggle the Add to asset management switch to the on position ![]() All items that have been included under this item type in the configuration database so far are automatically transferred to list of assets. Turning on the switch also makes the field available for entering the default format of the inventory number. This will be described in the next parts of the manual.
All items that have been included under this item type in the configuration database so far are automatically transferred to list of assets. Turning on the switch also makes the field available for entering the default format of the inventory number. This will be described in the next parts of the manual.
For the records of Branches and Places, change the Link to branch and Link to place to mandatory or optional in the settings of the main group. You also have the option to enable the Model field, which will only be displayed for Types in which this field is enabled.
List of assets
You can view the list of existing assets via the main menu Asset management -> List of Assets.
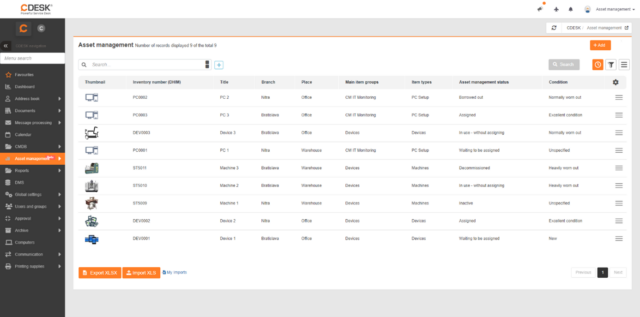
You can edit existing items by double-clicking on the appropriate row, or by selecting an option from the context menu ![]() Edit. To create a new item, click +Add.
Edit. To create a new item, click +Add.
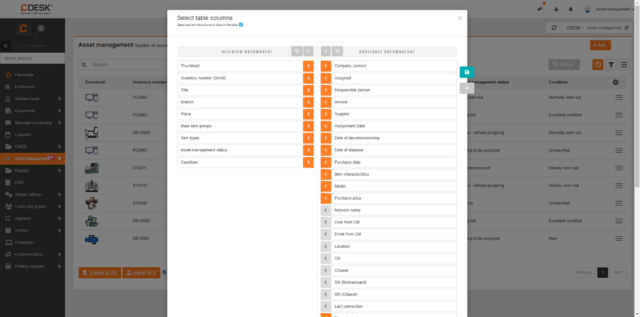
To edit the columns that appear in the asset list table, use the gear in the upper-right corner of the table. ![]() Clicking this button will bring up a modal window offering a selection of table columns. The columns (custom fields) that are in the Selected Columns column will appear in the Asset list. Use the right and left arrows to adjust how columns are displayed. It is also possible to adjust the order of the displayed columns using the drag and drop function. To return the default columns to their original state, use the red Reset button. Confirm the changes made with the green Save button. Coloured column arrows indicate default fields in Asset management, grey arrows indicate custom fields defined by you.
Clicking this button will bring up a modal window offering a selection of table columns. The columns (custom fields) that are in the Selected Columns column will appear in the Asset list. Use the right and left arrows to adjust how columns are displayed. It is also possible to adjust the order of the displayed columns using the drag and drop function. To return the default columns to their original state, use the red Reset button. Confirm the changes made with the green Save button. Coloured column arrows indicate default fields in Asset management, grey arrows indicate custom fields defined by you.
To search the list, use the top search bar. To specify the columns in which the search bar should search for the entered text, the two-squares button is used ![]() .
.
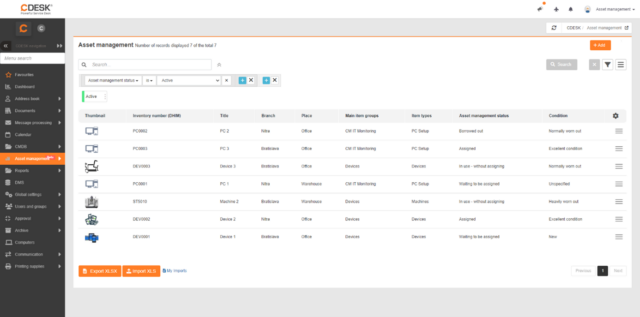
Filters can be used to make it easier to search the list. To add a filter, press the blue + button. More complex filters can be added with the funnel button ![]() .You can save filters via the hamburger menu, New filter. To remove the filters, click the X button. The use of filters is described in a separate manual.
.You can save filters via the hamburger menu, New filter. To remove the filters, click the X button. The use of filters is described in a separate manual.
Export the Asset List
Exporting an Asset List works on the same principle as editing columns. The only change is the ability to pin a column for XLSX with the pin button ![]() . Confirm the export to XLSX with the green Export button.
. Confirm the export to XLSX with the green Export button.

Import items into the asset list
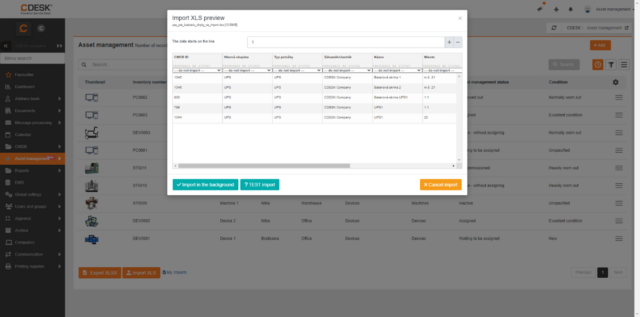
Clicking the Import XLS button will open a system window to select a file from your computer to import. Select the XLS file. In the next window, you need to check or select a column pairing for all columns. To start the import, press the green Import button in the background. If problems arise during import, you can verify and edit them by using the blue My Imports button.
Add an item
To add an item, click the +Add button in the List of assets. After clicking, a form for entering the parameters of the asset will appear.
Basic data
Title – enter the title of the item under which the item will appear in the lists.
Description of asset – You can provide a description of the item.
Company – Select the company to which the item relates. Each item must have a specific company assigned to it. If you do not yet have the necessary company defined, click on the + icon.
IInventory number – indicate the inventory number by which this item will be identified. The inventory number must be unique for all items. In this field, you can use the automatic assignment of an inventory number. You can define the pattern according to which the inventory numbers will be entered for the entire Asset management in Global Settings -> Asset management -> Default Inventory Number Format or for each item type separately in CMDB -> Item Types -> specific type -> Default format of inventory number. You can use 2-5 letters at the beginning of the number and at least 4 digits.
Maingroup – Select the Main group you want to put the item under. To add a new main group, you can use the orange plus + next to this field.
Item Type – Select the Item Type under which you want to classify the item. To add a new item type, you can use the orange plus + next to this field.
Model – you turn on this field in the Item Type settings. If an asset has a CM link and this field is filled in the CM section, its value is automatically transferred to this field.
Asset management status – select the status of the asset management from the offered values in the selection list. You can choose from Inactive, Waiting to be assigned, Assigned, In Use – without assignment, To borrow, Borrowed, Decommissioned, Disposed of.
Condition – Select the condition of the asset from the offered values in the selection list. You can choose from Unspecified, New, Excellent condition, Normally worn out, Heavily worn out, Missing, To be decommissioned.
Assigned to – Select the user to whom the asset was assigned to. This field is displayed only after you select the Assigned status. If you do not register employees in CDESK, you can use the free text button ![]() , which allows you to enter any text. You can switch back to the user selection in the CDESK field with the button
, which allows you to enter any text. You can switch back to the user selection in the CDESK field with the button ![]() . When you change the Asset management status to something else, this field will remain active with the original value retained.
. When you change the Asset management status to something else, this field will remain active with the original value retained.
Responsible – Select a user who is responsible for the asset, even if the asset isn’t assigned to them.
Branch – select a Branch, which you have previously defined in the Configuration database.
Place – select a Place, which you have previously defined in the Configuration database.
Faktúra – Invoice – select an invoice that you have saved in CDESK in advance. To add a new invoice, you can use the orange plus + next to this field. You can view the selected invoice using the magnifying glass button ![]() . If you do not record invoices in CDESK, you can use the free text button
. If you do not record invoices in CDESK, you can use the free text button ![]() , which allows you to enter any text. You can switch back to the invoice selection field in CDESK with the button
, which allows you to enter any text. You can switch back to the invoice selection field in CDESK with the button ![]() .
.
Purchase price – enter the price and select the currency in which you want to record the price. If you are not offered the desired currency, you can access it in Global Settings -> Billing -> Currencies.
Supplier – Select a supplier from the list of companies. To add a new supplier, you can use the orange plus + next to this field. The Supplier is automatically filled in if you have the Supplier field filled in the invoice registered in CDESK.
Date of purchase – Select the date the asset was purchased. If an asset has a CM link and this field is filled in the CM section, its value is automatically transferred to this field.
Assignment date – Select the date that the asset was assigned. This field becomes available when you select the Assigned to status of the assets.
Day of activation – Select the date that the asset was activated.
Disposal date – Select the retirement date of the asset. This field becomes available when you select the Scrapped status of the records.
Date of disposal – Select the disposal date of the asset. This field becomes available when you select the Disposed of status.
Warranty expiration – Select a warranty expiration date. If an asset has a CM link and this field is filled in the CM section, its value is automatically transferred to this field.
Attachments – the ability to attach an attachment (e.g. scan, document, photo). To attach a file, drag it with your mouse to this field, or click it to select a file from the disk. Multiple attachments can also be added. A list of attached files will appear below this field. If you have selected an invoice and you have a scan of it registered in the attachments, it will automatically be pulled into the attachment of the item.
Equipment data is displayed for devices of the main IT equipment group with a link to CM.
Custom fields – here you will see the user fields that you have defined in the item type.

Identifiers
Identifiers are used to mark your assets.
Label status – select a value from the selection list that corresponds to the label on the asset. You can choose between Conforming and Damaged.
RFID – here you can enter the RFID code belonging to the item, but this field will be automatically filled in if you use the mobile application of asset management -> Pairing RFID tags (described below in the documentation).
QR – the displayed QR code is unique to the item and can be used for scanning in the mobile application of the asset management. You can set, whether the QR code is generated from an Inventory Number (DHIM) or a CMDB ID in the Global Settings -> Asset management -> Generation of QR code according to.
Infobox
The infobox is the top rectangle with useful information. It displays different data in each module. You can change and overwrite the values in the infobox as in a classic field. If you do not want the infobox to be displayed, use the up arrow located on the right edge. To expand the infobox again, use the gray button with the down arrow. There is also an option to disable the infobox for the entire CDESK. You can find this toggle in the Global Settings -> Other at the bottom of the page.
Connections
This tab is the same as in the Configuration Database, except for the omitted Item connections to Companies and Connections to Requests.
To add a Connection between items and to Users, use the +Add connection button. Connections in Asset management, i.e. assignment to user are automatically entered into this table.

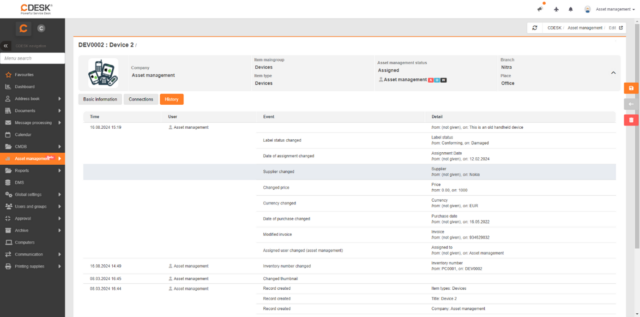
History
The history tab records all changes made to the item.
Inventúry
You can view the list of existing inventories via the main menu Asset management -> Inventories. If the inventories are not displayed in the menu, check the permissions in Users and Groups -> Users -> a specific user -> the Permissions tab -> Asset management -> Inventories. Filters and column editing work the same as with the List of assets, as described above.
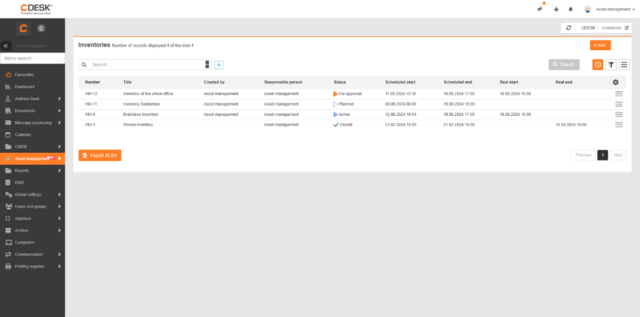
You can edit existing inventories by double-clicking on the appropriate row, or by selecting an option from the context menu ![]() Edit. To create a new inventory, click +Add.
Edit. To create a new inventory, click +Add.
Export inventories
As in the asset list, there is also an XLSX export option. Select the columns you want to export and press the Export button.
Add inventory
To add a new inventory, click the +Add button in the inventory list. After clicking, a form for entering inventory parameters will appear.
Basic information
Company (owner) – select the company in which the inventory will be performed, or to which company the assets in the inventory belong. If the inventory contains inventory orders, it will no longer be possible to change the company selection. This field also serves as a filter for locations and assets. Their selection will only be displayed after the company has been selected.
Title – enter the title of the inventory under which it will appear in the list.
Note / Description – you can add additional information to the inventory, e.g. what assets to focus on during the inventory.
Created by – this field is automatically filled in by the currently logged in user.
Responsible person – select the responsible user who will approve the inventory result.
Scheduled start – Select the date when you want the inventory to start.
Scheduled end – Select the date when you want the inventory to end.
Real start – This field is automatically filled in with the date the first inventory order was run.
Real end – This field is automatically filled in with the date when the entire inventory was approved.
Location – Select which locations will be inventoried. You can select entire Branches or specific Places. Locations are created in the CMDB -> Item List. You can find a more detailed procedure in the Branches and Places section above .
Subject of the inventory – select which items you want to check in the inventory by selecting a main group or type. The numbers next to the main group or type indicate the number of items in that group/type of the company. These are items from the list of assets. Adding asset items is described above in the Adding a new item paragraph .
Purpose of the inventory – select the purpose of the inventory from the options offered: Partial inventory, Routine inventory at the end of the accounting period, Audit.
Attachments – the ability to attach an attachment (e.g. scan, document, photo). To attach a file, drag it with your mouse to this field, or click it to select a file from the disk. Multiple attachments can also be added. A list of attached files will appear below this field.

After saving, the Save button displays the Inventory Orders tab.
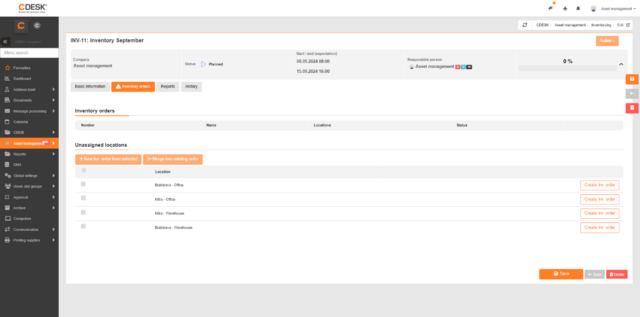
Inventory orders
A list of all inventory orders can be found via the navigation menu Asset management -> Inventory Orders. Adding an inventory order in the inventory will be explained below. The number in the tab indicates the number of inventory orders. If a warning triangle is displayed in the tab, it means that no inv. Orders.
Inventory orders are created from pre-prepared inventory orders, which can be found in the Unassigned locations section. Only those locaions that you have defined in the Basic information tab are displayed here. To create an inv. order, click the Create inv. order button in the desired row. By clicking on the New Inv. Order from selected and by marking multiple unassigned locations using the checkbox in each row, you will create one Inv. order together for all locations. After selecting the checkbox, it is also possible to merge all selected unassigned sites into an already created inv. order using the Merge into existing order button.
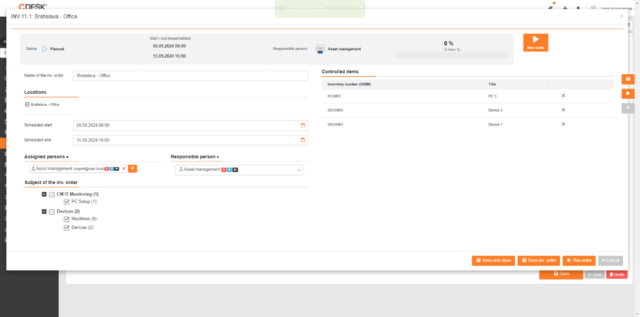
Add a new inventory order
Title of the inv. order – you do not need to fill in this field. If it is left blank when saved, a title is automatically created from the locations on the inv. order.
Locations – all locations that were selected before creating the inv. order.
Scheduled start – select the date of the scheduled start of the inventory order. The date of the scheduled start of the entire inventory is automatically inserted.
Scheduled end – the scheduled end of the inventory is automatically inserted. In Global settings -> Asset management -> Inventory orders, you can set the number of days that are deducted from the scheduled end of the inventory. This date is then inserted into all planned inv. orders.
Assigned persons – select the person who will carry out the inv. order itself, i.e. scanning the assets. To select people, click the +Select button. If you select more people, it does not change the result of the inv. order. However, only one person can scan the assets at a time, after logging out of the scanning application, another person can continue scanning.
Responsible person – select the person who will be responsible for the inv. order and will therefore approve it after completion. The Responsible person selected in the inventory detail is automatically added to this field.
Subject of the inv. order – select the asset to be inspected by the given inv. order using the checkboxes. You can also remove individual items and add them back to the inv. order.
Controlled items – a list of specific items that will be checked in the inv. order. Select the main group/type of items. If you wish to remove specific items from the checklist, use the X at the end of the line. To add again, select the type of deleted item in the Subject of the inv. order.

Run inv. order
The creation of an inv. order must be confirmed by saving. Created inv. orders will be displayed in the Inventory orders section of the Inventory Orders tab. After saving in the inv. order, the Run Order button appears. Clicking on it will send an order to the mobile scanning application, where the inventory itself will be carried out.
You can also run the inv. order with the hamburger menu ![]() in the list of inv. orders.
in the list of inv. orders.
The course of the inv. order
An item control record can be added by clicking the Add control record button that appears when you hover over the item row in the Controlled items section. After filling in the fields in the modal window, the item is saved as checked. You can edit the control record by clicking the Edit control record button, which is also displayed by hovering over the required row. Once you click on it, you will see the same pop-up window that allows you to transcribe the data.
For better orientation in the list, we recommend using the toggle in the upper right corner:
![]() – the entire list,
– the entire list, ![]() – unchecked items,
– unchecked items, ![]() – conflicts.
– conflicts.
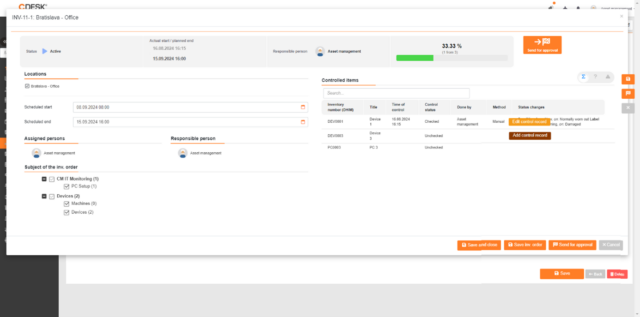
Approval of inv. order
After the assets have been inspected, you can send the inv. order for approval by using the Send for approval button. The selected responsible person for inv. The order will have the option to write a note, approve or reject the inv. order with the Reject and Approve buttons. After the rejection, the inv. order reopens to rework. By using the Shifting the scheduled end when reopening an inv. order setting when reopening an inventory order in Global Settings -> Asset management -> Inventory Orders, you can set the number of days by which the Scheduled end date of both the inventory order and the inventory itself will be postponed.

Inventory approval
Approval of the inventory is possible only after the approval of all inventory orders that are part of the inventory. To approve the inventory, use the Approve button, which is located on the Basic information tab. The Approve button opens a window with the entire list and information about the items and their status after the inventory. You can also type a note in the left window. You can edit the note later in the list of reports. Reject the inventory with the Reject button. After rejecting the inventory, it is possible to reopen the inv. orders.

Inventory report
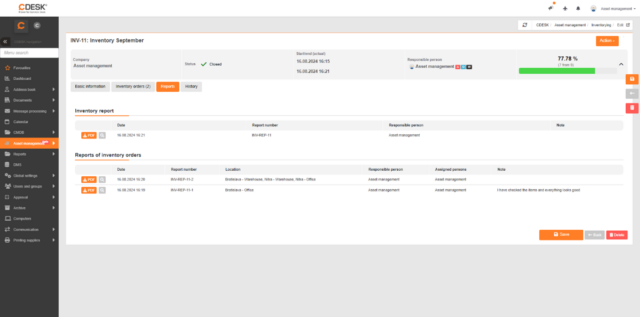
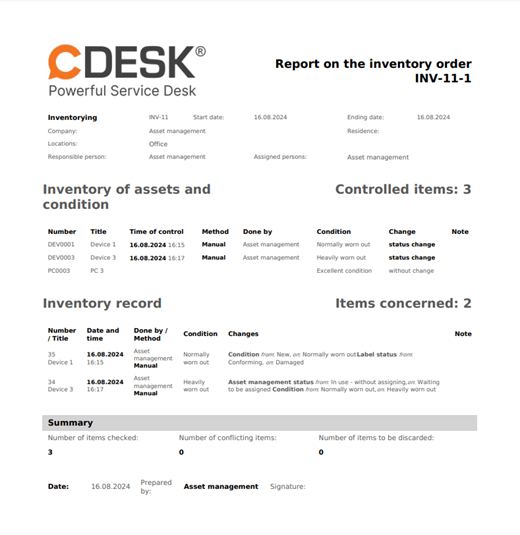
In the Reports tab, you will find all reports associated with the given inventory, i.e. reports from inventory orders and one overall inventory report. By clicking on the PDF button, the report will be downloaded in .pdf format. The button ![]() opens a preview of the report in a new browser tab. To add a note to the report, click on the appropriate row in the Note column.
opens a preview of the report in a new browser tab. To add a note to the report, click on the appropriate row in the Note column.
History
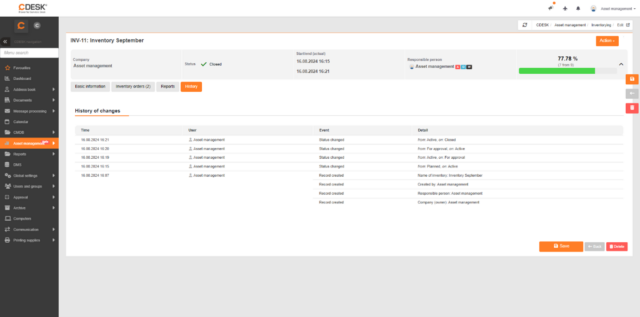
The History tab records all changes made to the inventory except for the scans.
Inventory statuses
Inventory statuses are displayed in the infobox as well as in the inventory/inv. orders.
The statuses of the inventories coincide with the statuses of inv. orders. The statuses change automatically according to the course of the inventory/inv. order.
Planned – the status after the inventory was created. Add inv. orders.
Active – the state after the first inv. order was run.
For approval – for inv. orders, this state occurs after they are sent for approval. In the inventory, this state is used only when all inv. orders will be in the For approval status. It is possible to approve the inventory only after all inv. orders.
Closed – the status after the approval of the entire inventory/inv. order.
Handover protocols
Asset Handover protocols are used to document the movements of your assets. The protocols can be found in the main menu Asset management -> Handover Protocols.
Creation of the handover protocol
To create a handover protocol, click +Add. This is followed by a list of fields.
The grey button is used to specify the transferor relationship ![]() . There are two options. The transferor is the Company (it is also possible to specify the person responsible for the transfer) or the transferor is a person. Fill in the fields according to your scenario. The Transferor (and Company) fields serve as a filter for the Asset List offered. Only items that are assigned to a given user/company are offered.
. There are two options. The transferor is the Company (it is also possible to specify the person responsible for the transfer) or the transferor is a person. Fill in the fields according to your scenario. The Transferor (and Company) fields serve as a filter for the Asset List offered. Only items that are assigned to a given user/company are offered.
Title – fill in the title. If the title is left blank when the protocol is saved, a title is automatically created from the chosen items.
Note for the protocol – add a note that will also appear in the report.
Selecting assets for a report
Selecting items for handover works on the same principle as selecting columns in lists. From the right List of assets, use the left arrow to select the items to be recorded on the handover protocol.

Add a free item
If you need to record the handover of assets in the protocol that you do not have registered in the Asset management, you can use the grey Add free item button. Enter the title of the property and you can also add a description. Confirm the addition of a free item with a tick at the end of the line. To delete a free item, press the X button.
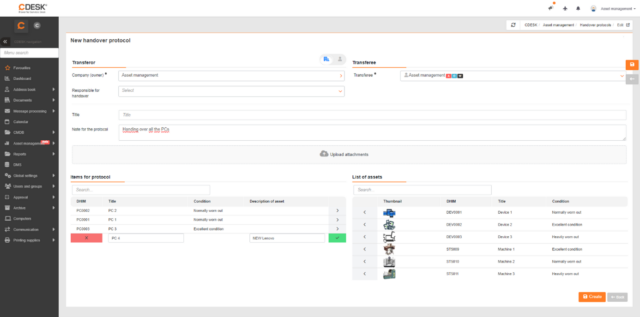
Signature & Printing – soon
Background actions
After saving the Handover protocol, the status of the records of the handed over items will automatically change. If the item is handed over to a person, the status of the records changes to Assigned and the user who took over the item is entered in the Assigned to field. If the item is handed over to the company, its status changes to Waiting to be assigned.
Asset management mobile application
The mobile application is mainly used to carry out inventory orders – scanning. We recommend editing items via the web.
Login
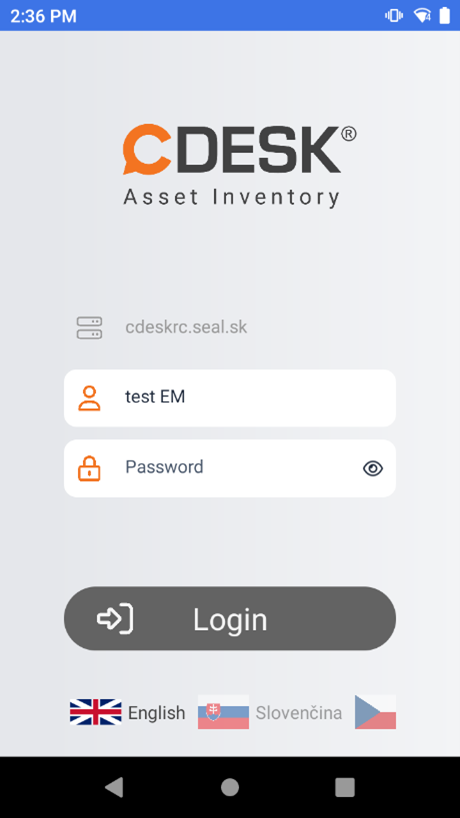
To log in to the application, you need to fill out the required login details. To confirm your login, click the Login button.
Server – fill in the server where your CDESK domain is located
User – the title of the user, the assigned person under whom you want to log in
Password – password for the specified user
At the bottom of the screen, you can also change the language of the app by clicking on the flags for each language.
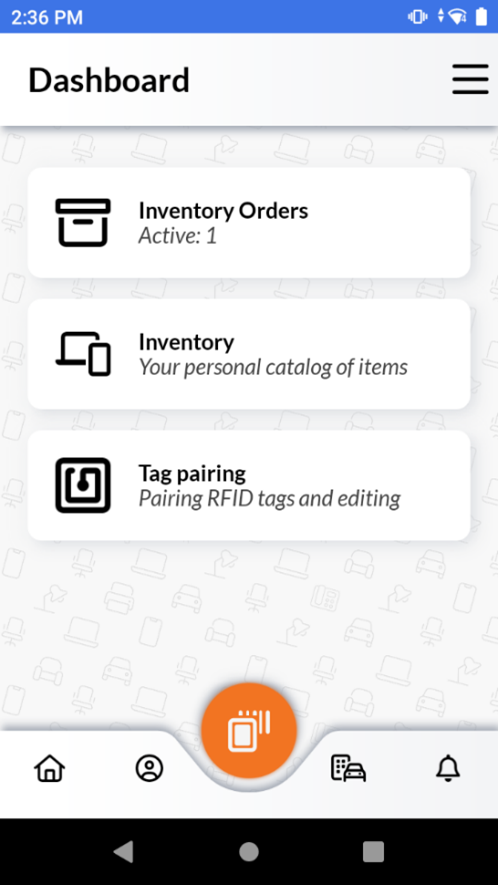
Dashboard – home screen
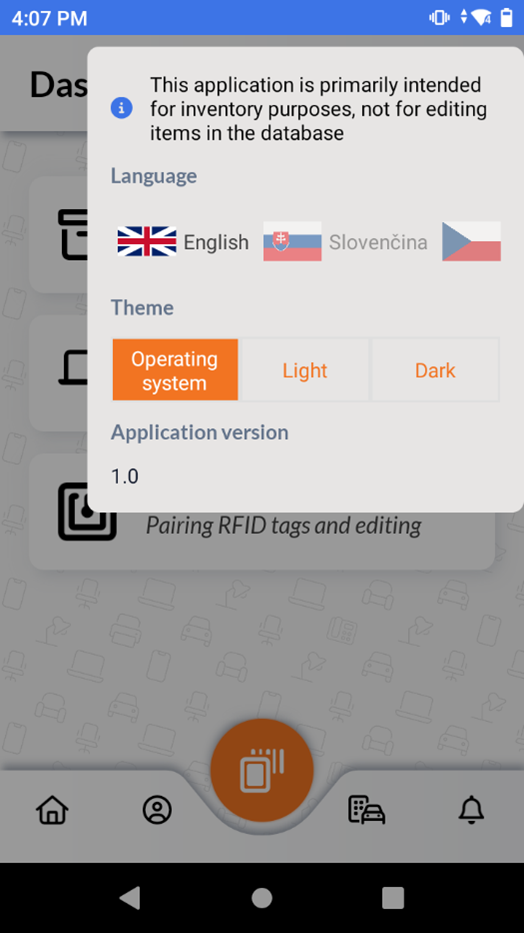
Settings
Clicking on the hamburger menu will display the language (app) settings and app appearance (operating system/light/dark).
Profile
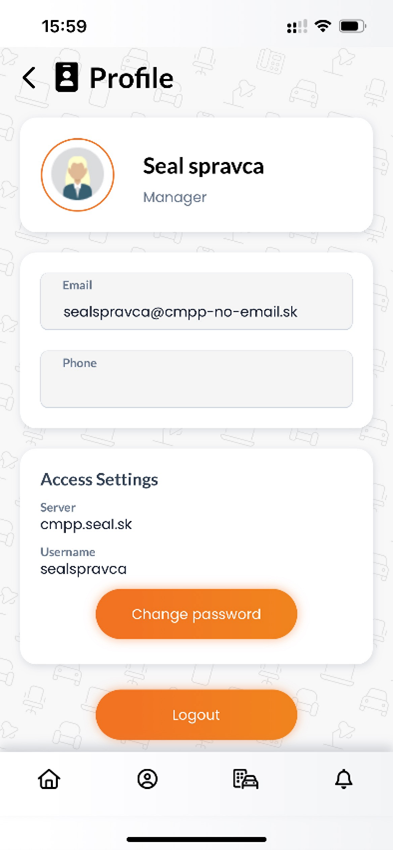
Click on the profile icon in the bottom menu to open the settings for that profile. Here it is possible to change data such as Email, Phone, Password. It is also possible to log out and log in again under another user.
Inventory
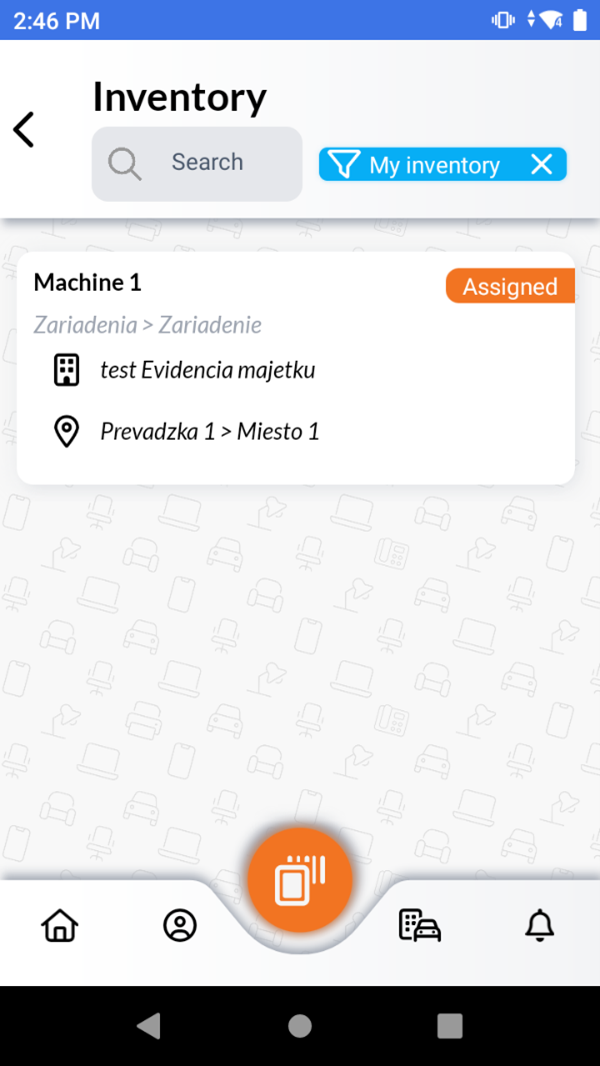
In the Inventory tab, you can view the assets assigned to the logged-in user or the assets of the company (the logged-in user must have permissions to do so). Easily find and manage your assets. To refine your search, use the default My Inventory and All system filters.
List of assets
You can open the list of assets for viewing with an icon with a house and a car.
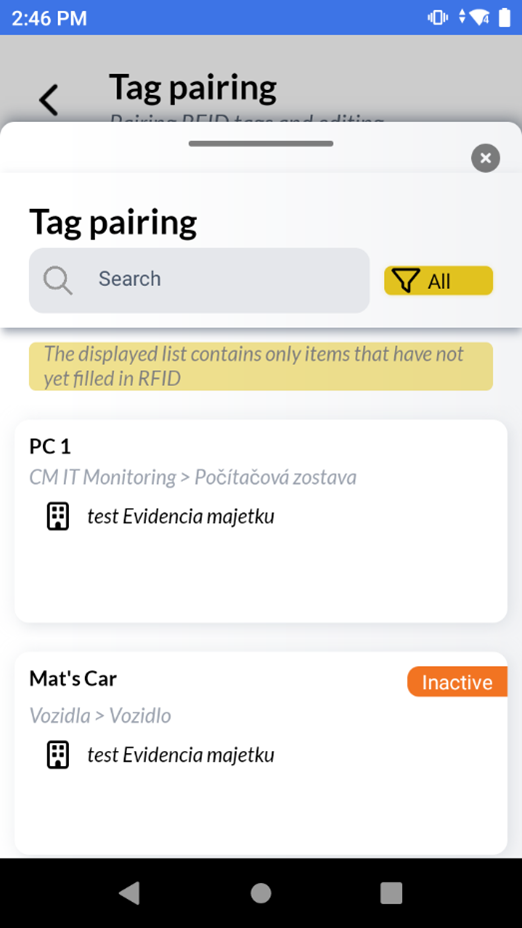
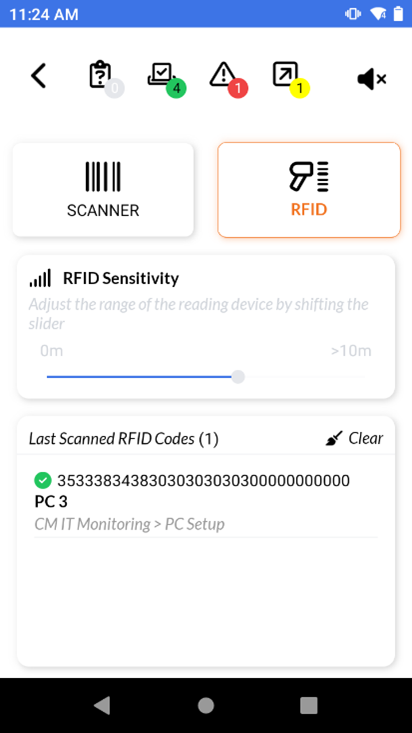
RFID Tag Pairing
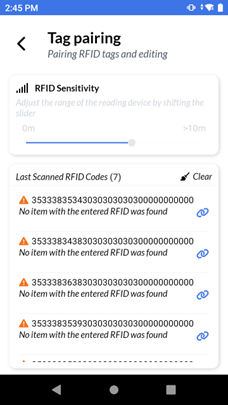
To start pairing an RFID tag, click the Tag Pairing button. This button will only appear on a device that supports RFID scanning, such as a Zebra scanner (automatically recognized by the app). Press the physical button on the scanner to start scanning the labels. The tags found will appear in the Last Scanned RFID Codes list. Already assigned RFID tags have a green tick symbol next to their code, unassigned ones have a red exclamation mark. To assign a label to an item, click one of the unassigned codes. A list of assets in CDESK that has not yet been assigned an RFID code will be displayed. Click on an item to assign an RFID tag (code). The function of creating a new item will be added soon.
Inventory orders
List of inv. orders
To open the list of inv. orders, click on the main screen button. The list automatically displays orders from newest to oldest. Their current statuses are also displayed, by which you can filter them. It is possible to search for specific inventory orders thanks to the search field at the top of the list.
Inventory order
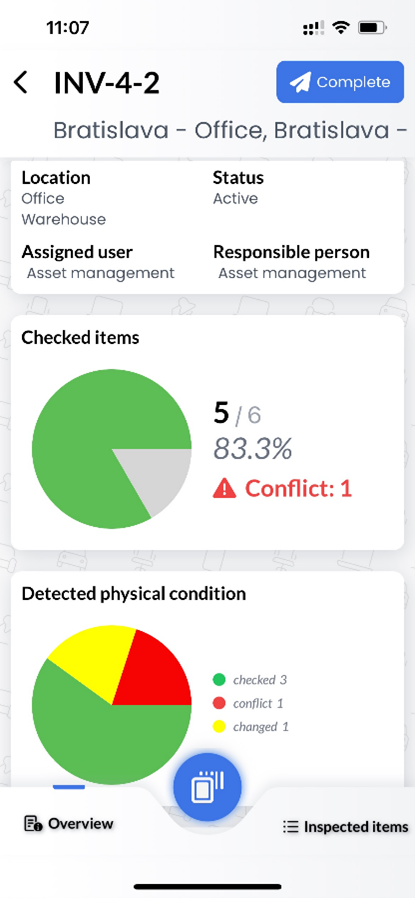
To go to the inventory order tab, click on the selected inv. order in the list. The tab of the inventory order displays all the necessary information to execute it: Location, Status, Assigned person. Numerically and graphically checked items, changes or conflicts.
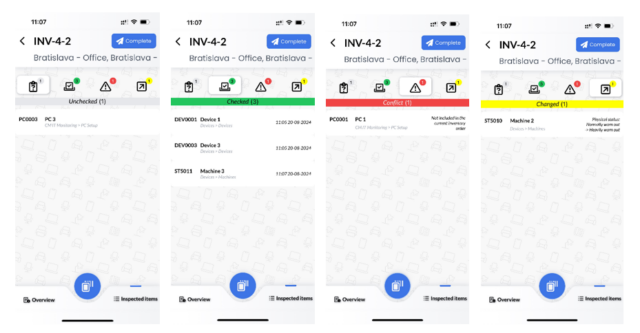
To access the list of checked items, click the Inspected items button in the lower right corner. This list is divided into 4 parts:
- Unchecked – items that have not yet been scanned, but have been subject to inv. order
- Checked – items that have been scanned in the correct location with no changes in physical status
- Conflict – items that could have been scanned at a different location than they should have been located or were not subject to inv. order
- Changed – items that had some fields changed by Edit Items (described below)
To end the inv. order, use the blue Complete button located in the upper right corner. This sends the inv. order for approval.
Scanning barcodes/QR codes with a mobile device
Scanning during inv. Order
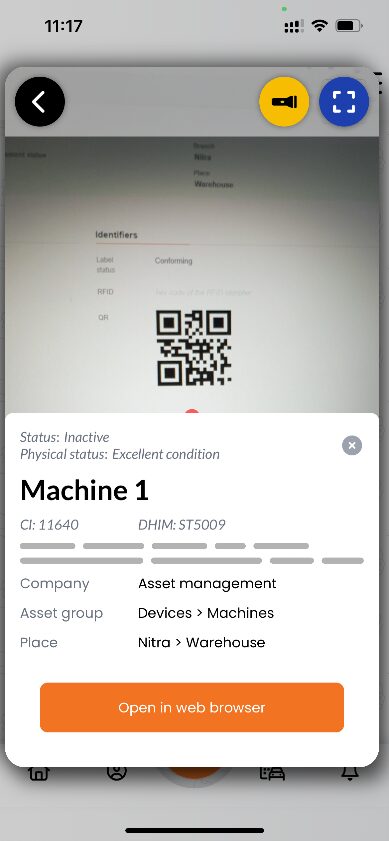
To scan in an inv. order, press the blue scan button at the bottom of the screen. When you press it, the camera screen opens. If this is your first time using the app, you need to allow the app to access your camera. To scan, point the code at the centre of the screen indicated by the red dot. If you’re scanning in a dark place and the camera is having trouble reading codes, use the flashlight button to turn on the light on the back of your mobile device. To change the camera resolution, use the blue button in the upper right corner of the screen. Depending on the selected resolution, the image is processed, a higher resolution is slower to process, but easier to detect the code, and vice versa.
Scanning outside the inv. Order
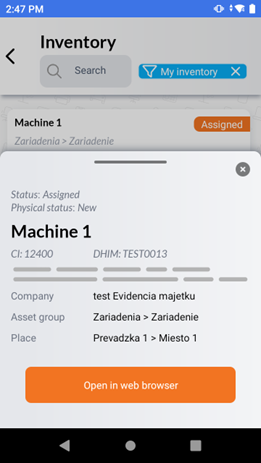
Scanning on both the home screen and the inv. order list, i.e. the orange scan button, works on the same principle as the blue one during inv. order. It is used to quickly open the detail of a given item on the website.
Scanning with an RFID-enabled scanning device
Scanning with a scanning device is tuned to Zebra scanners.
Red Laser Scanning
Red laser scanning works the same way as scanning with a camera on a mobile device. Press the physical scan button on the device to activate the laser. Point the laser at the barcode/QR code. Sound feedback can be turned off by adjusting the device’s notification volume system. Working with scanned items is no different from scanning a mobile device.
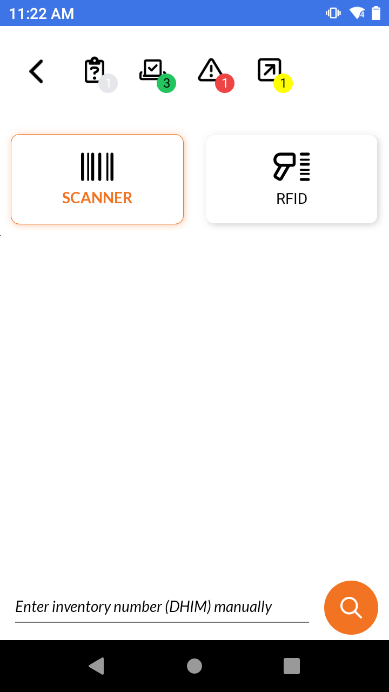
RFID Scanning
To start the RFID scanner, select the RFID option on the screen. Press the physical button on the device to start the scan. The scan will last while the button is pressed. You can adjust the range (sensitivity) of the RFID scanner with the RFID sensitivity slider. The sound feedback can be turned off with a button in the upper right corner of the screen. Working with scanned items is no different from scanning a mobile device.
Please note: a range of 10 meters or more is only in an optimal environment if the label is in a visible place, and nothing stands in the way between the label and the scanner.
Edit items
There are several ways to edit items:
- Click on the View Detail button at the bottom of the screen within 3 seconds of scanning the item
- In the list of scanned items, click on an item
- Through the web in the list of checked items using the Edit control record button (displayed in the row of the item by hovering the mouse)
The fields that can be edited from the app during the inventory are Condition, Label Status. Add a note to clarify or justify the change. It is also possible to file a proposal to be decommissioned with the button. Scan changes (checked/unchecked) and location review are done automatically.
Automatic processes (in the background)
Synchronization between the application and the web interface takes place constantly as long as the mobile device is connected to the Internet. From entering an inventory order through scanning to individual adjustments to items. All scan results are displayed in real time on the web with all individual changes if the application is in online mode. If the application is not connected to the network, the information is stored on the device, and the next time it is connected to the network, the data is uploaded to the server and displayed on the web.
Scans of the location where the item was found and the status change after scanning from unchecked to inspected are also carried out automatically.
Asset Management Labels
RFID Labels
We recommend having RFID tags printed for you. If you plan to use RFID scanning in large warehouses with many items, we recommend purchasing an RFID tag printer from Zebra.
QR/Barcode Tags
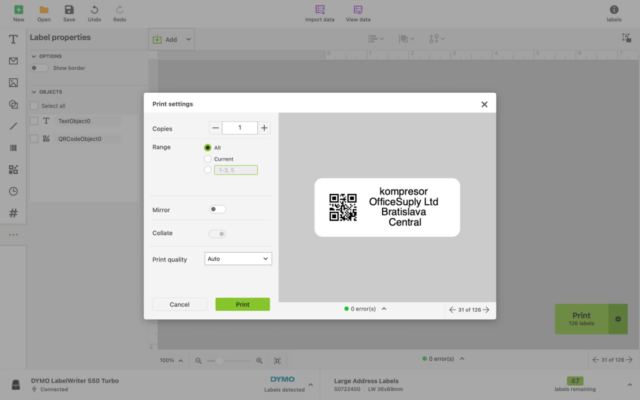
To print self-adhesive labels with a printed QR/Barcode, we recommend buying a printer from DYMO. Here you will find a short guide on how to get data from CDESK into the DYMO Connect system and how to print labels with them.
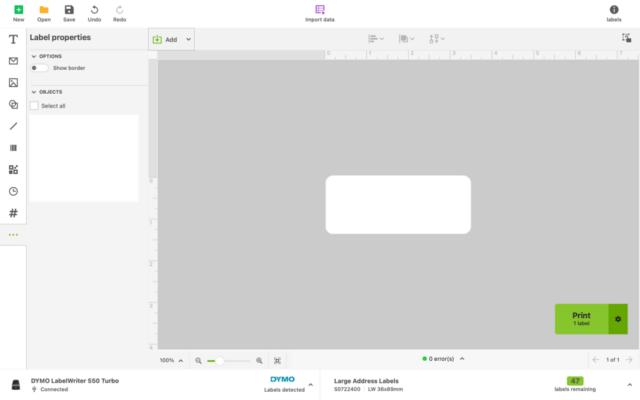
The first step is to export the List of assets. You can find this procedure in the manual above.
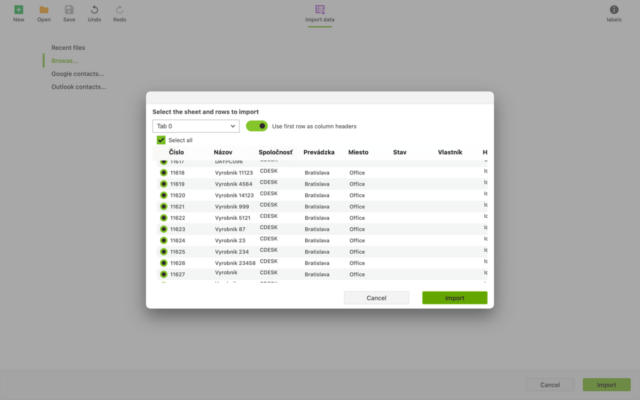
To insert the export table into the DYMO Connect software, use the purple Import Data button.
Please note that on MAC OS devices, the XLSX format file may not work in this software, so rewrite the XLSX file in XLS format or use a Windows device. Select the file and press the green import button.
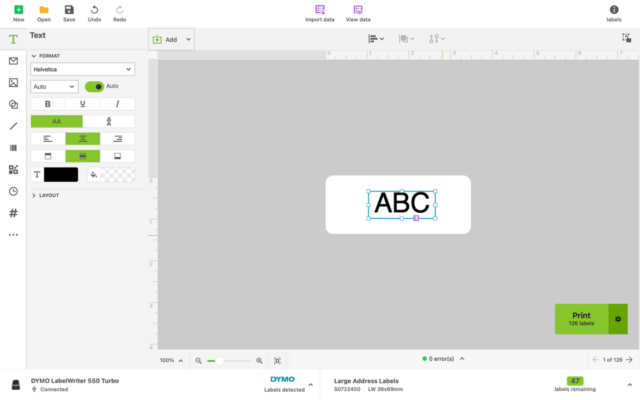
To add text that will appear on the labels, press the green Add button and select Text.

A small purple button will appear in the blue rectangle on the screen. Click on it to select the columns/data you want to display on the label. You can edit this text according to your needs.
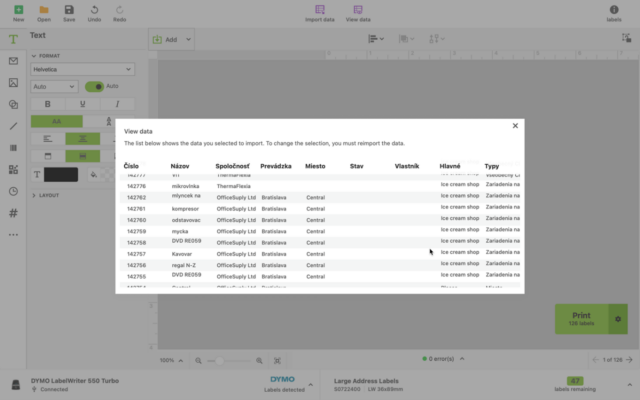
To add a QR/Barcode, the procedure is similar. Click the green Add button and select the option you want. Again, the data must be selected with the purple button. Please note that here you need to select the column with the Inventory number or CMDB ID, as the application cannot scan other codes.
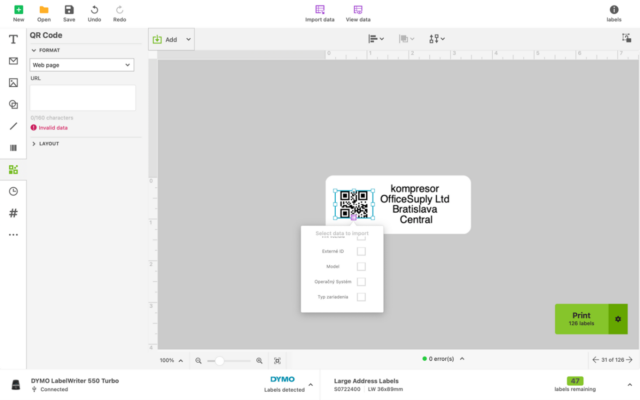
If you import all the data according to the described procedure, all labels will be prepared for printing automatically. To print the labels, press the green Print button. Make sure that you have entered the correct size and number of labels (newer DYMO printers automatically recognize labels) and that you have a printer connected.
