CDESK/CM Server Installation Guide
Page contents
Requirements for Local Server Installation
System Requirements for CDESK / CM Server
Before installing the CDESK/CM server, it is necessary to consider how much the server will be used and to select the appropriate hardware resources. There are three types of load:
- Low load
- Medium load
- High load
How to imagine different server loads along with recommended system resources is described below.
If the CDESK server will be in a virtualized environment, we recommend vmware vSphere (ESX version 6.x at least), Hyper-V Win server 2016 version at least or Open Source Proxmox VE 6.x at least. It is also possible to use other virtual environments compatible with Rocky Linux OS.
System Requirements for CDESK / CM Server with Low Load
Low load is described as follows:
- CDESK: up to 100 assignees, hundreds of customers, configuration database up to 5000 objects
- CM: up to 10 CM Technicians, up to 500 computers
Hardware Parameters
- 1x RAID array with high-performance SAS drives, ideally SSDs with a minimum size of 80 GB
- Minimum 8 GB RAM, optimum 16 GB RAM
- 2 to 4 core powerful server processor
Backup – recommended backup space 200 GB
System Requirements for CDESK / CM Server with Medium Load
The medium load is described as follows:
- CDESK: 100 assignees, thousands of customers, configuration database up to 10 000 objects
- CM: up to 50 CM Technicians, up to 1000 computers
Hardware Parameters
- 2x RAID array with SSDs of at least 200 GB
- 32 GB RAM
- 6 to 8 core powerful server processor
Backup – recommended backup space 500 GB
System Requirements for CDESK / CM Server with High Load
The high load is described as follows:
- CDESK: more than 100 assignees, thousands of customers, configuration database up to 10 000 objects
- CM: more than 50 CM Technicians, more than 1000 computers
Hardware Parameters
Separate server for CDESK/CM and separate server for CDESK/CM database
For stand-alone CDESK/CM server:
- 2x RAID array with SSDs of at least 200 GB
- 32 GB RAM
- 6 to 8 core powerful server processor
For a stand-alone database server:
- 2x RAID array with SSDs of at least 200 GB
- 16 GB RAM
- 4 to 6 core powerful server processor
Backup – recommended backup space 500 GB
Overview of IP Configuration and Used Ports of CDESK/CM Server
If the server will be accessible from outside, 1 public IP address is required. In case you do not have a free public IP address, use HTTPS PROXY and share one IP address with other https services. Within the LAN, the CDESK/CM server occupies one IP address. Should you need assistance with network configuration, please contact our support.
| Port used on the CDESK/CM server side | Purpose |
| http://CDESK/CM-server-address
port 80 – optional |
http communication on standard port 80 is recommended, but not mandatory. It can be omitted and the portal will only be available on port 443 (https). |
| https://CDESK/CM-server-address
port 443 |
https://communication for web access to the portal, connection to the mobile application, desktop client, API interface for other applications. |
| Emails to/from CDESK /CM-server
port 25 – optional |
If you choose to receive emails directly via SMTP communication, you need to open port 25. You do not need it if you choose to receive email messages to CDESK through an IMAP mailbox. For sending, you can use the internal SMTP server or redirecting to an external SMTP server. See section Prepare Mail Configuration. |
| SSH access for support port 22 | The SSH port using port 22 by default (other ports may be used) is recommended but not required. It is used for vendor support access. In case of preference that this port is not accessible, the procedure of requesting access to the server, via mail or telephone communication, is chosen. |
If CDESK is to be externally accessible, the inside of the CDESK server cannot block access to the Internet, at least not on ports 80, 443, 25. Even if CDESK will not be externally accessible, we recommend an SSL Certificate from a regular certificate authority or Encrypt for your https:// address (not a self-signed certificate). For more information on preparing an SSL certificate, see Prepare Deployment of Purchased SSL Certificate. If you use a Let’s Encrypt certificate, the procedure is more straightforward and is described in the section CDESK/CM Server Installation Process.
Prepare Domain to Run CDESK/CM Server
For the installation to work properly, you need to set up IP address transfer in your DNS. To do this, choose one of the following options:
| cdesk.your-address.xy | A | IPv4_address | if your CDESK/CM server has only a static public IP address |
| cdesk.your-address.xy | CNAME | Domain | if another domain already exists for that IP address and CDESK will always be on the same IP as that domain. (If you choose multiple domains on your CDESK server, put the first one on the A record and the others on the CNAME with a link to the first domain. |
A reverse DNS record (PTR record) is required if it does not already exist. Verification can be done here.
Prepare Deployment of Purchased SSL Certificate
It is possible to install a Let’s Encrypt certificate during the installation of the CDESK/CM server. In this case, no preparations are necessary as the certificate is installed during the server installation. However, if you have purchased your own SSL certificate, you can use this one during installation. Before installation, you need to perform the following steps.
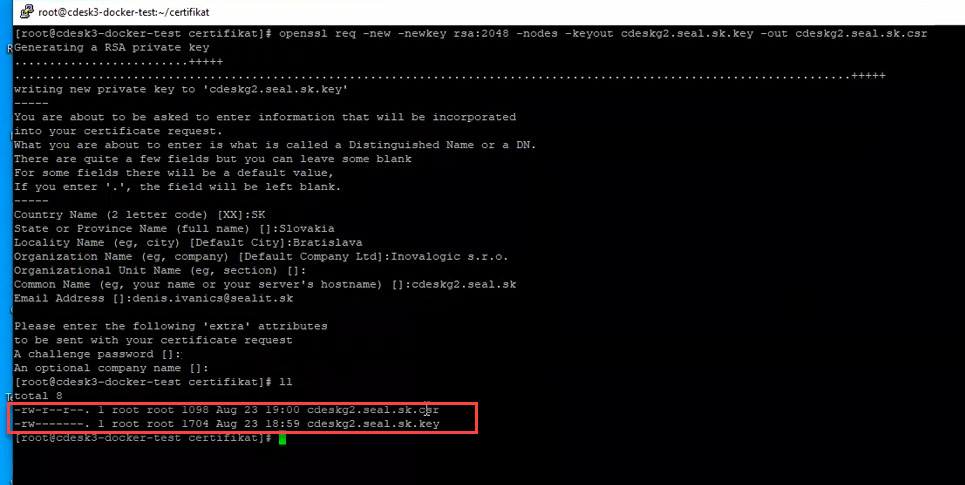
First you need to get the .csr file. In the first step, create a folder to save it.
mkdir folder_name_to_certificate
Then go to that folder
cd folder_name_to_certificate
And enter the command
openssl req -new -newkey rsa:2048 -nodes -keyout
domain_name.com.key -out  domain_name.com.csr
After pressing Enter, the private key creation starts and a series of questions are displayed:
- Country Name (2 latter code) [XX]: enter the two-letter code of your country. For Slovakia it is SK.
- State or Province name (full name) – enter the name of the state (Slovakia).
- Locality Name (e.g. city) [Default city]: enter a city, e.g. Bratislava.
- Organization Name (e.g. company) [Default Company Ltd]: enter your company name. In our case it is Inovalogic s.r.o.
- Organization Unit Name (e.g. section): in this section you can specify the company’s department, but it is not mandatory. You can skip the step by pressing Enter.
- Common Name (e.g. your name or your server´s hostname): enter the server name in the form server_name.company.com. In our case it is cdeskg2.seal.sk.
- Email Address: enter email address of the administrator. License expiration messages will be sent to this email address.
You will then be prompted to enter additional parameters that will be sent with your certificate request:
- A Challenge password: optional. You can skip this step by pressing Enter.
- An optional company name: optional. You can skip this step by pressing Enter.
The system will now generate one file of type .csr and one of type .key.
To find the exact location of these files, type the command
pwd
Then use any software that allows file transfer between the local and remote computer (in our case WinSCP) to access the server and use the path displayed to find the files.
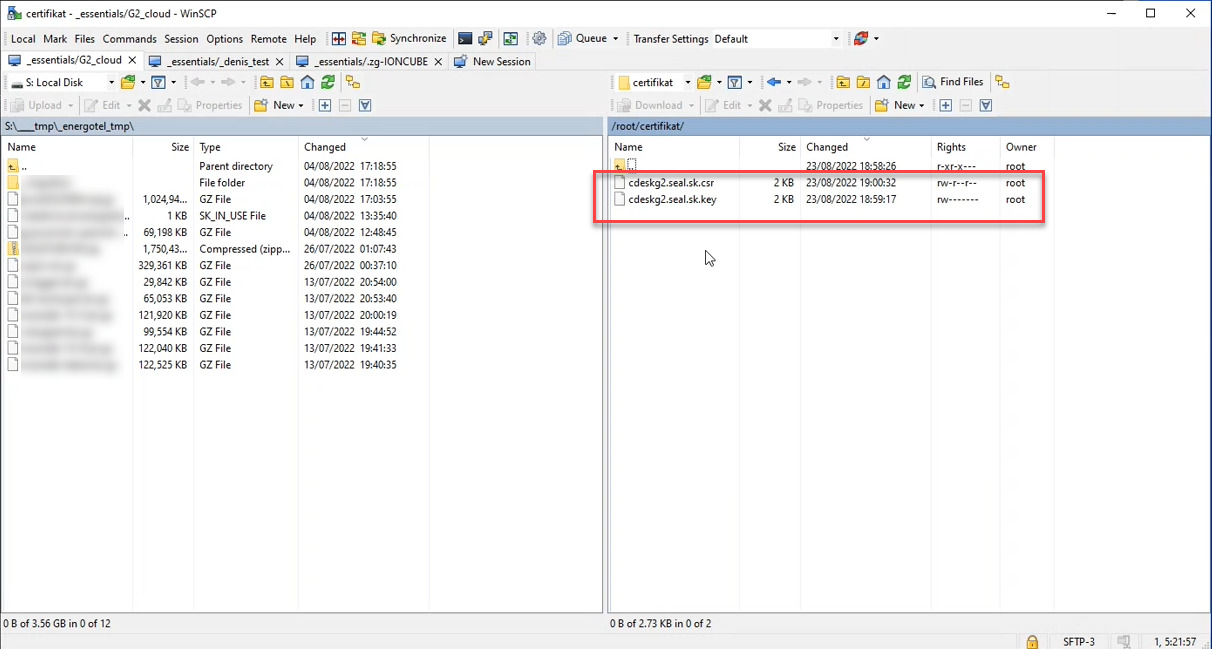
Download the .crt file to your local computer. Then search the Internet for any certificate generation service to which you provide this file and obtain a certificate. The generated file will be in .crt format.
Now use the remote access software to upload the newly generated .crt file to the server.
Prepare Mail Configuration
CDESK/CM offers two ways to send and two ways to receive mail. Select the method of sending and receiving mail according to your needs.
Mail Configuration for Sending
You can configure one of the following methods for sending emails:
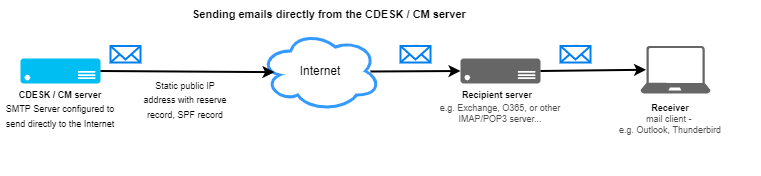
- Sending directly via the SMTP of the CDESK/CM server to the Internet.
If you expect to send a lot of emails, we recommend that you set up sending to the Internet directly from the CDESK/CM server.
When configuring, be sure to add an SPF record in DNS to the domains under which emails will be sent so that emails from CDESK/CM are not unnecessarily moved to the SPAM folder or blocked altogether. SPF records are checked by the receiving SMTP servers to see if email received from a particular domain was sent from an authorized server.
You also need to set up a reverse DNS record for the IP address from which emails will be sent.
2. Sending via another SMTP server (SMTP relay)
If you have an SMTP server for your domain to which you can direct the flow of outgoing mail from the CDESK/CM server, you can use it. You will benefit from an easier setup because you don’t have to deal with the aforementioned SPF settings and the reverse DNS record from the previous configuration.
On the other hand, you need to deal with the authorization to send. Either the authorization will be the public IP address of the sending server (we recommend this method for Office365 mail services) or it will be done via the name/password of the SMTP server.

Mail Configuration for Receiving
You can configure one of the following methods to receive emails:
- Receive via IMAP mailbox
This is the easiest way to receive emails. Create IMAP mailboxes for the addresses that the CDESK/CM server will download. You do not need to set up any DNS records. You can even use one IMAP mailbox for multiple addresses (via aliases), the CDESK server can split this into the addresses set in Global Settings -> Message Processing.
Currently (September 2022) IMAP mailbox downloads must be set up by our support, but we plan to allow you to set up the mailbox downloads yourself.

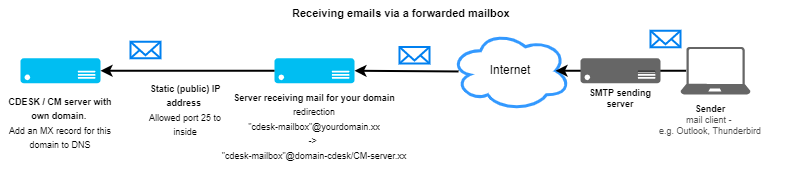
2. Receive via mailbox forwarding
If for CDESK/CM you are using an address from an established domain (98% of cases), it cannot direct the flow of incoming mail directly to the CDESK/CM server. This means that other mail has to be routed to a different server. To solve this, after receiving the mail on your main server, redirect it to the CDESK/CM server with the mailbox address “cdesk-mailbox”@domain-cdesk-cm-server.xx. To deliver the redirected mail, you need to:
- Set the MX record for the CDESK/CM server domain (domain-cdesk-cm-server.xx)
Enable communication on port 25 inward to the CDESK/CM server
Virtual Server Creation and Preparation of OS Rocky Linux Installation
Demonstration of VM Installation in Cloud Environment – Geetoo.com
Please note that the installation video guide can be found in geetoo.com. To learn more, see the blog Demonstration of CDESK / CM Server Installation in Cloud Environment – geetoo.com.
Demonstration of VM Installation in Local Vmware vSphere Environment
This virtual machine installation in the local vmware vSphere environment is described for VMware ESXi 6.7.
Once logged in, click on Storage in the main menu on the left and select a storage location. Clicking on the name of the storage will display details about it. On the top bar, click Datastore browser.

When clicked, a modal window appears. On the left side, click on the storage name again, open the ISO folder and use the Upload button to upload the RockyLinux operating system file.
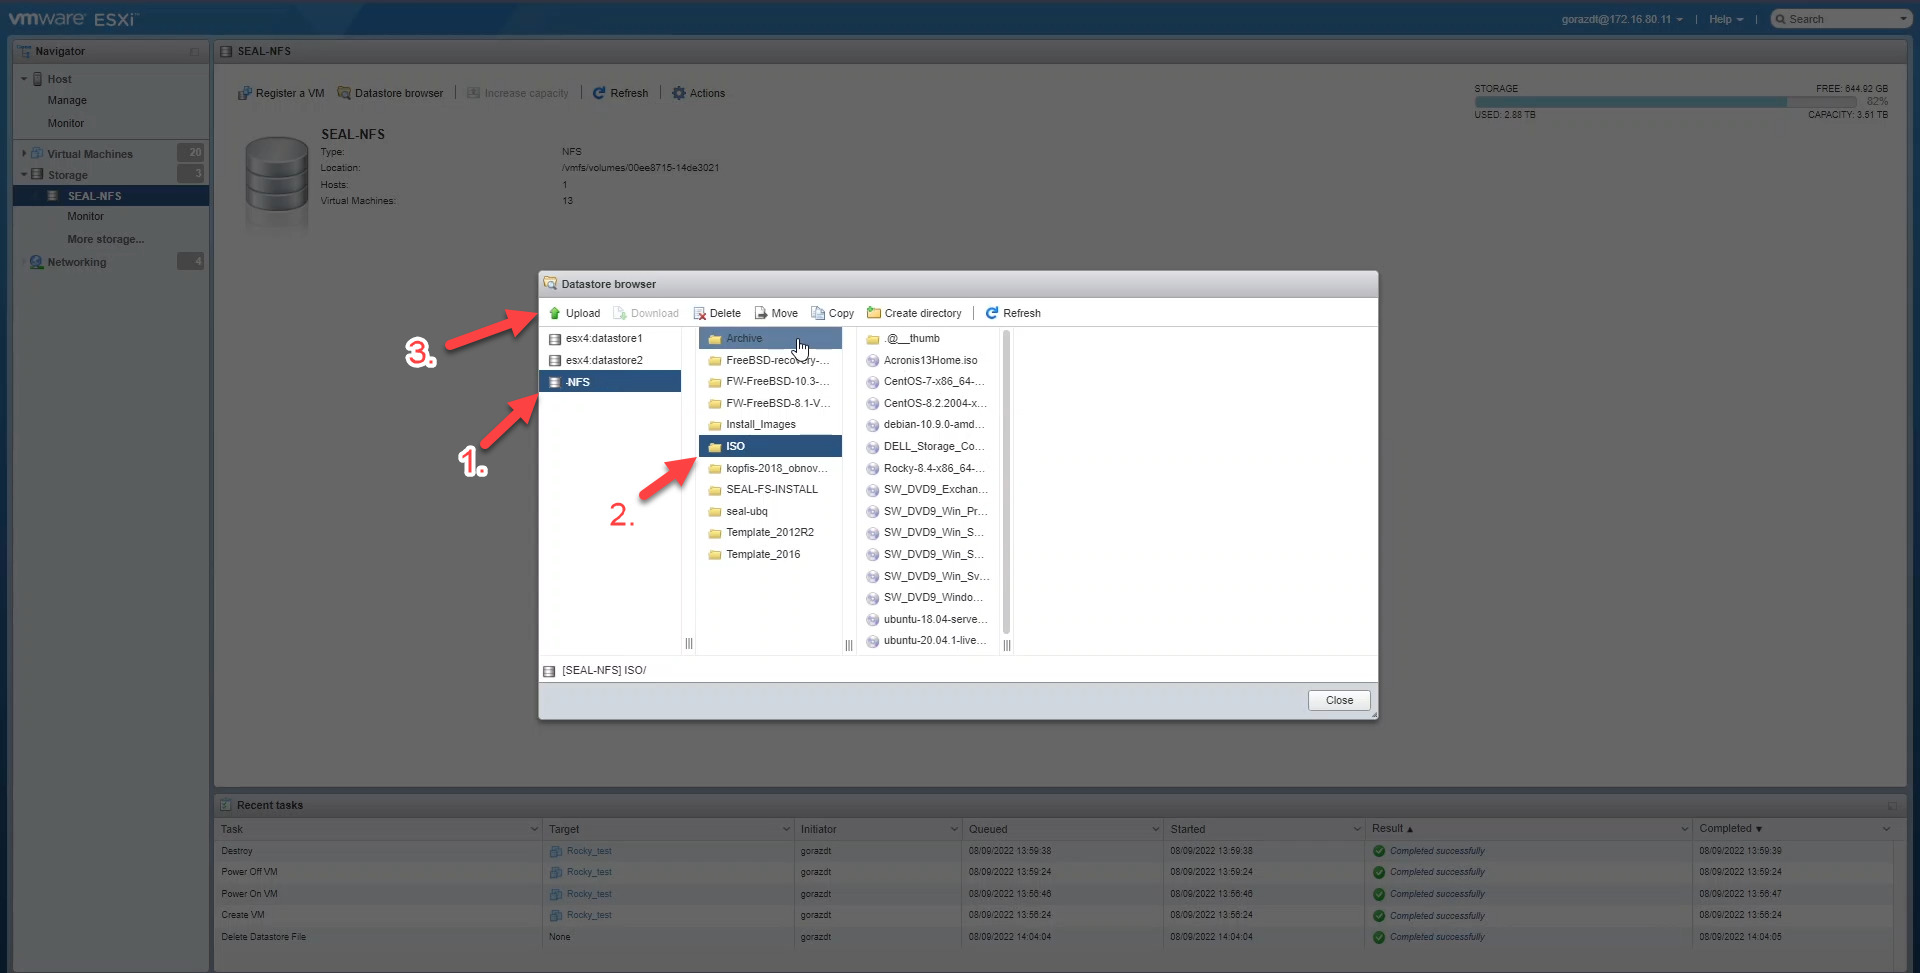
When clicked, a modal window opens in your web browser to select the operating system file from your computer. Download the Rocky Linux operating system at this link. When downloading, select the Minimal version.

After the file is selected, the upload to the storage starts. The upload progress can be monitored in the upper right corner. Uploading may take a while as the size of the uploaded item exceeds 1 GB.
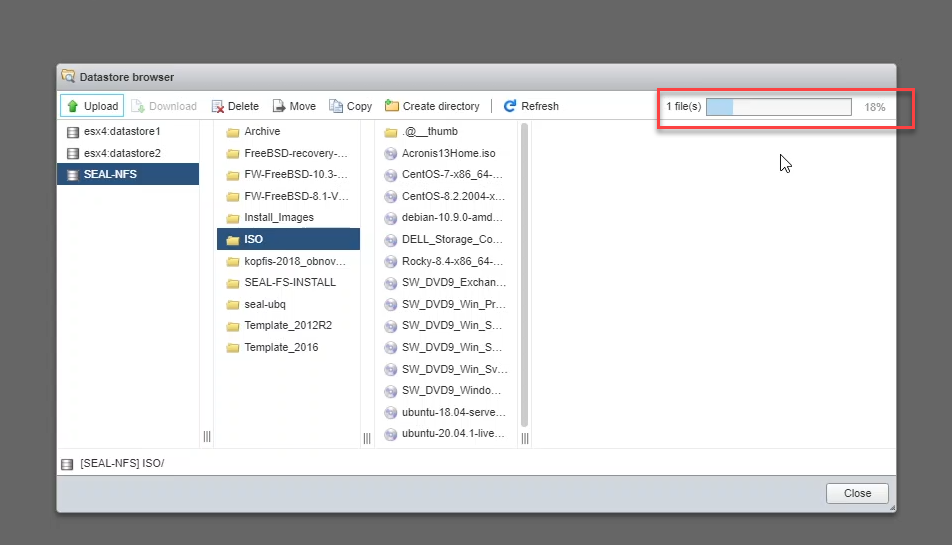
Once the operating system is loaded into the storage, create a new virtual machine. To create a virtual machine, click Virtual Machines in the left menu and then click Create/Register VM in the upper left corner.

A modal window is then displayed. Select Create a New Virtual Machine and then click Next.
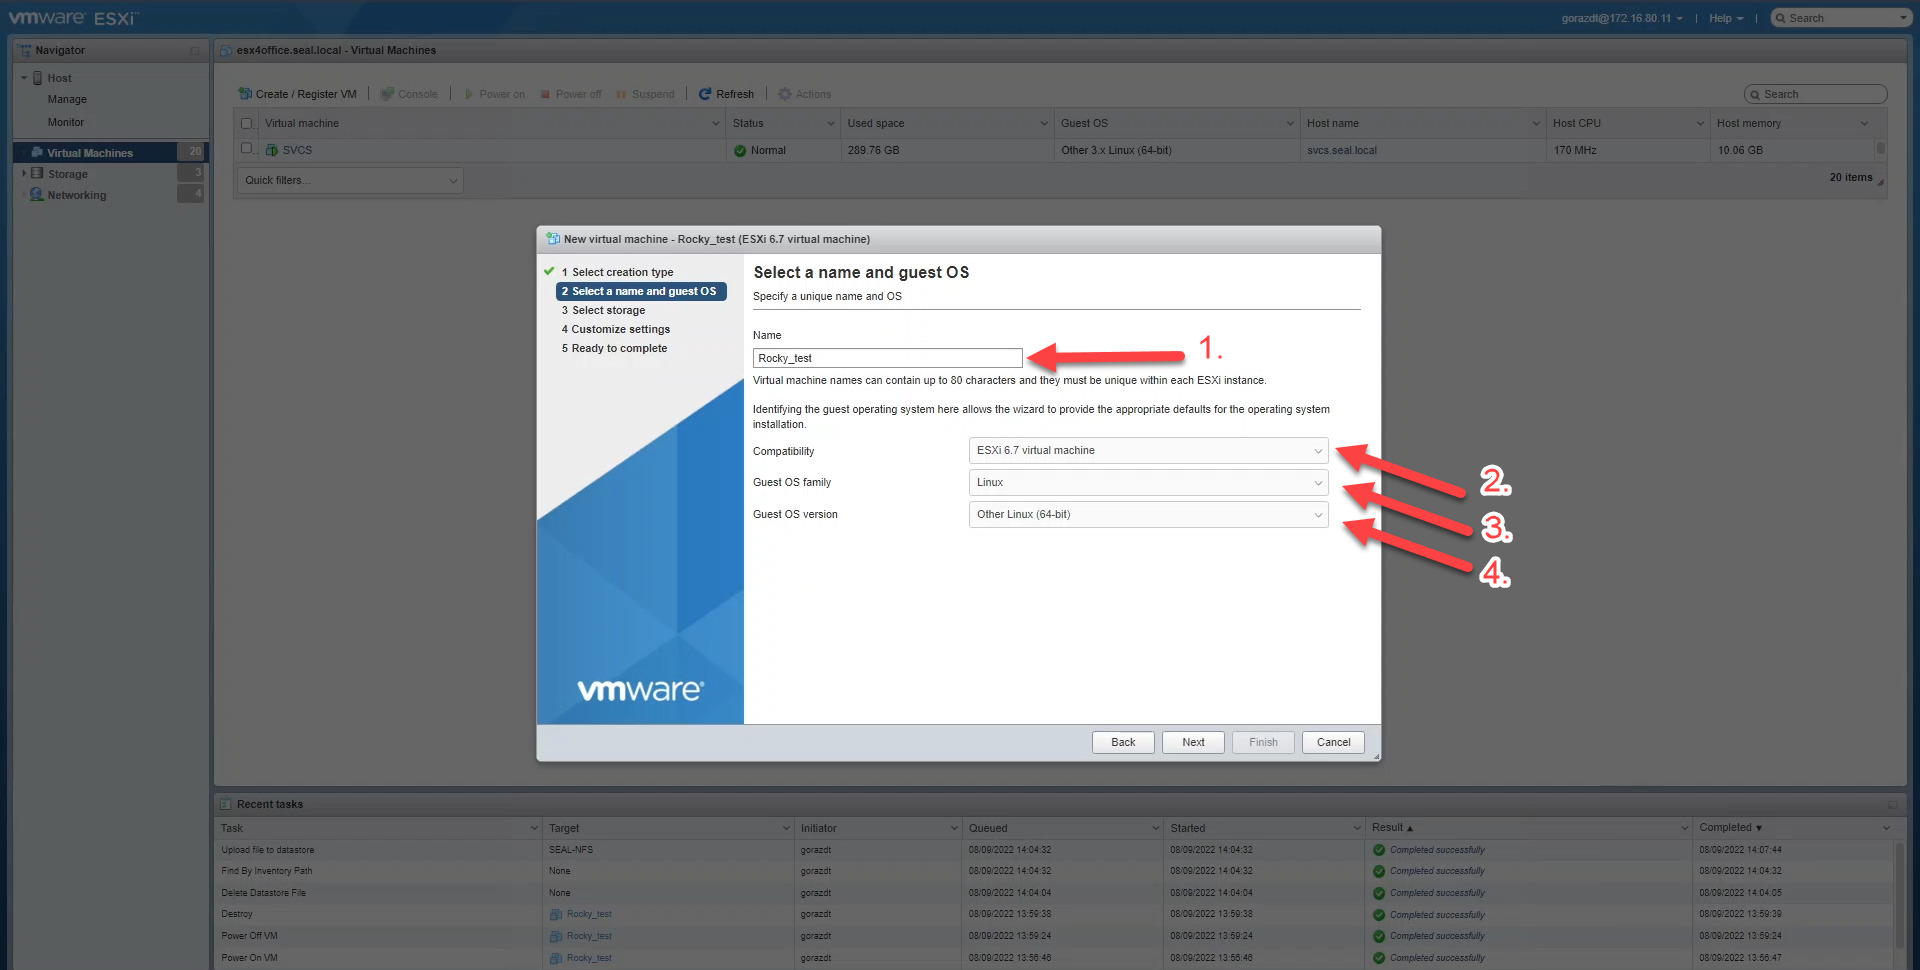
In the next step, enter in the Name field any name for the virtual machine. For the settings shown below, select the following options:
- Compatibility – ESXi 6.7. virtual machine.
- Guest OS family – Linux
- Guest OS version – Other Linux (64-bit)
Proceed to the next settings by clicking Next.
Select which storage to install the virtual machine to and click Next to continue.

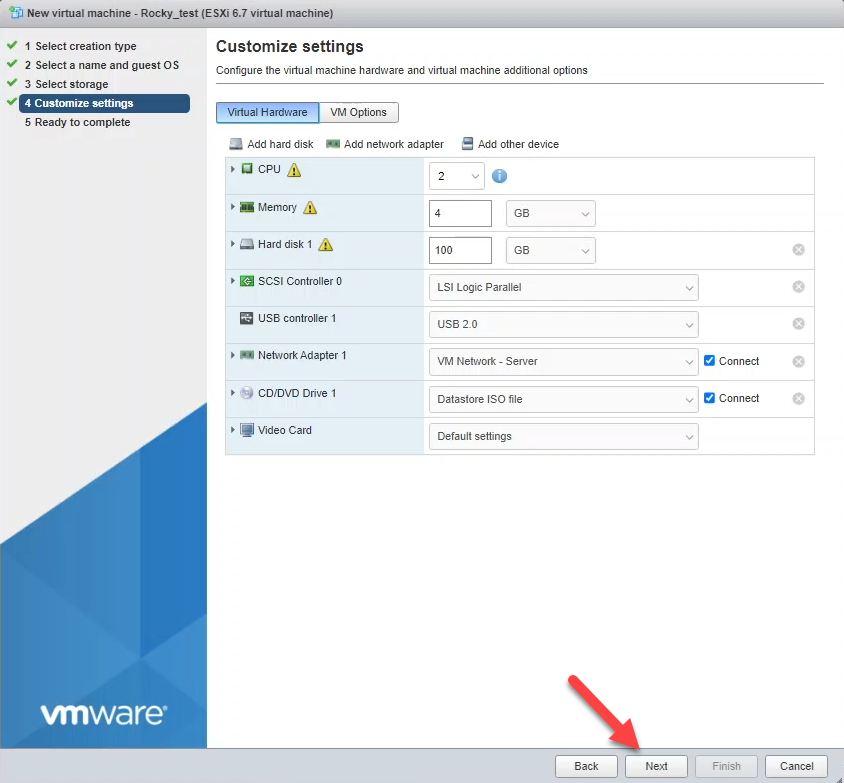
In the next step, set the desired hardware parameters for the virtual machine. Under CD/DVD Drive 1, select Database ISO file. A modal window will appear to select the operating system iso file you uploaded in the previous steps. Click Select to confirm the file selection.
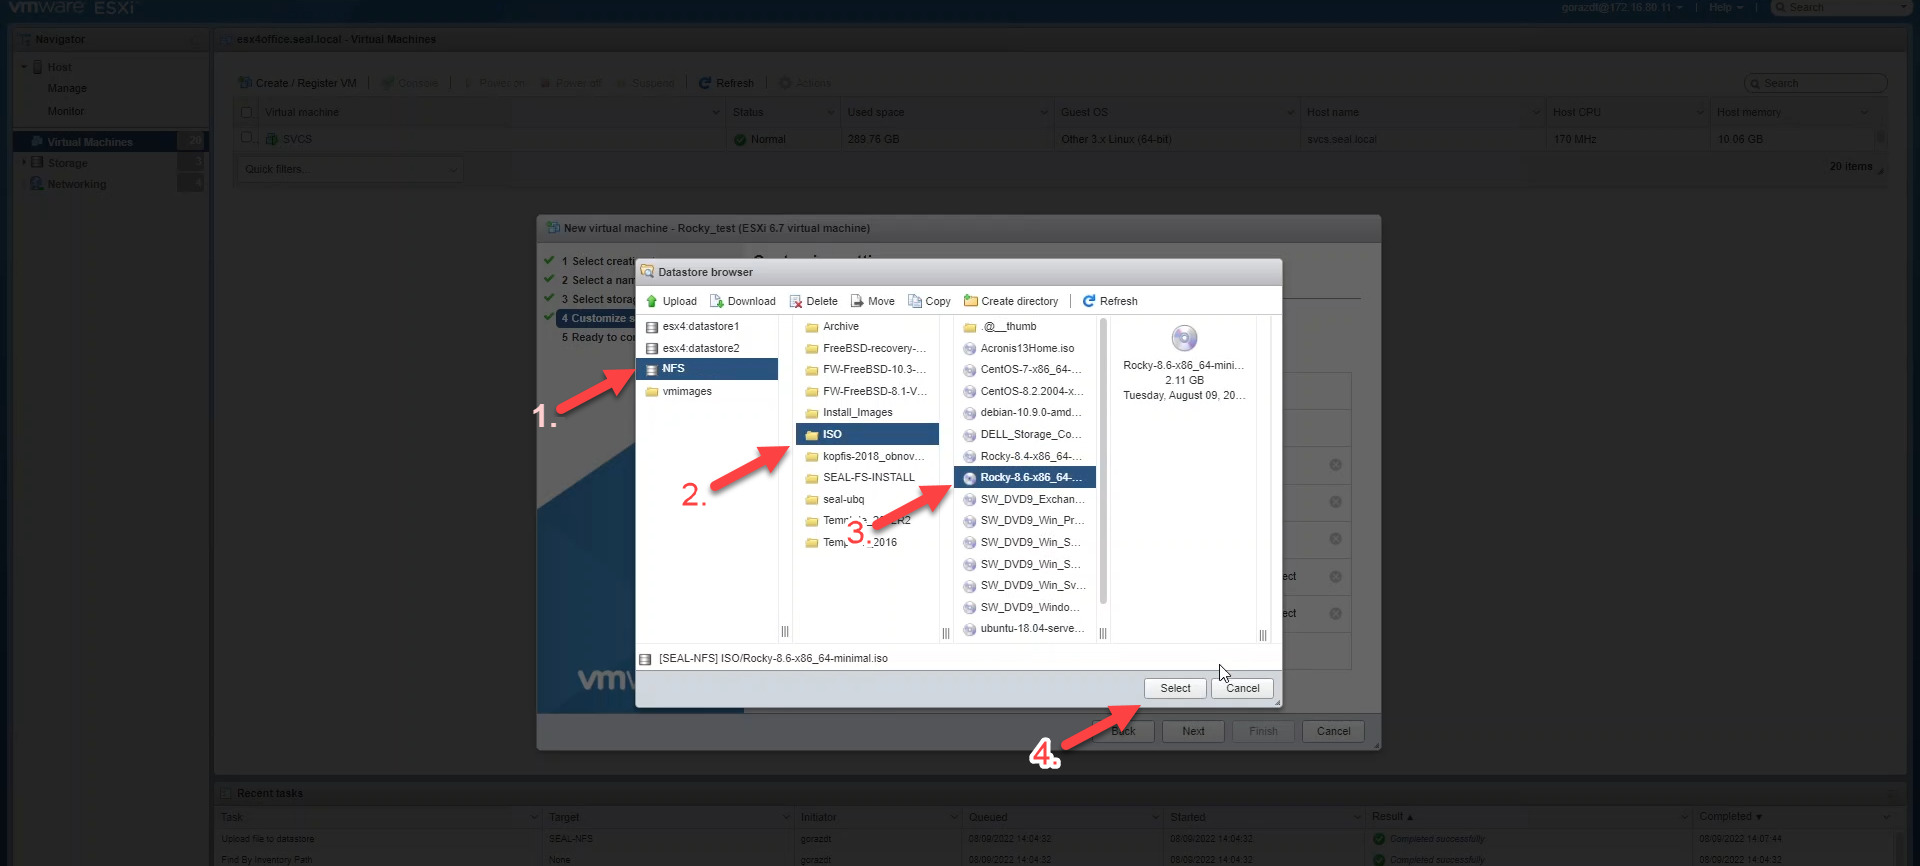
After setting the hardware parameters and selecting the operating system, proceed to the next settings by clicking Next.
A summary of the parameters set in the previous steps is then displayed. If all of them are correct, click Finish to finish the virtual machine configuration.

Once created, the virtual machine is added to the list of existing virtual machines. Click the name to open the virtual machine.

A window with information about the virtual machine is then displayed. To start it, click the Power on button located on the top bar.

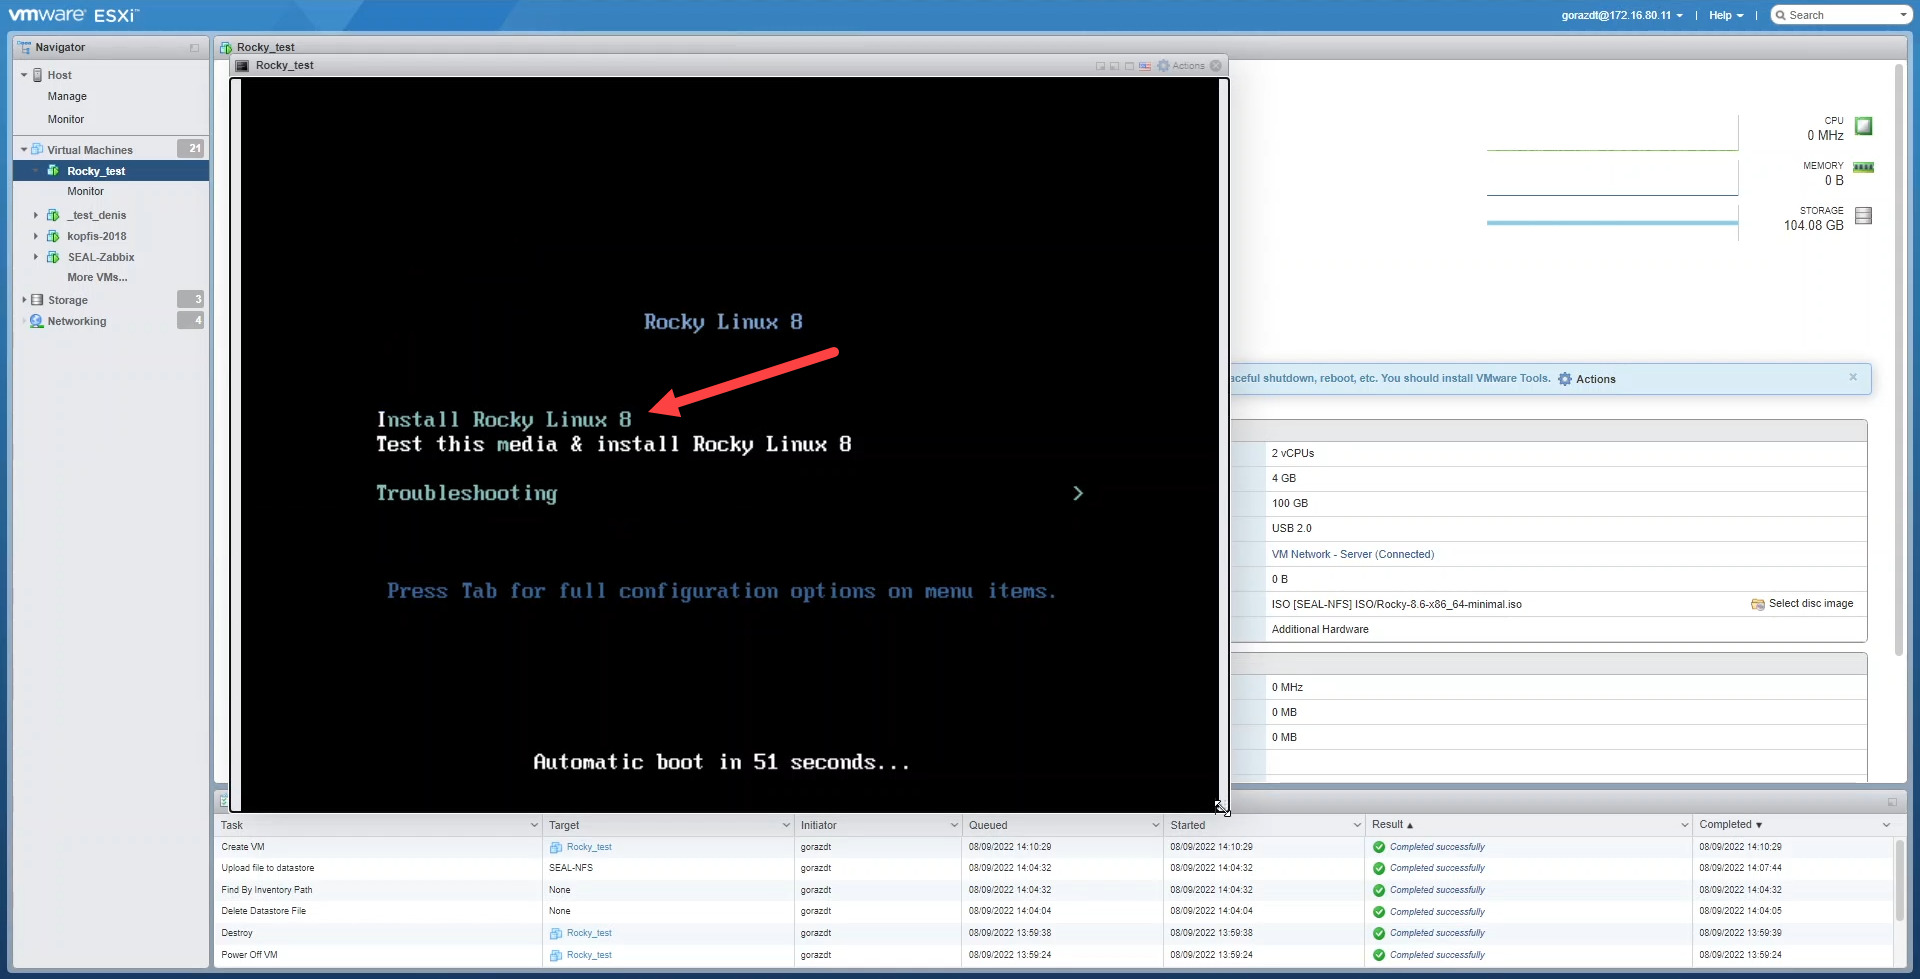
Once the virtual machine is started, use the Console button located in the upper left corner to launch the console.

The console will then appear in the new window with the options Install Rocky Linux 8, Test this media & Install Rocky Linux 8 and Troubleshooting. Use the arrow keys on your keyboard to navigate to the first option Install Rocky Linux 8 and press Enter. This will launch the Rocky Linux installation wizard. The installation procedure is described in the paragraph Rocky Linux OS Installation Procedure.
Installation Process of the Rocky Linux OS
Install Operating System
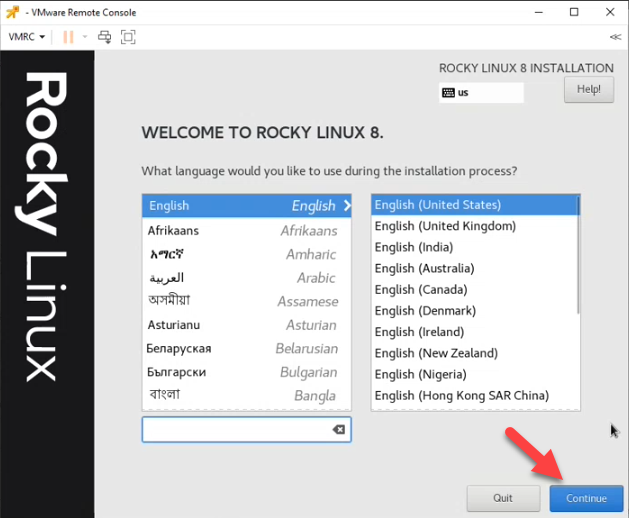
In the first step of the installation, select the language of the installation. Select any language of your preference and click Continue. Next procedure described is for the English language.
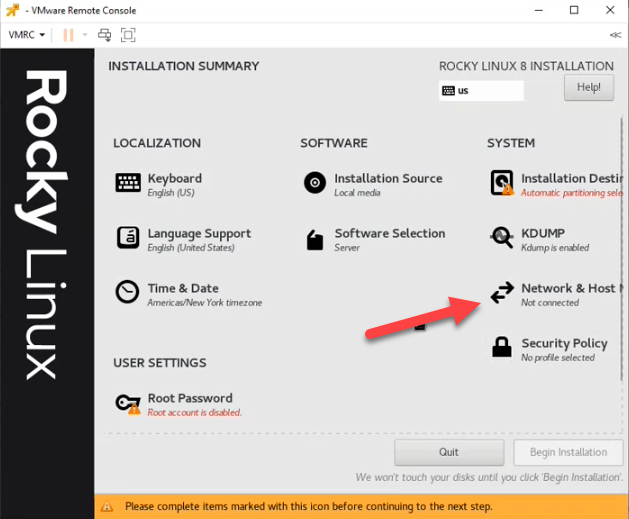
A window with further settings appears. First, configure the network connection. Select Network & Host Name.
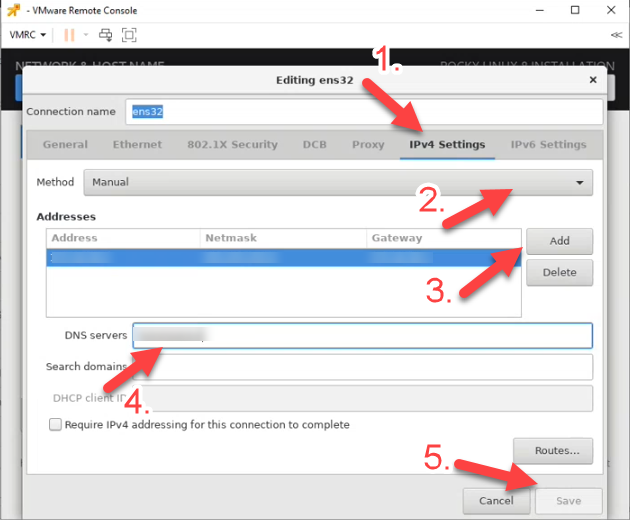
After clicking, a new window appears. Click on the Configure button located in the bottom right corner.

A modal window divided into several tabs is then displayed. First, go to the IPv4 Settings tab, where all the information regarding the IP address is entered. The IP address will be entered manually, so select Manual under Method. To insert the address, click the Add button located next to Addresses. Then enter the DNS address in DNS Servers. To save the settings, click the Save button located in the bottom right corner.
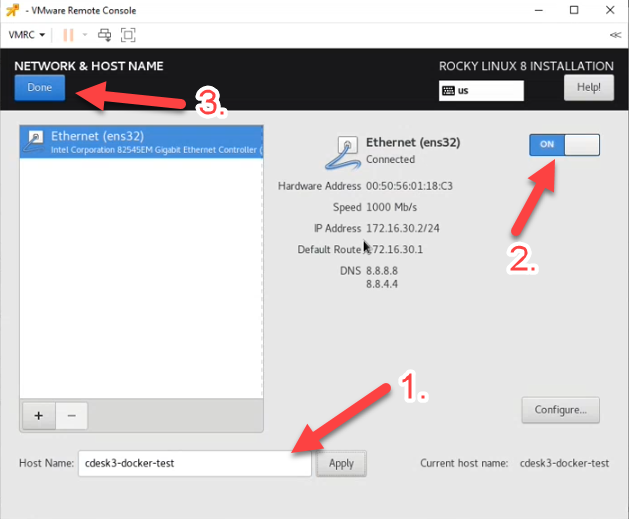
After saving the settings, you will be redirected to the previous window. To make the connection functional, you need to turn on the switch located in the upper right corner. Confirm the settings by clicking Done in the upper left corner of the window.
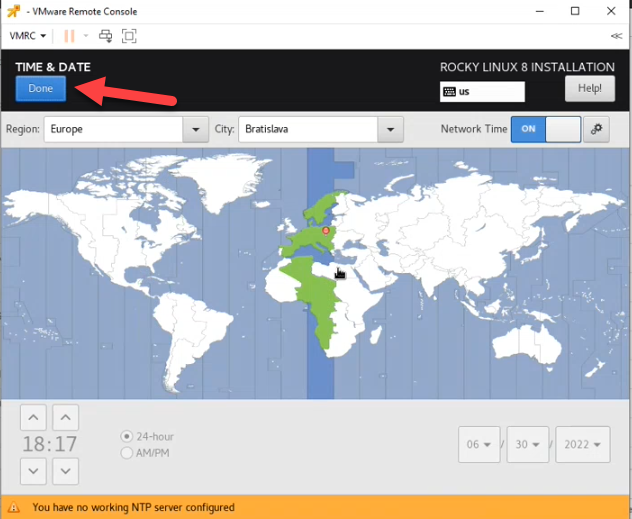
The next step is to set the time zone using the Time & Date button.
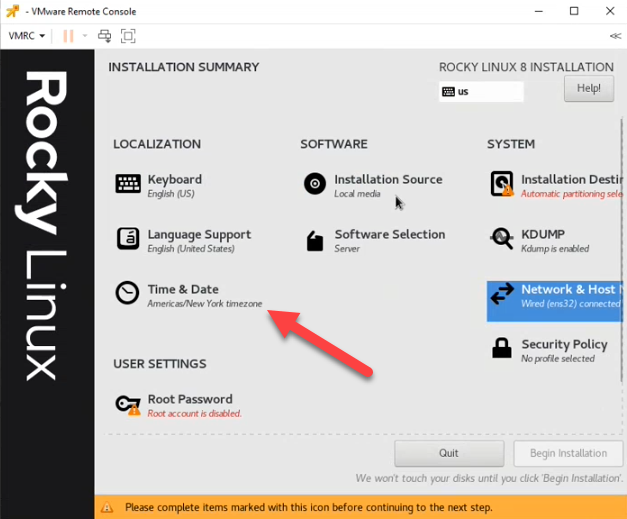
Click on the map to set the necessary time zone and click Done in the upper left corner of the window to save the settings.
Next, go to the partition configuration of the machine’s disks. Click the Installation Destination button to begin the configuration.
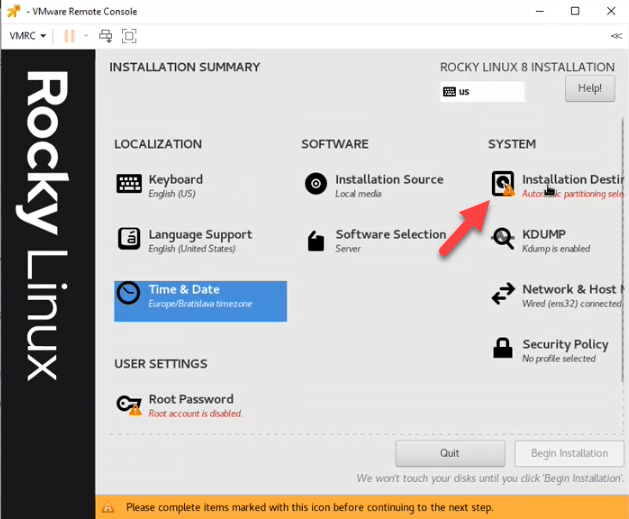
At the bottom of the window is the Storage Configuration setting. Select Custom in this section and then confirm the setting by clicking Done in the upper left corner of the window.
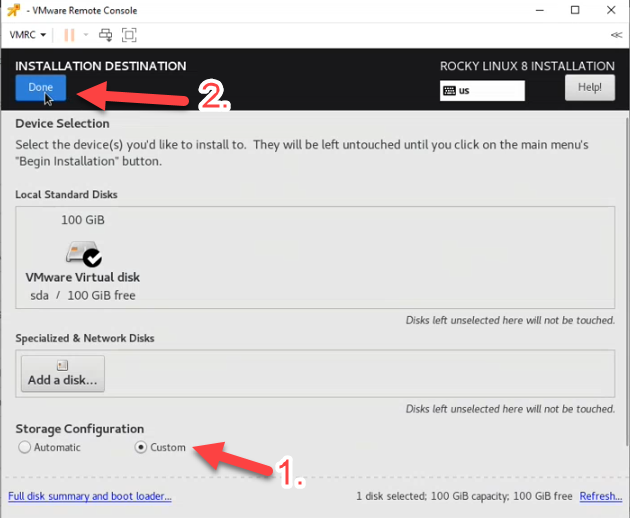
This will open a window with further settings Under New Rocky Linux 8 Installation.
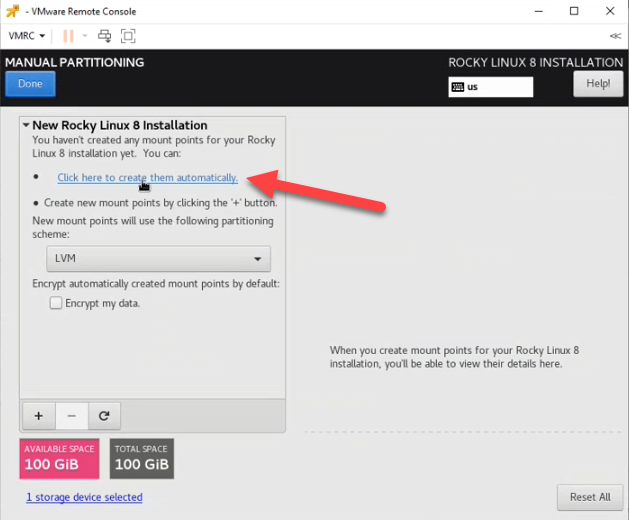
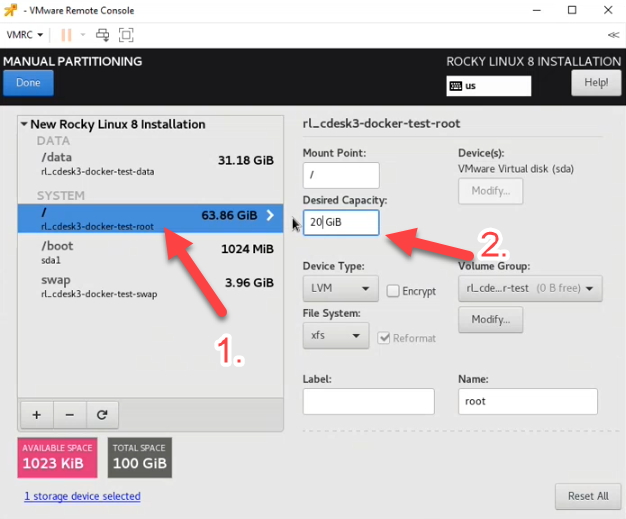
In the next step, set the storage for the system. In the window on the left, click on the first option under the heading System. For this option, enter 20 GB in the Desired Capacity field.
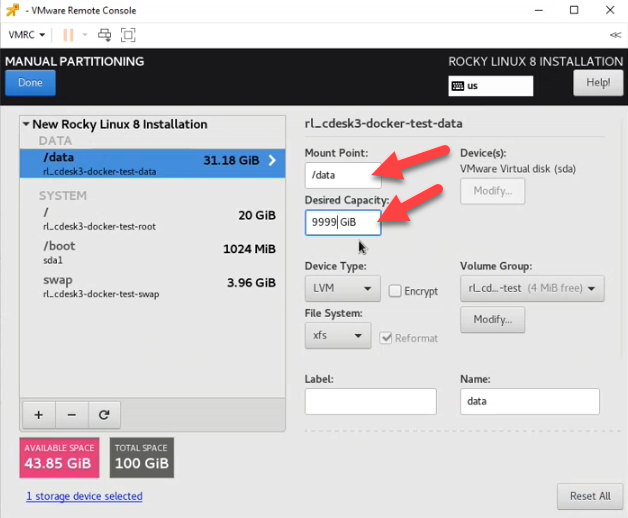
The default values for the storage need to be changed. First you need to set the storage for the data. In the window on the left, click on /home. Then enter /data in the Mount Point field and similarly, enter data in the Name field. In the Desired Capacity field, enter a big number such as 9999. This will ensure that all the capacity that remains after partitioning is allocated for the storage. This value is continuously calculated based on the ongoing setup.
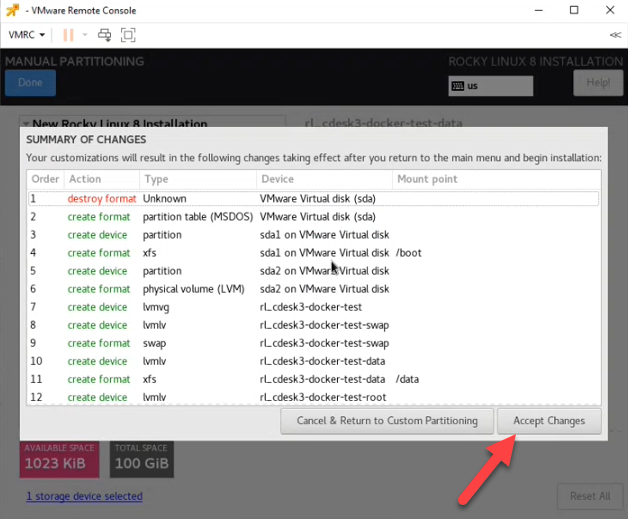
To save your settings, click Done in the top left corner of the window. Once clicked, the summarizing changes appears. Confirm the changes by clicking Accept Changes.
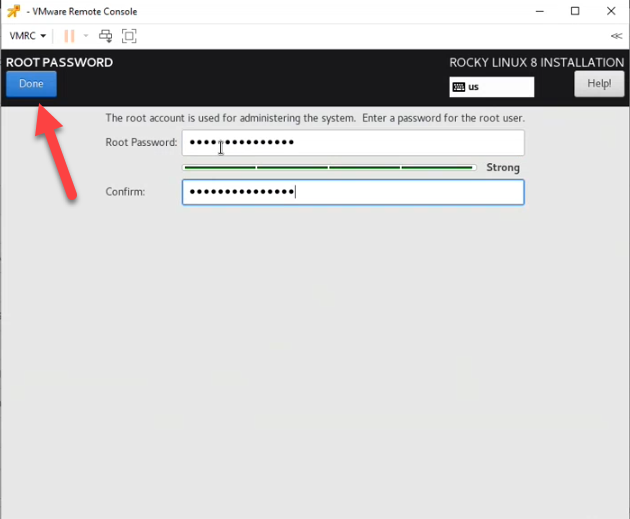
The next step is user settings, which you can access by clicking on Root Password.
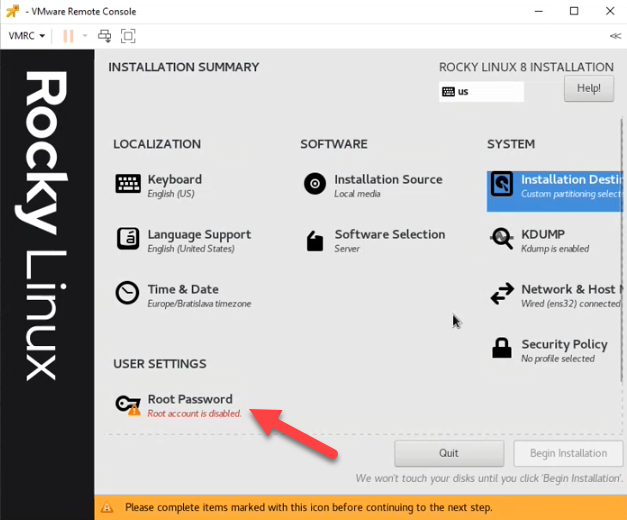
Then enter the user’s password in the Root Password field and repeat it in the Confirm field. To save your settings, click Done in the upper left corner of the window.
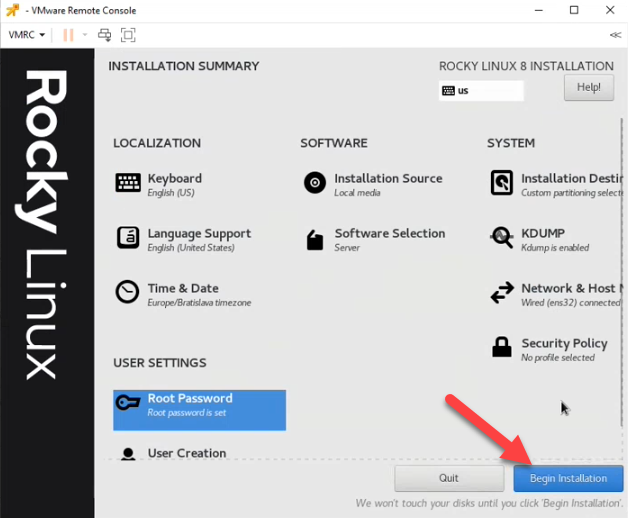
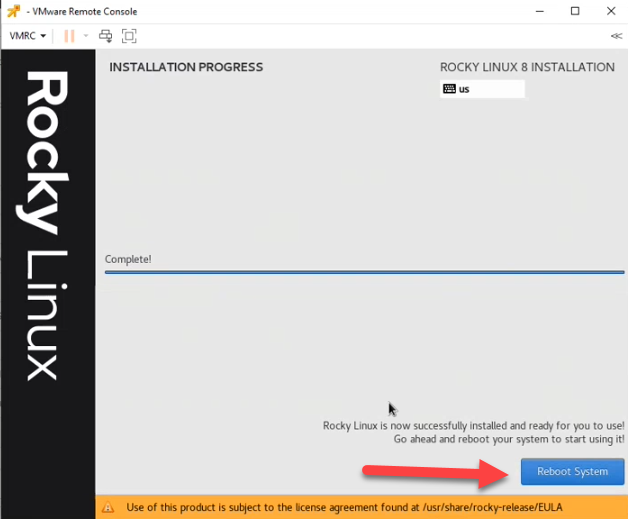
After saving the password, User Creation will appear under the Root Password option to create a new user. In this step we will not create a new user, but we will go directly to the system installation. The installation is started by clicking on the Begin Installation button located in the bottom right corner. This may take a few minutes.
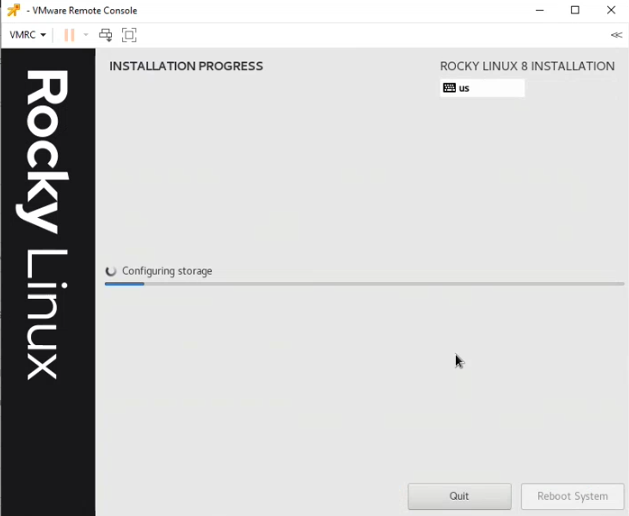
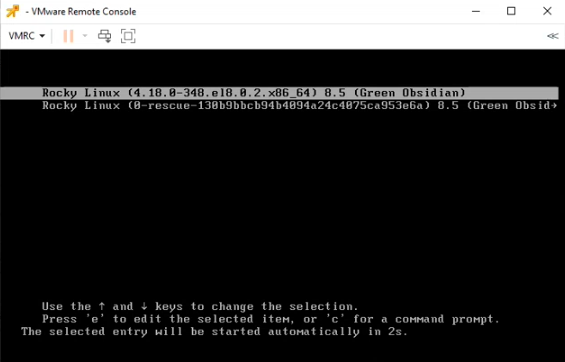
When the installation is complete, a Reboot System button appears in the bottom right corner to start the system booting. Continue by clicking on it.
Click to start rebooting process. After a moment of loading, a window appears with a selection of options. Use arrow keys to navigate to the first option and continue by pressing Enter.
CDESK/CM Server Installation
Download CDESK/CM Server Installation Package
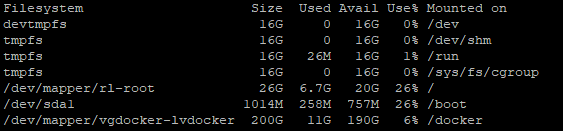
After installing the Rocky Linux operating system, make sure that created partitions and free space are correct.
df -h
Your output should be similar to the following example.
Now it is possible to start the installation of the CDESK package. The first step is to download the installation package. However, a few configuration settings need to be made before that. First, create a folder where the installation package will be downloaded. Create the folder using the mkdir command and then enter a folder name. The full command can look like this.
mkdir install-cdesk
Then navigate to the folder using the cd folder-name command, so in this case:
cd install-cdesk

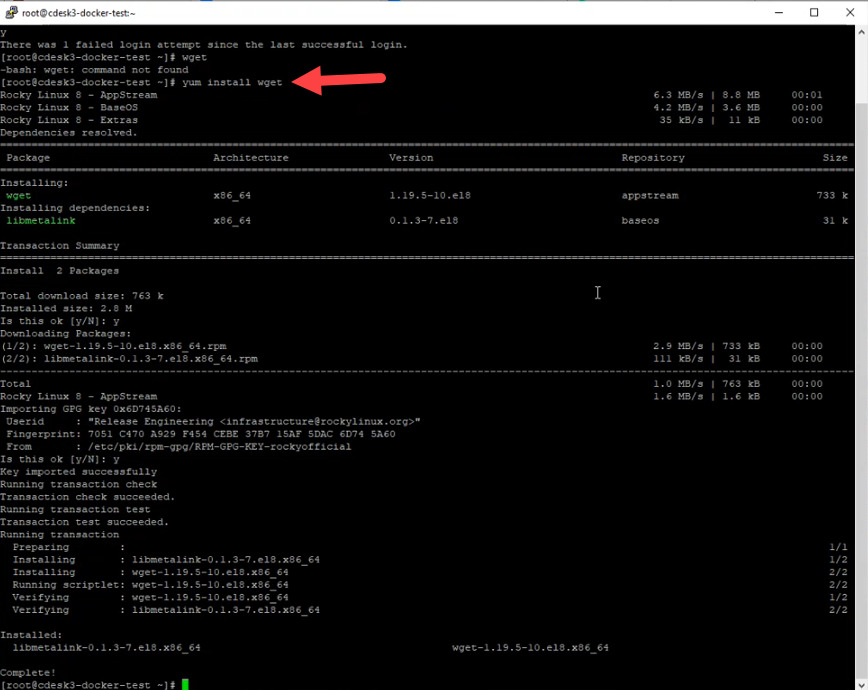
After opening the folder, you can start downloading the installation package. The package will be downloaded to this folder. However, once installed, the operating system does not include the wget command needed when downloading the installation package. You can install it into the system by entering the command:
yum install wget
During the command installation, you will be asked if the parameters displayed during installation are correct. To continue, you need to press Y, which means yes. This question is displayed twice during the installation of the command.
Once installed, the command can be used to download the installation file. You can download the wget+ installation file by specifying the path and its name. To download the CDESK/CM server installation package, enter the command
príkazom wget https://sm.seal.sk/cdesk-server-installer
and press Enter. The download will then start, which can take several minutes depending on the speed of your internet connection.

The installation package is downloaded in .zip format. After successful download, unzip it using the command:
unzip cdesk-cm-ver3.1.2.6.zip
To run the command to unpack the package, press Enter. The installation package will be extracted to the file you created in the previous steps
CDESK/CM Server Installation
After unzipping the package, enter the folder that was created after unzipping by entering the command
cd address_book_name_from_previous_step
Then enter the command
ll
and press Enter again. You can now run the installation script using the ./cdesk-server-install.sh command. After entering the command, a menu of options appears:
- Install CDESK
- About
- Quit
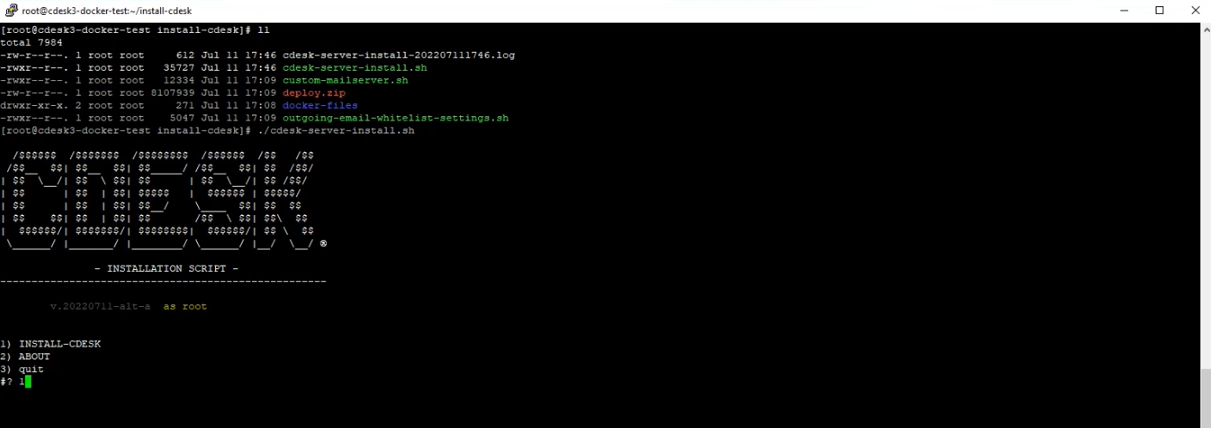
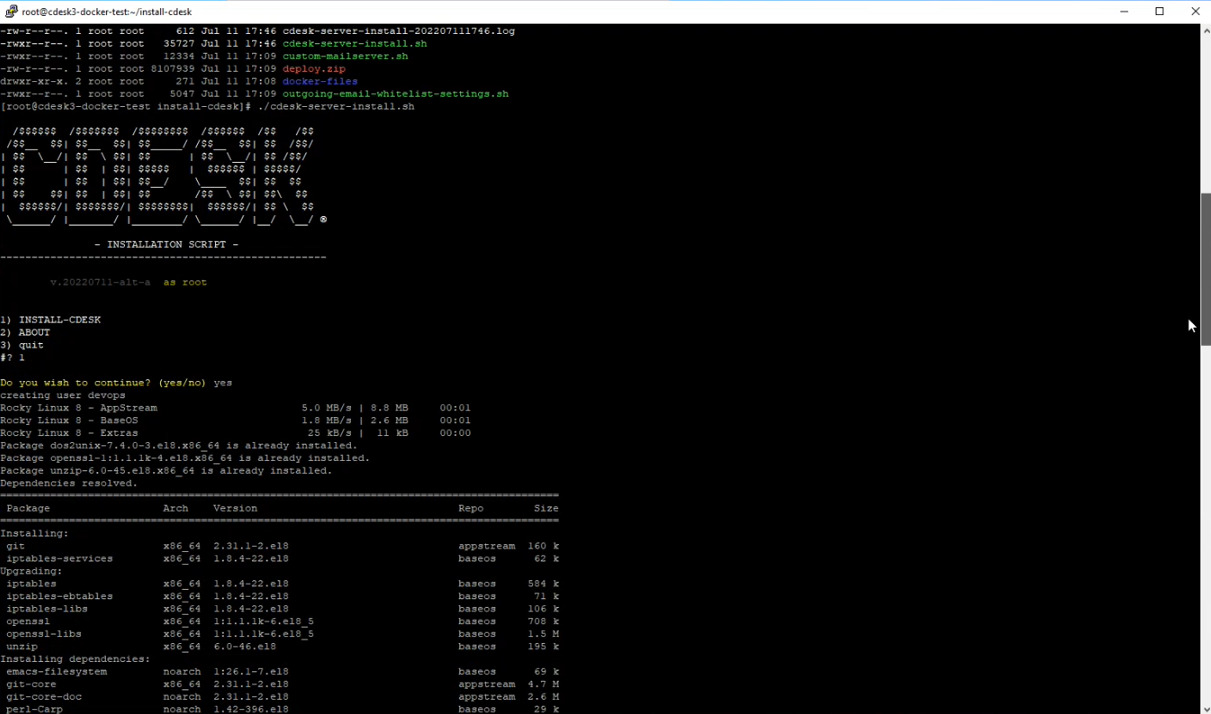
Press 1 to start the installation. You will then be asked if you wish to continue. Type yes and confirm your choice by pressing Enter. Lines will then appear informing you of the installation progress. These lines are also saved in the file where the installation package is located.
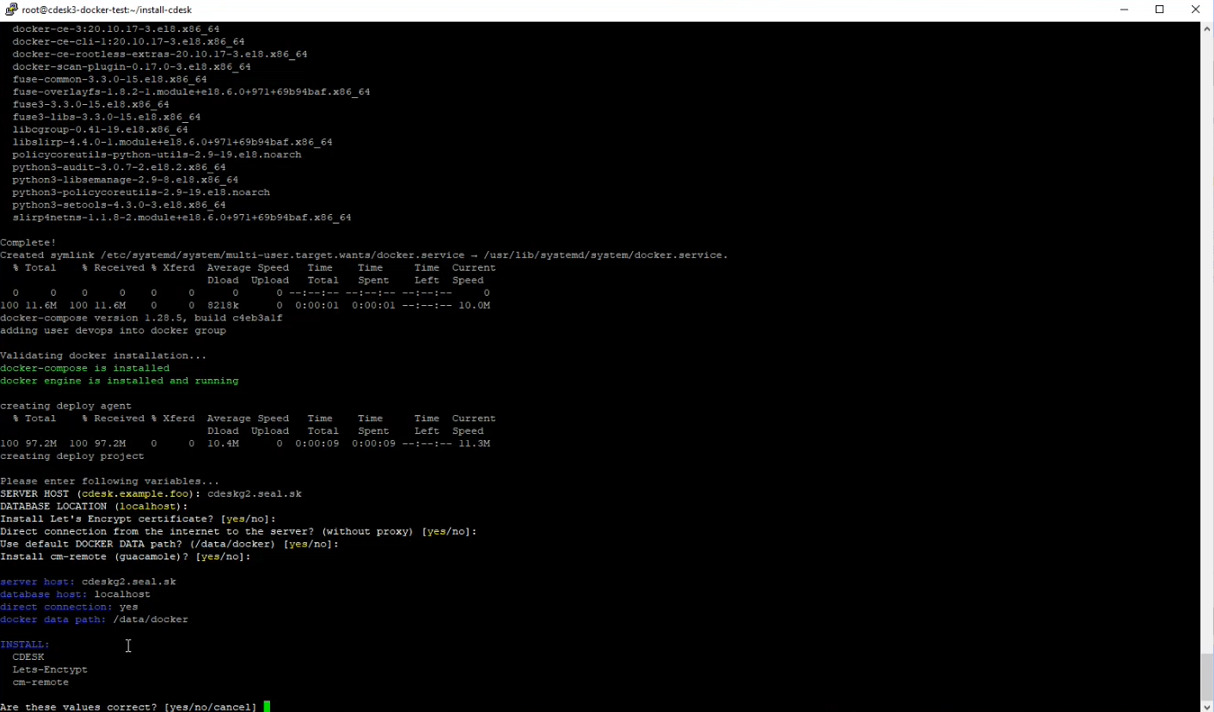
After all the libraries and other installation components have been loaded, the SERVER HOST line is displayed, in which you need to enter the domain name of the server, for example cdesk.your_company.com. We are working with the domain cdeskg2.seal.sk. After entering the server name, a series of additional questions will appear, which you confirm by pressing Enter. These are:
- DATABASE LOCATION (localhost)
- Install Let´s Encrypt certificate?
- Direct connection from the internet to the server? (without proxy)
- Use default DOCKER DATA path? (/data/docker)
- Install cm-remote (guacamole)?
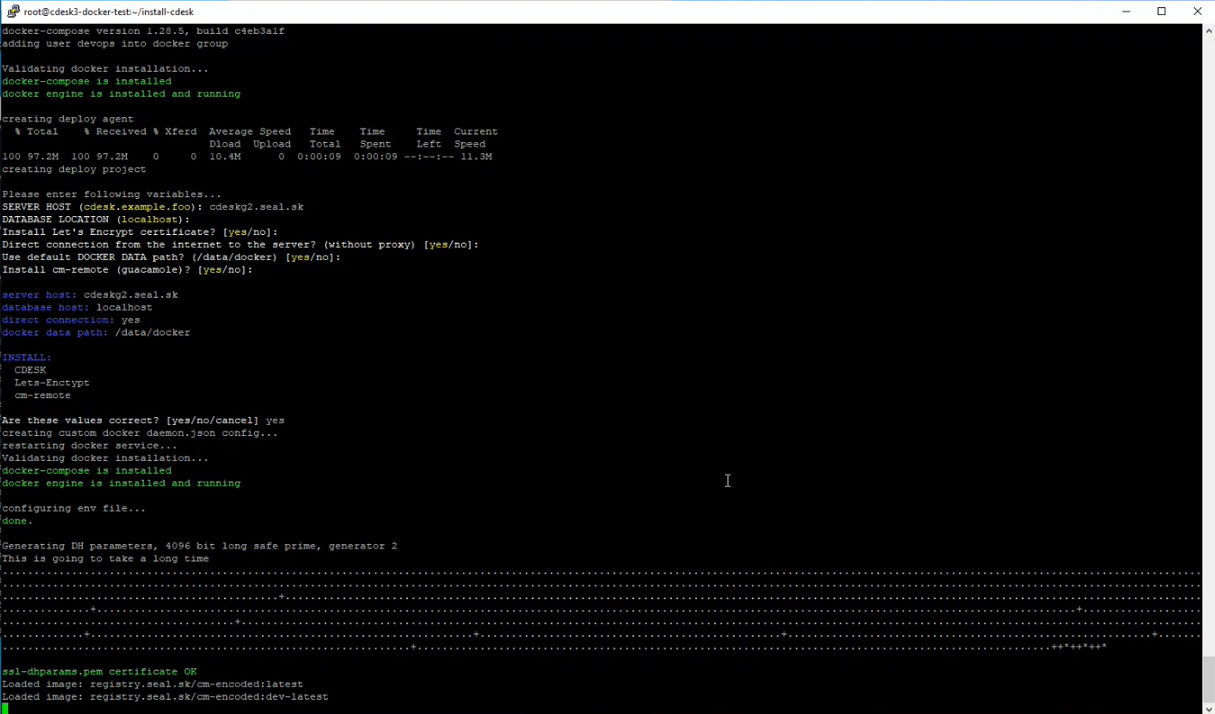
After confirming all these options, a summary is displayed and at the end of the summary you are asked if the values you have entered are correct. If so, type yes and press Enter. Unlike the series of previous questions, you must also type yes in this step. By simply pressing Enter you would return to the previous series of questions.
In case you prefer your own purchased certificate to a Let´s Encrypt certificate, when asked Install Let´s Encrypt certificate? Enter no and follow the instructions described in the Use Custom SSL Certificate section. You can also change the certificate later, during server operation. The procedure is described in the paragraph Change Deployed Certificate for Custom Certificate. Once all the questions have been confirmed, the installation of the configured components starts. This step may take several minutes.
Use Custom SSL Certificate
During instalation of the server
you will be asked if you wish to install a Let’s Encrypt certificate. If you type no, you will continue with this procedure.
After rejecting installation of the Let’s Encrypt certificate, you will be prompted to install a self-signed certificate. Type no to be prompted to install a custom purchased certificate: Install custom purchased certificate? Type yes.
The next steps require the use of .crt and .key files. The procedure for obtaining them is described in Prepare Deployment of Purchased SSL Certifiate.
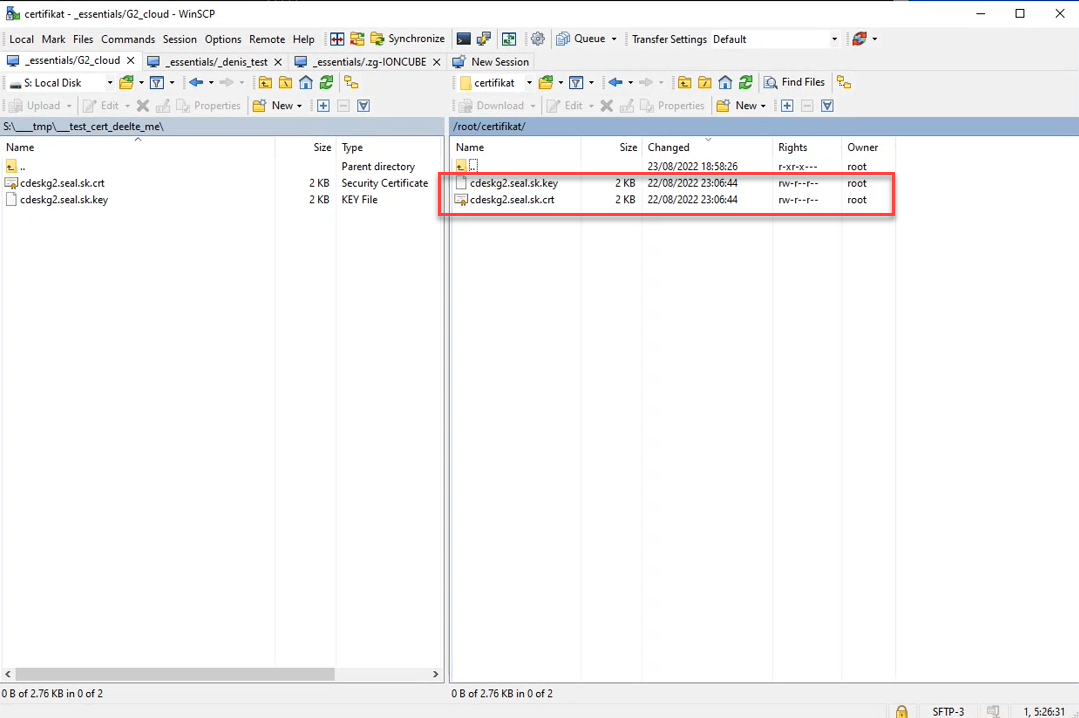
After confirming the prompt and installing the custom certificate, a box appears to specify the path to the .crt file Full path to custom certificate <crt> file. The path is entered in the form
/address_book/addressee/crt_file.crt
In our case it was: /root/certifikát/cdeskg2.seal.sk.crt. Then a field to enter the path to the .key file Full path to custom certificate < key> file is displayed. Enter the path in the same way as in the previous step. A question will then be displayed asking if all the values entered are correct [yes/no/cancel]. Type yes and confirm the choice by pressing Enter to start the certificate upload.
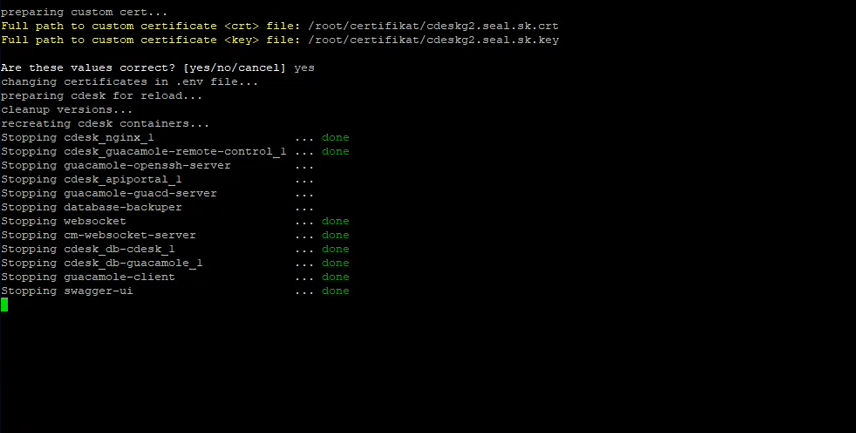
After all components are loaded, the certificate is successfully deployed.
First Start-Up and License Insertion for CDESK/CM Server
When the installation is successful, you will see lines with automatically generated login name and password. These credentials are used to log in as admin of the newly created CDESK environment.

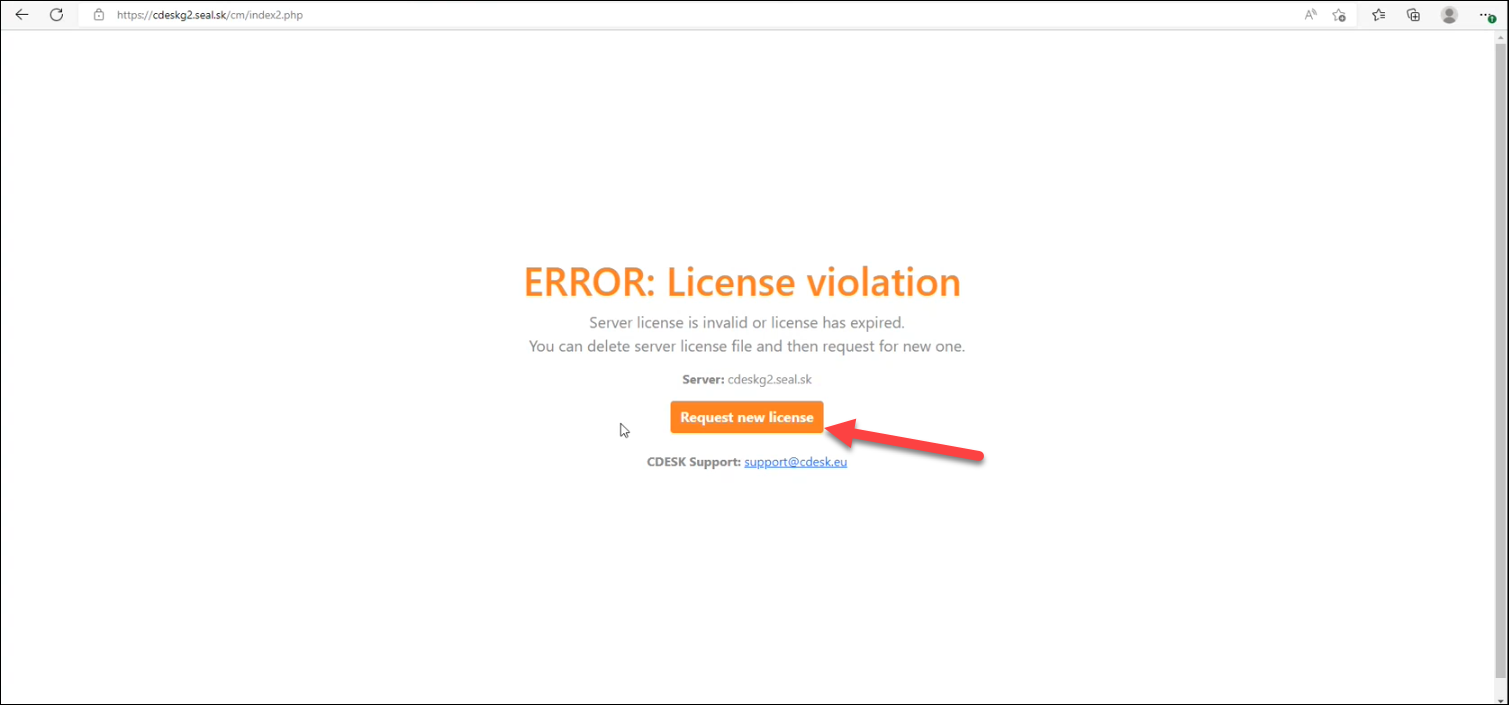
Now open your web browser and enter the domain under which the installation took place. In our case it was https://cdeskg2.seal.sk. First is displayed the license error message. To get the license on the displayed page, click on Request new license.
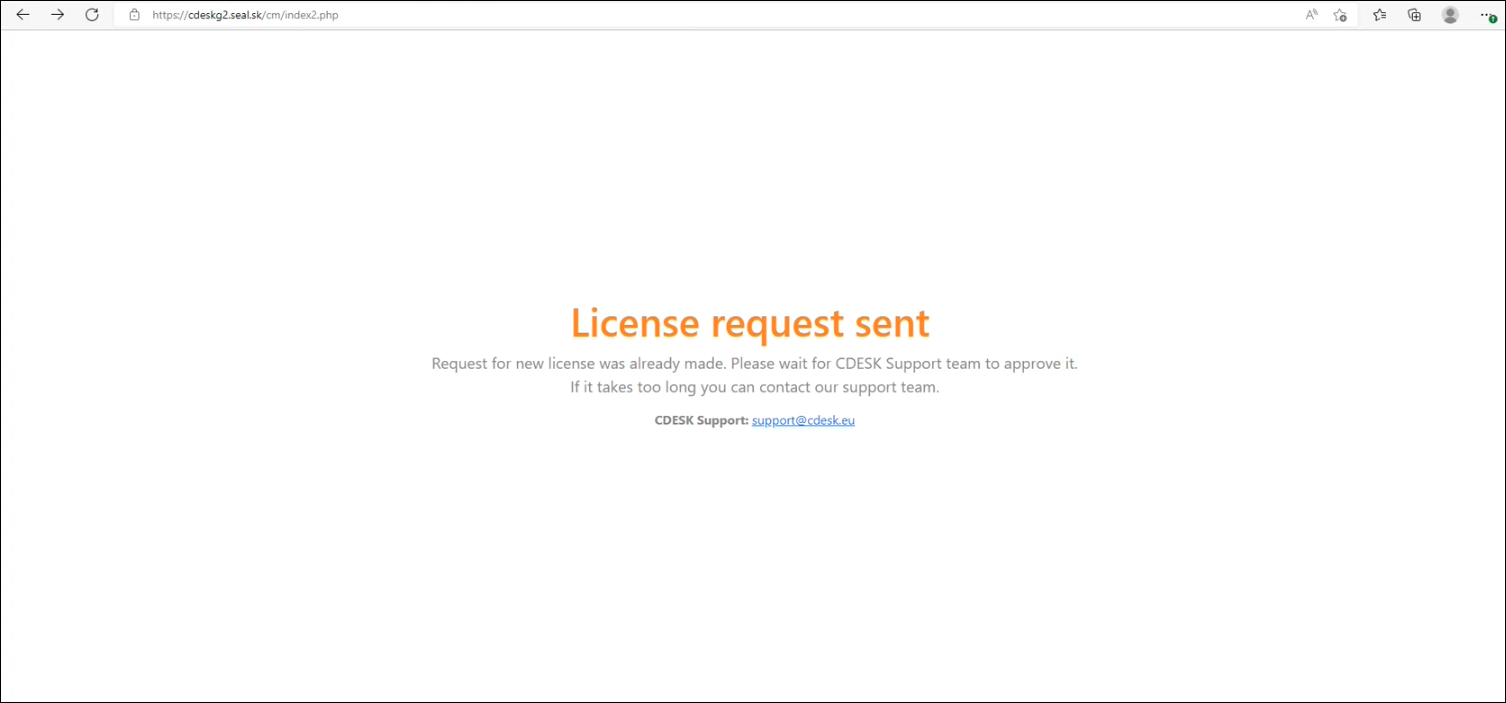
Once clicked, a message will appear stating that the license request has been successfully submitted and you need to contact support at support@cdesk.eu. In the last line a link to return to the server is displayed. Click on it.

When you click on the link, you will see a message saying that the license request has been sent and you need to wait.
When the license is approved, a message about it is displayed in the upper left corner. You need to reload the page.
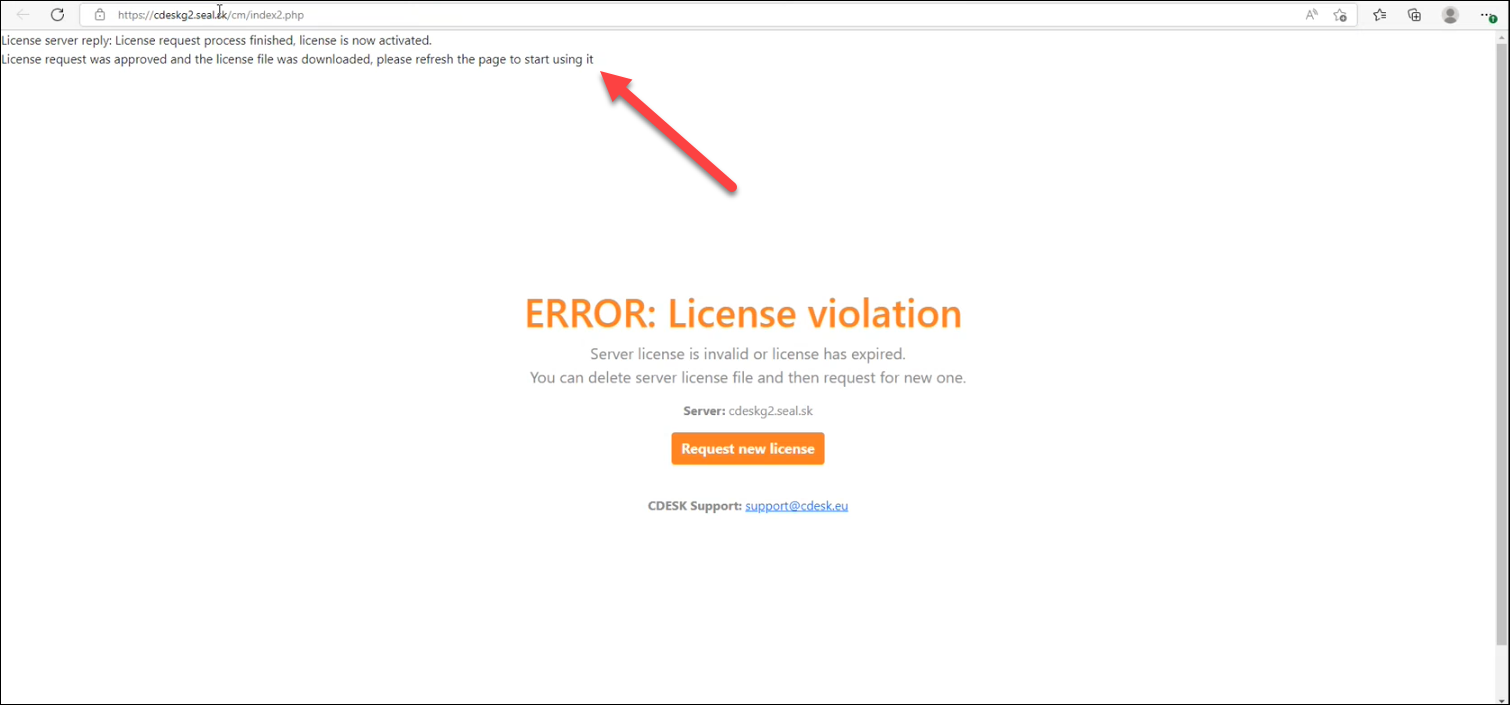
When you click on the link, a login screen appears. Enter the environment administrator login credentials that were displayed after the the installation completion. To complete the configuration of the CDESK/CM server, continue with the steps described in the following sections.
Once CDESK/CM Server Installed
Activate System for Server Updates
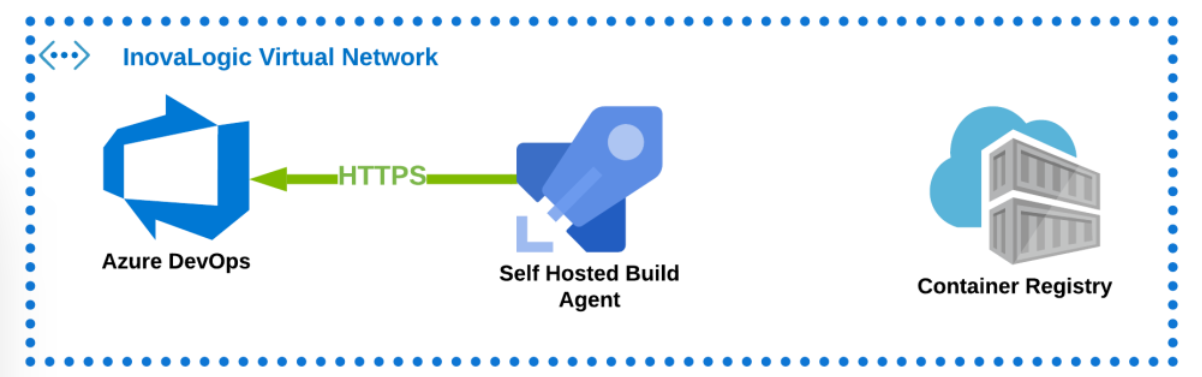
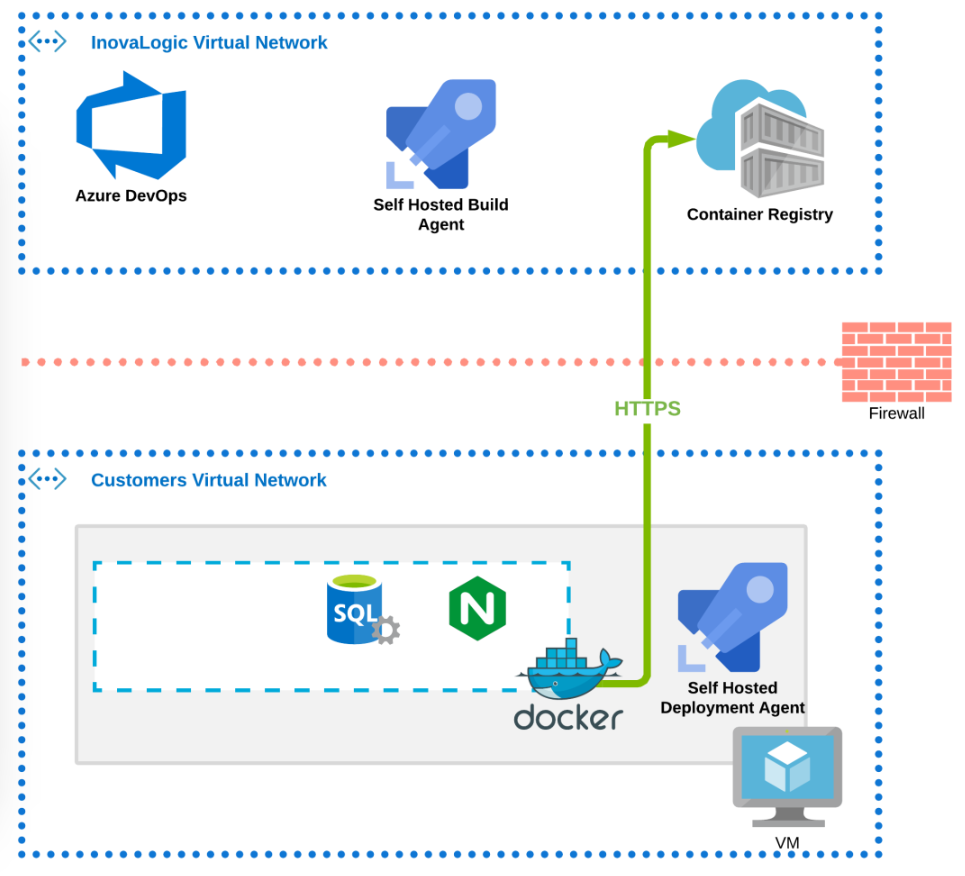
When updating the server, we use the Azure DevOps system, which greatly simplifies the update process. In order to use this software, the server must first be connected to it, for which the SSH access is used. Once the server is connected into DevOps, it is no longer necessary to use SSH access for updates, as the update can be done directly through DevOps. This method of updating includes several advantages:
- Reduction of error rates due to human error
- Efficiency and speed
- Faster distribution of security updates.
Cdesk runs on dockers.
The update starts with the agent detecting the new version of CDESK. The agent is activated via SSH and is used to communicate with DevOps on Inovalogic’s virtual network.
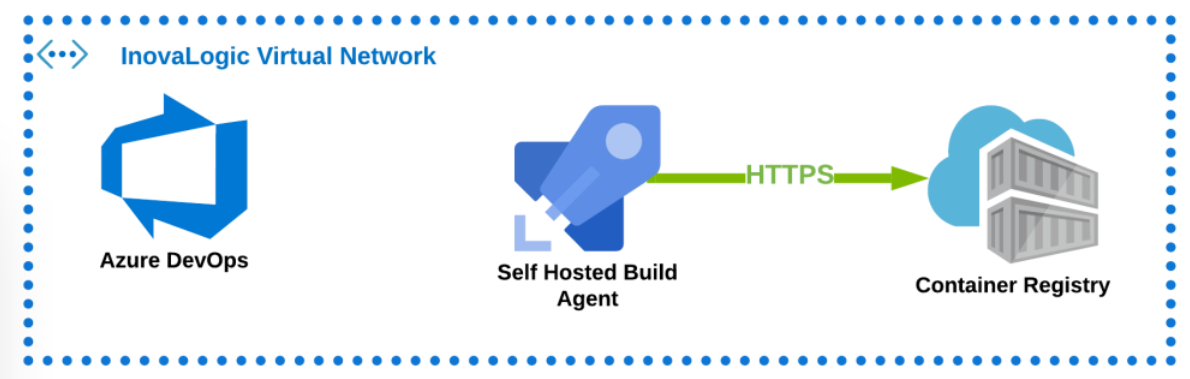
The agent then creates a new package, which is uploaded to the Docker Registry.
The agent notifies DevOps when the new package is completed, which makes the new version available for release. This is provided to the agent on the customer network.
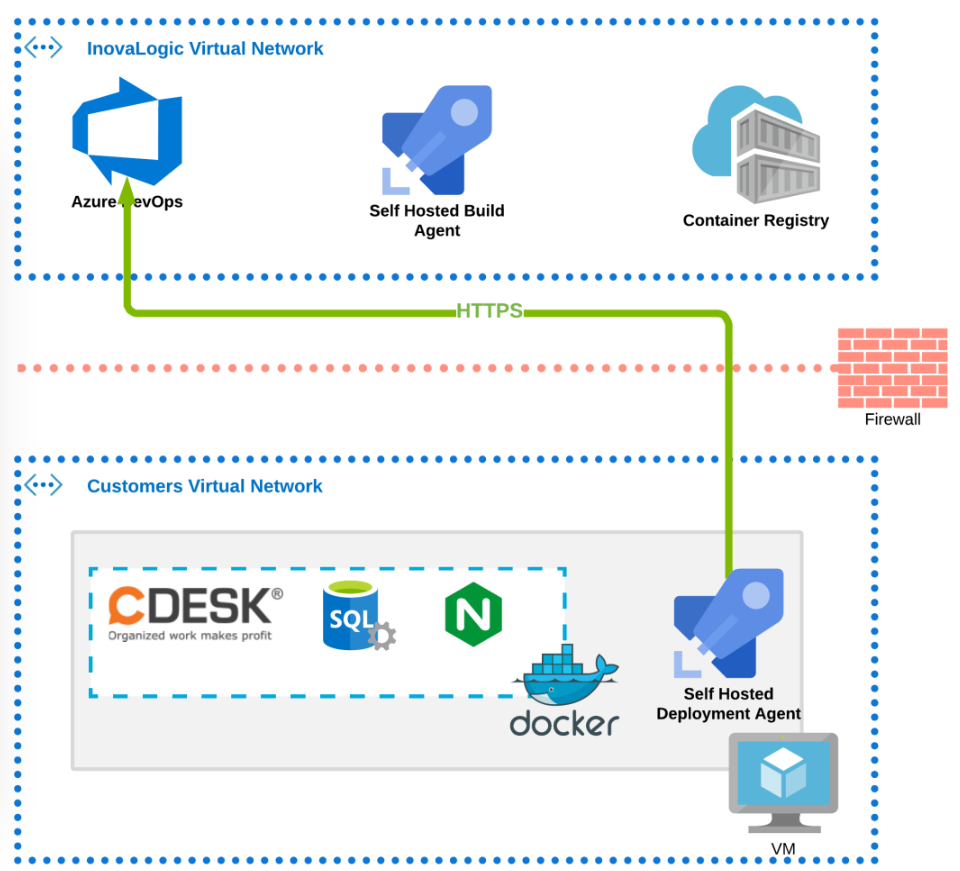
The agent on the customer network makes a backup of the database and files and then offers the new configuration to Docker.
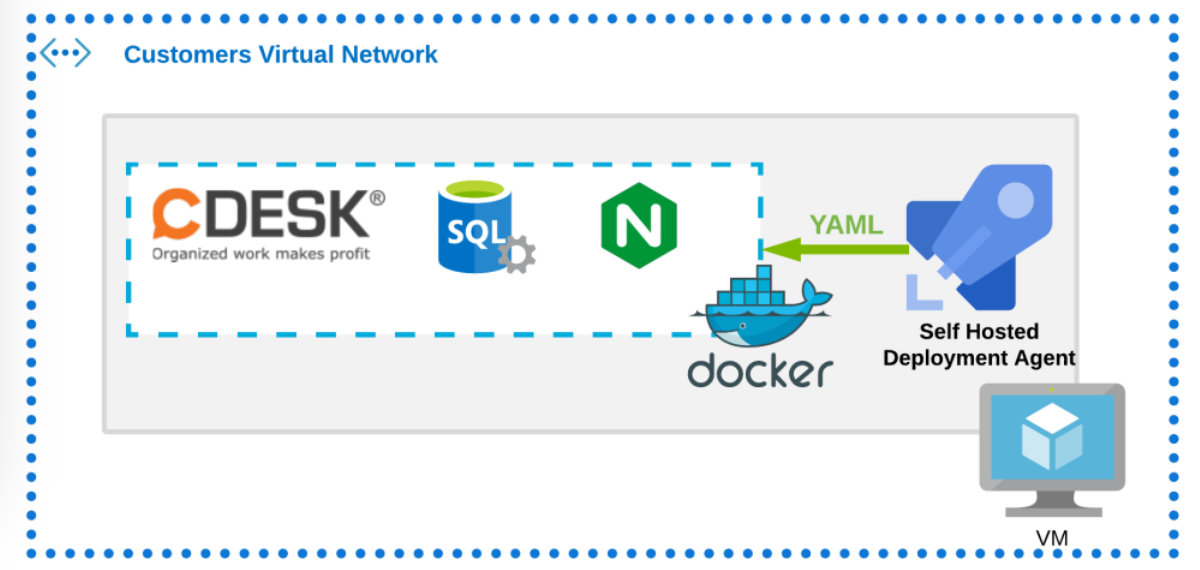
The Docker daemon then suspends the operation of CDESK. After this, Docker can download the new package from the Docker Registry. After a successful download, Docker will run the new version of CDESK.
Recommended Server Backup Settings
The database is backed up automatically every day and the backed-up files are deleted after one month. In order to maintain such a backup, it is necessary when creating a virtual machine to make another backup disk with approximately half the capacity of the main disk.
If you do not have a dedicated disk for backup, the data is automatically backed up to the disk on which the server is running.
Email Settings for Receiving and Sending Messages
Once the server is installed, you need to make email settings for receiving and sending messages. Go to the installation file folder and start by typing the command
ll
After entering the command, the following options are displayed:
- cdesk-server-install-file_name.log
- cdesk-server-install.sh
- config-cdek-server-domain-name.sh
- config-certificate.sh
- config-email.sh
- zip
- docker-files
- imap-management.sh
- outgoing-email-whitelist-settings.sh
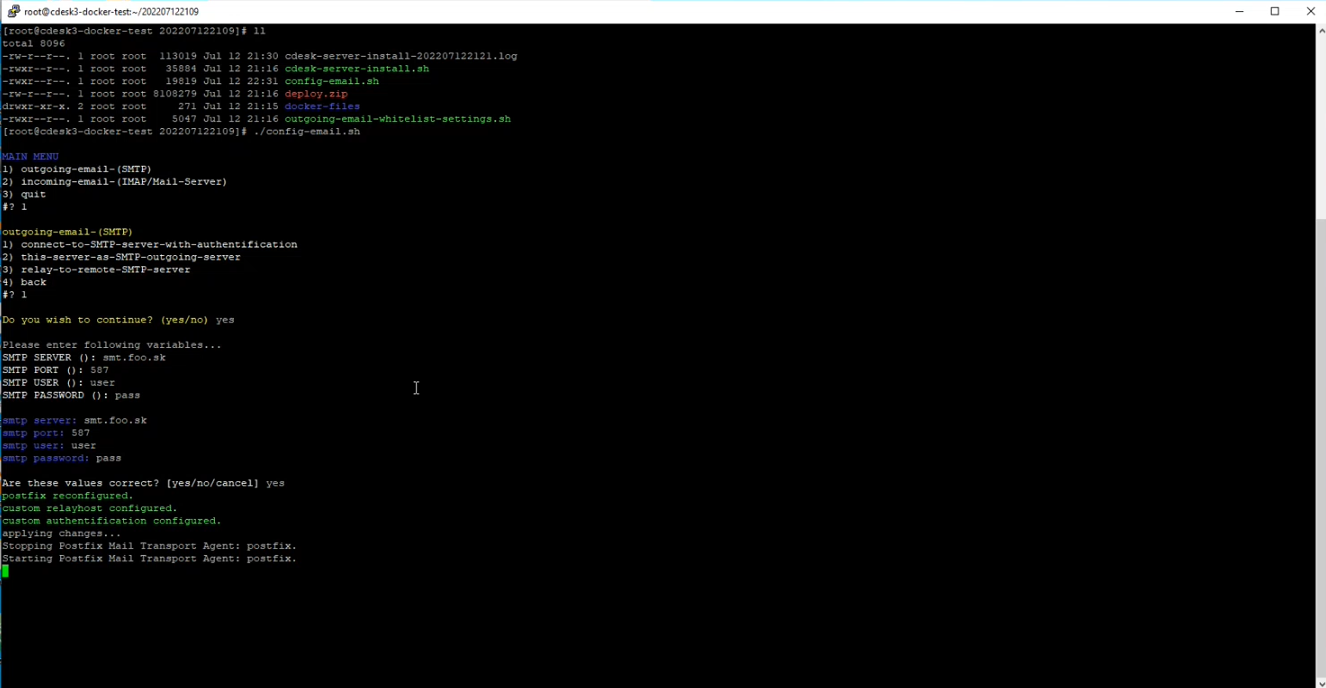
To configure email settings, type the command
./ config-email.sh
The following options appears:
- outgoing-email-(SMTP)
- incoming-email-(IMAP/Mail-Server)
- quit
First configure the sending of mails. Enter number 1 and confirm the choice by pressing Enter. When this option is selected, additional settings are displayed:
- connect-to-SMTP-server-with-authentication
- this-server-as-SMTP-outgoing-server
- relay-to-remote-SMTP-server
- back
Enter number 1 again and press Enter to confirm. You will be asked Do you wish to continue? (yes/no). Type yes and press Enter to confirm. Lines will be displayed in which you need to fill in parameters.
SMTP SERVER (): enter SMTP server name, e.g. smt.foo.sk
SMTP PORT (587): it is recommended to enter the value 587
SMTP USER (): enter any username, e.g. user
SMTP PASSWORD (): enter a password for the user
After filling in the last line, a summary of the filled in parameters is displayed and a question if the entered values are correct (yes/no/cancel). To continue, type yes and confirm the selection by pressing Enter. The configuration is started.
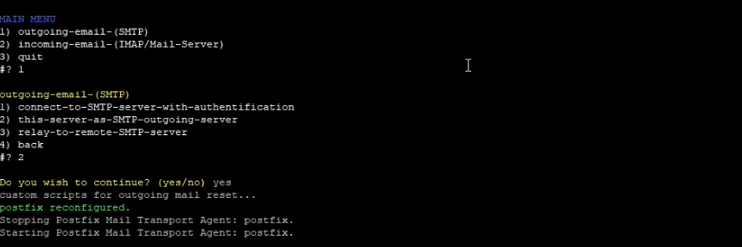
After successful configuration, the main menu with options is displayed again:
- outgoing-email-(SMTP)
- incoming-email-(IMAP/Mail-Server)
- quit
Enter number 1 again and confirm the choice by pressing Enter. The following options will be displayed:
- connect-to-SMTP-server-with-authentication
- this-server-as-SMTP-outgoing-server
- relay-to-remote-SMTP-server
- back
Enter number 2 and press Enter to confirm the choice. You will then be asked Do you wish to continue? (yes/no). Type yes and press Enter to confirm. The command will run automatically.
The main menu with a selection of options is displayed again:
- outgoing-email-(SMTP)
- incoming-email-(IMAP/Mail-Server)
- quit
Enter number 1 and press Enter to confirm the choice. The following options will then be displayed:
- connect-to-SMTP-server-with-authentication
- this-server-as-SMTP-outgoing-server
- relay-to-remote-SMTP-server
- back
Enter number 3 and press Enter to confirm the choice. You will then be asked Do you wish to continue? (yes/no). Type yes and press Enter to confirm. These lines are then displayed:
SMTP SERVER (): the address you entered in the previous steps will be pre-populated in brackets. Just press Enter to continue.
SMTP PORT (25): enter 25
After filling in the last line, a summary of the filled in parameters and a question if the entered values are correct (yes/no/cancel) are displayed. To continue, type yes and confirm the selection by pressing Enter. The configuration is started.

After successful configuration, the main menu with options is displayed again:
- outgoing-email-(SMTP)
- incoming-email-(IMAP/Mail-Server)
- quit
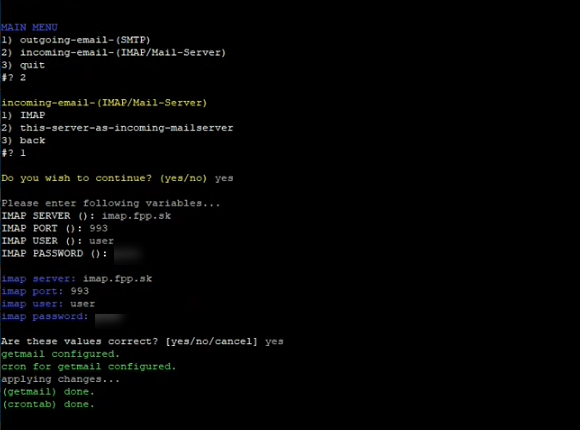
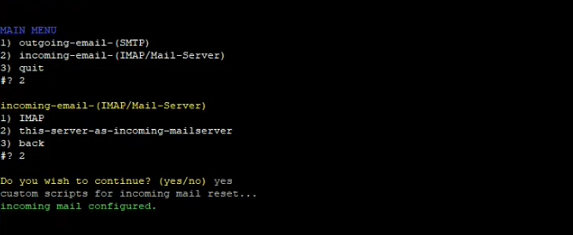
To configure incoming mail, enter number 2 and confirm the choice by pressing Enter. The following options are displayed:
- IMAP
- this-server-as-incoming-mailserver
- back
Enter number 1 and press Enter to confirm the choice. You will then be asked Do you wish to continue? (yes/no). Type yes and press Enter to confirm. These lines are then displayed:
IMAP SERVER (): enter the name of the IMAP server, for example: smt.server.sk
IMAP PORT (993): we recommend entering the value 993
IMAP USER (): enter any username, e.g. user
IMAP PASSWORD (): enter the password for the user
A message will then be displayed to check if the values entered are correct (yes/no/cancel). To continue, type yes and confirm the selection by pressing Enter.
The main menu appears again with a selection of options:
- outgoing-email-(SMTP)
- incoming-email-(IMAP/Mail-Server)
- quit
Enter number 2 and press Enter to confirm. The following options will then be displayed:
- IMAP
- this-server-as-incoming-mailserver
- back
Enter number 2 and press Enter to confirm the choice. You will then be asked Do you wish to continue? (yes/no). Type yes and press Enter to confirm. The configuration will then start.
Create Admin
In order to use the new environment, you must first create an admin through which you will be able to create additional accounts in CDESK.
In a web browser, open the https://cdeskg2.seal.sk link and enter the environment administrator login credentials that were displayed after the end of installation process.
After logging in, the environment manager menu is displayed. The account created during installation is an administrator account and does not allow direct login to CDESK. To create an administrator account, click New Administrator.

When clicked, the form for entering administrator parameters is displayed.

Username – enter the name of the administrator. The user will log in under this name.
Password – enter the password that the user will enter when logging in.
Confirm password – re-enter the password.
Full name – enter the first and last name of the user.
Short name for reports – enter an abbreviated name of the user under which they will appear in all CDESK listings.
Contact email – enter the user’s mail address.
Phone – enter the user’s phone number. This field is optional.
Mobile – enter the user’s mobile number. This field is optional.
Default language – click in the box to select the main language of the environment. This language will be preset for each user, however, on the login screen or in their profile, each user can change the language to their own preference.
Allowed IP addresses – this field does not need to be changed.
After filling in all the data, you still need to assign a company to the administrator. To create a new company, click on the +Add Company button that appears in the bottom left corner.

A modal window will then appear with a form for entering company parameters. The meaning of individual fields is described in this article. Enter the necessary company parameters and save it. After saving, the modal window closes and the Create button in the admin form becomes available.

When the admin is created, they are added to the list of active users.

Customize Your Home Screen
Once the environment admin is created, personalization of the login screen can be done. To make these changes, log into CDESK as an administrator account and not as an management account. (Creating an administrator account was described above. )
Once logged in, go to Global Settings -> Logos, Domain, Files.

Domain – setting up your own domain is described below in Change domain of environment.
Favicon – icon displayed at the beginning of the tab in the web browser – setting the favicon is only possible after setting the custom domain, so it is also described in the paragraph Change domain of environment.
Logos

Custom Logo – Use Upload file to upload the logo that is displayed in the upper left corner above the main menu in CDESK. The maximum size of the uploaded file can be 300 kb. Clicking the Delete button deletes the uploaded logo and replaces it with the preset system logo.
Login logo – Pomocou tlačidla Nahrať súbor môžete nahrať logo, ktoré sa zobrazuje na prihlasovacej obrazovke. Maximálna veľkosť nahraného súboru môže byť 300 kb. Kliknutím na tlačidlo Zmazať sa vami nahrané logo zmaže a bude nahradené prednastaveným systémovým logom.
Pozadie prihlásenia – Use Upload file to upload an image that will be displayed in the background of the login screen. The maximum size of the uploaded file can be 1 MB. Clicking Delete deletes the uploaded image and replaces it with the preset system background.
Logo on invoice – Use Upload file to upload the logo that is displayed on issued invoices. The maximum size of the uploaded file can be 300 kb. Clicking Delete deletes the uploaded logo and replaces it with the preset system logo.
Logo for offer – Use Upload file to upload a logo that will be shown on issued offers. The maximum size of the uploaded file can be 300 kb. Clicking Delete deletes the uploaded logo and replaces it with the preset system logo.
Invoice Stamp/Signature – Use Upload file mto upload the stamp/signature that will be shown on issued invoices. The maximum size of the uploaded file can be 300 kb. Clicking Delete will delete the uploaded stamp/signature and nothing will be displayed on the invoice in the space provided for the stamp/signature.
Downloads – This section lists the files that will be displayed when the user clicks the Download button on the login screen. The procedure on how to upload files to this section and how to configure them is described below in this section.
Upload Downloads
CDESK allows you to upload files that will be available to anyone with access to the URL of a given CDESK environment. It is not necessary for the user to have login credentials to access them.
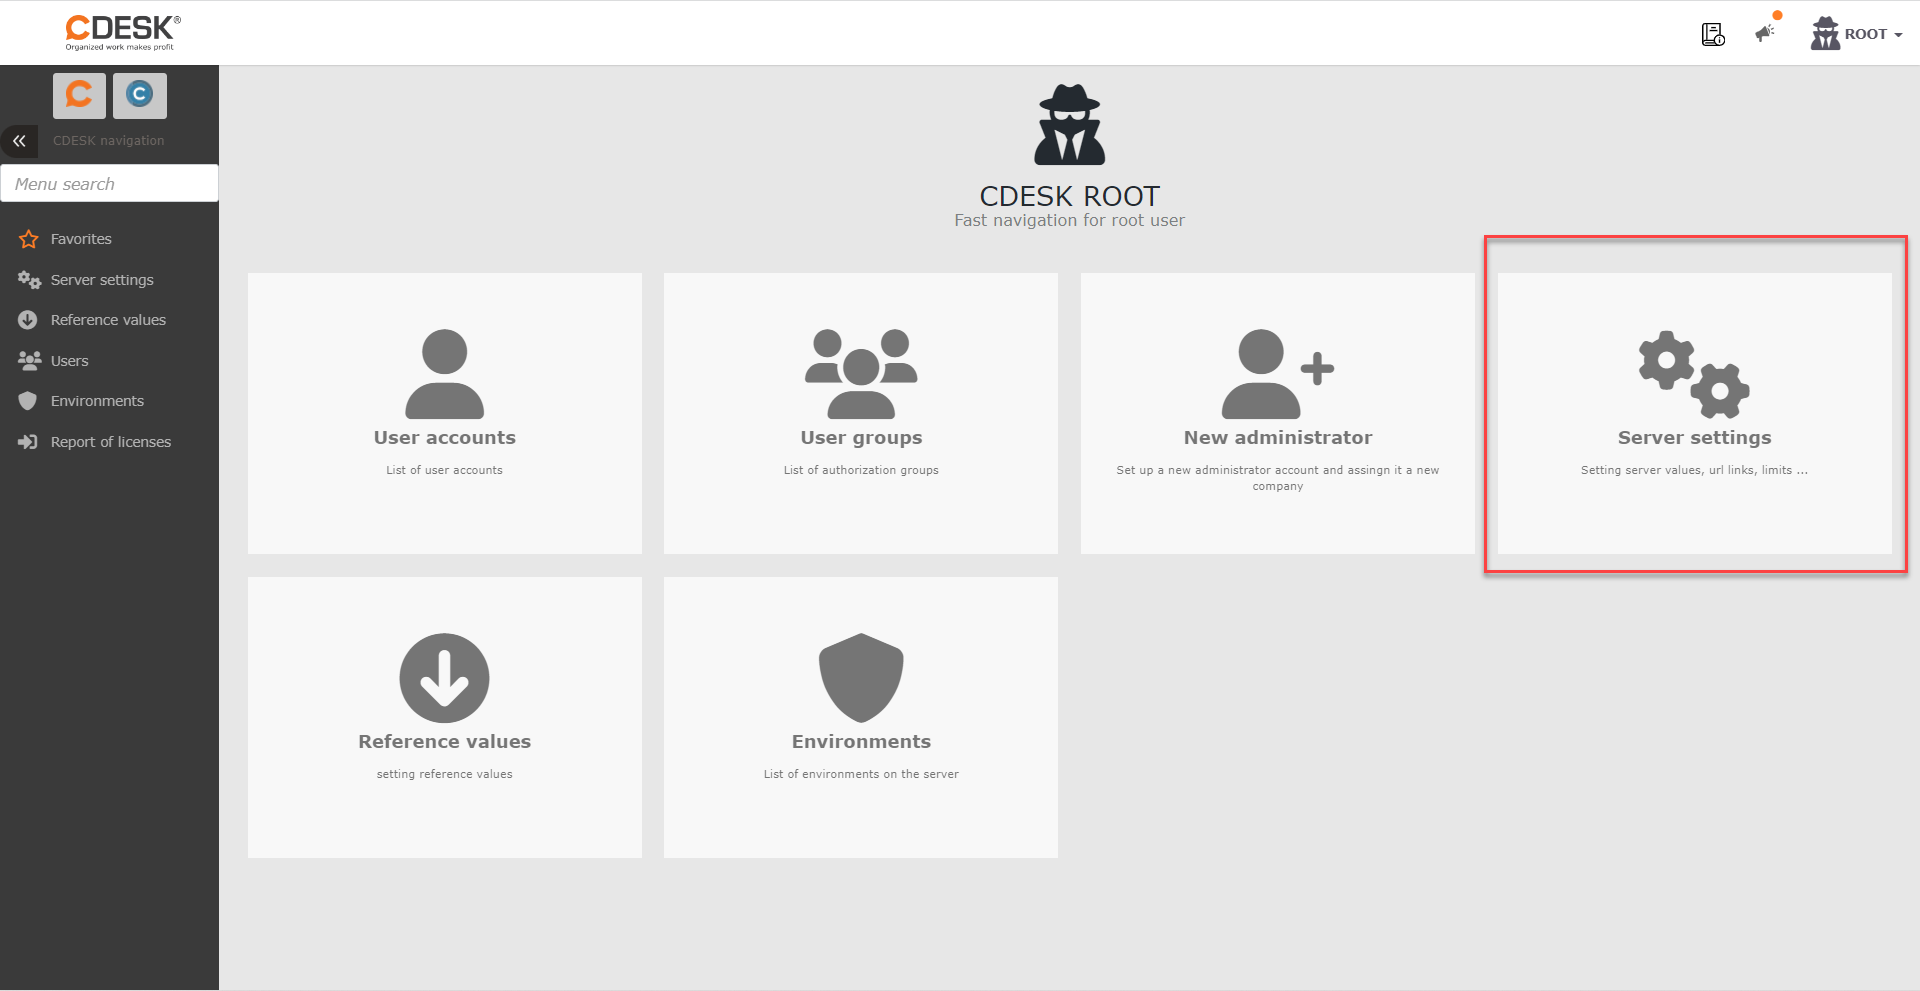
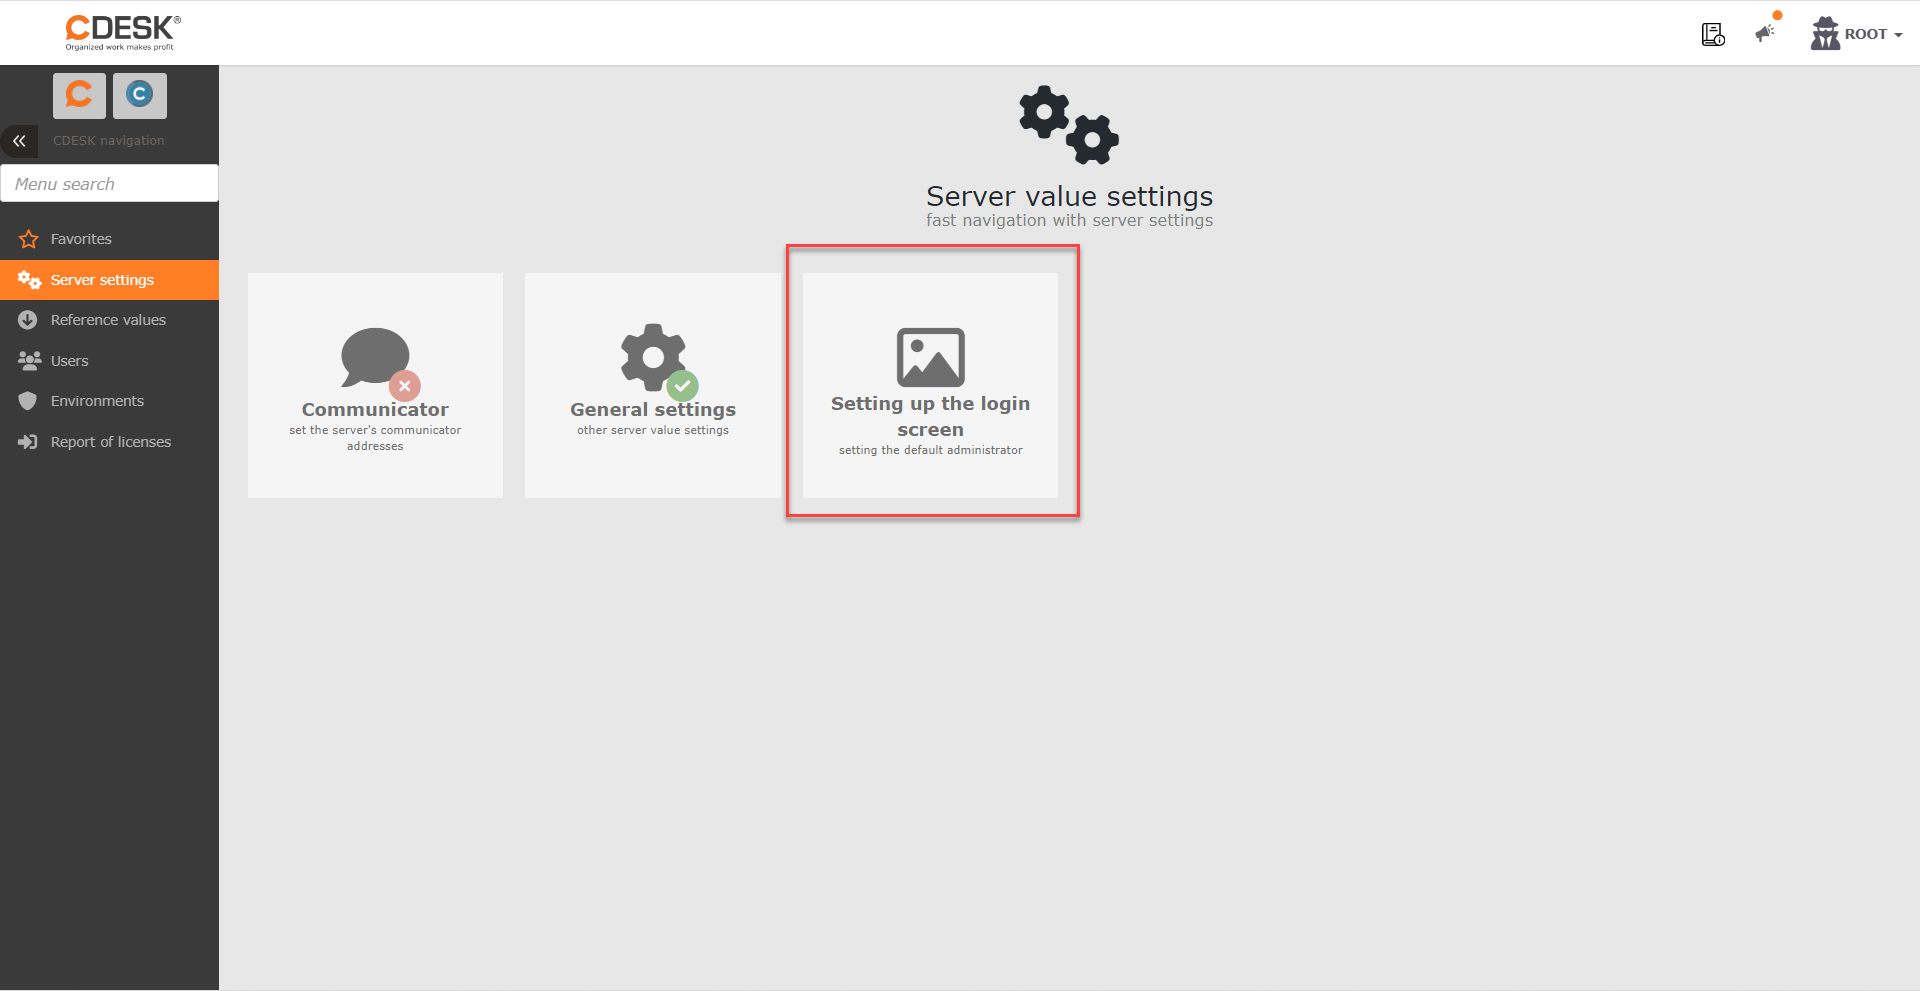
You can upload such files via administrator account to which you have obtained the login credentials pafter successfully instaling the CDESK/CM server. Once logged in, click on Server Settings and then Login Screen Settings.
Before uploading, you must select an admin in Default Admin for login screen. How to create an admin is described in this section.

You can then upload items for download in the Downloads section. To add an item, click Add item.

Once clicked, a form is displayed to upload an item.
Type – there are two options to choose from:
- File – when selecting this option, the form will be customized to upload a file that will be available for download. The form is customized primarily for uploading application.
- Link – when selecting this option, the form will be customized to enter the link to which the user will be redirected.
Item of File Type
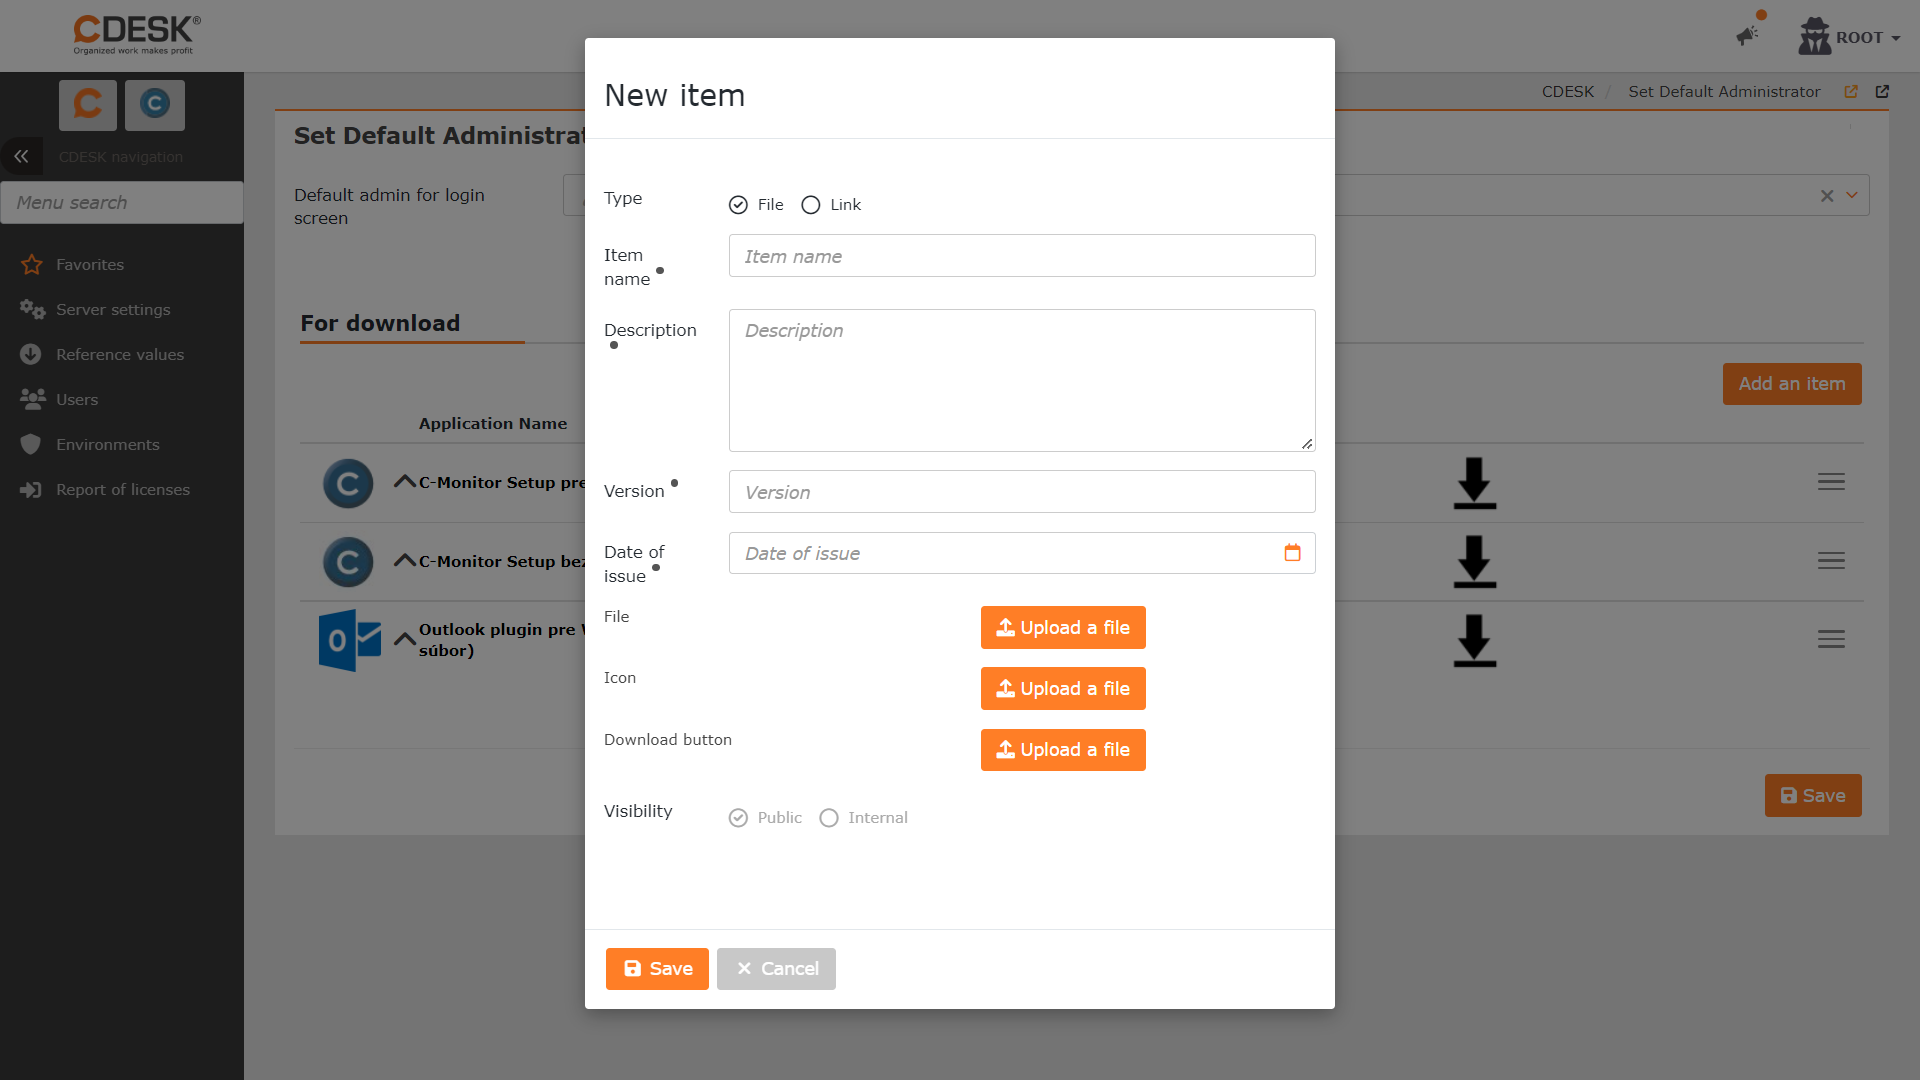
Item Name – enter name for the item that accurately describes it.
Description – enter description of the item, which will be displayed below the item name in the list of downloadable items. The description field is used to give more information on the item.
Version – enter a numeric indication of the version of the item. Only numbers separated by period are allowed. This information is especially useful when uploading applications.
Release date – click in the field to select the release date. This information is especially useful when uploading applications.
File – click Upload File to upload file/application you will be offering for download from your computer.
Icon – click Upload File to upload icon of the file/application. The recommended aspect ratio is 1:1. The icon will be 50×50 px when uploaded.
Download Button – click Upload File to upload a button icon from your computer, which will be used to download the uploaded file in the list of Downloads. The recommended aspect ratio for the button is 1:2. The button will be 100×50 px when uploaded. Uploading the button is optional. If you do not upload the button, the default Upload File button will be displayed in the list.
Visibility – currently, the visibility cannot be modified and all uploaded files are publicly accessible.
To save the download file, click on Save that is displayed in the bottom left corner of the modal window. When you click Save, the modal window is closed and the file will be added to the Downloads list.
Item of Link Type
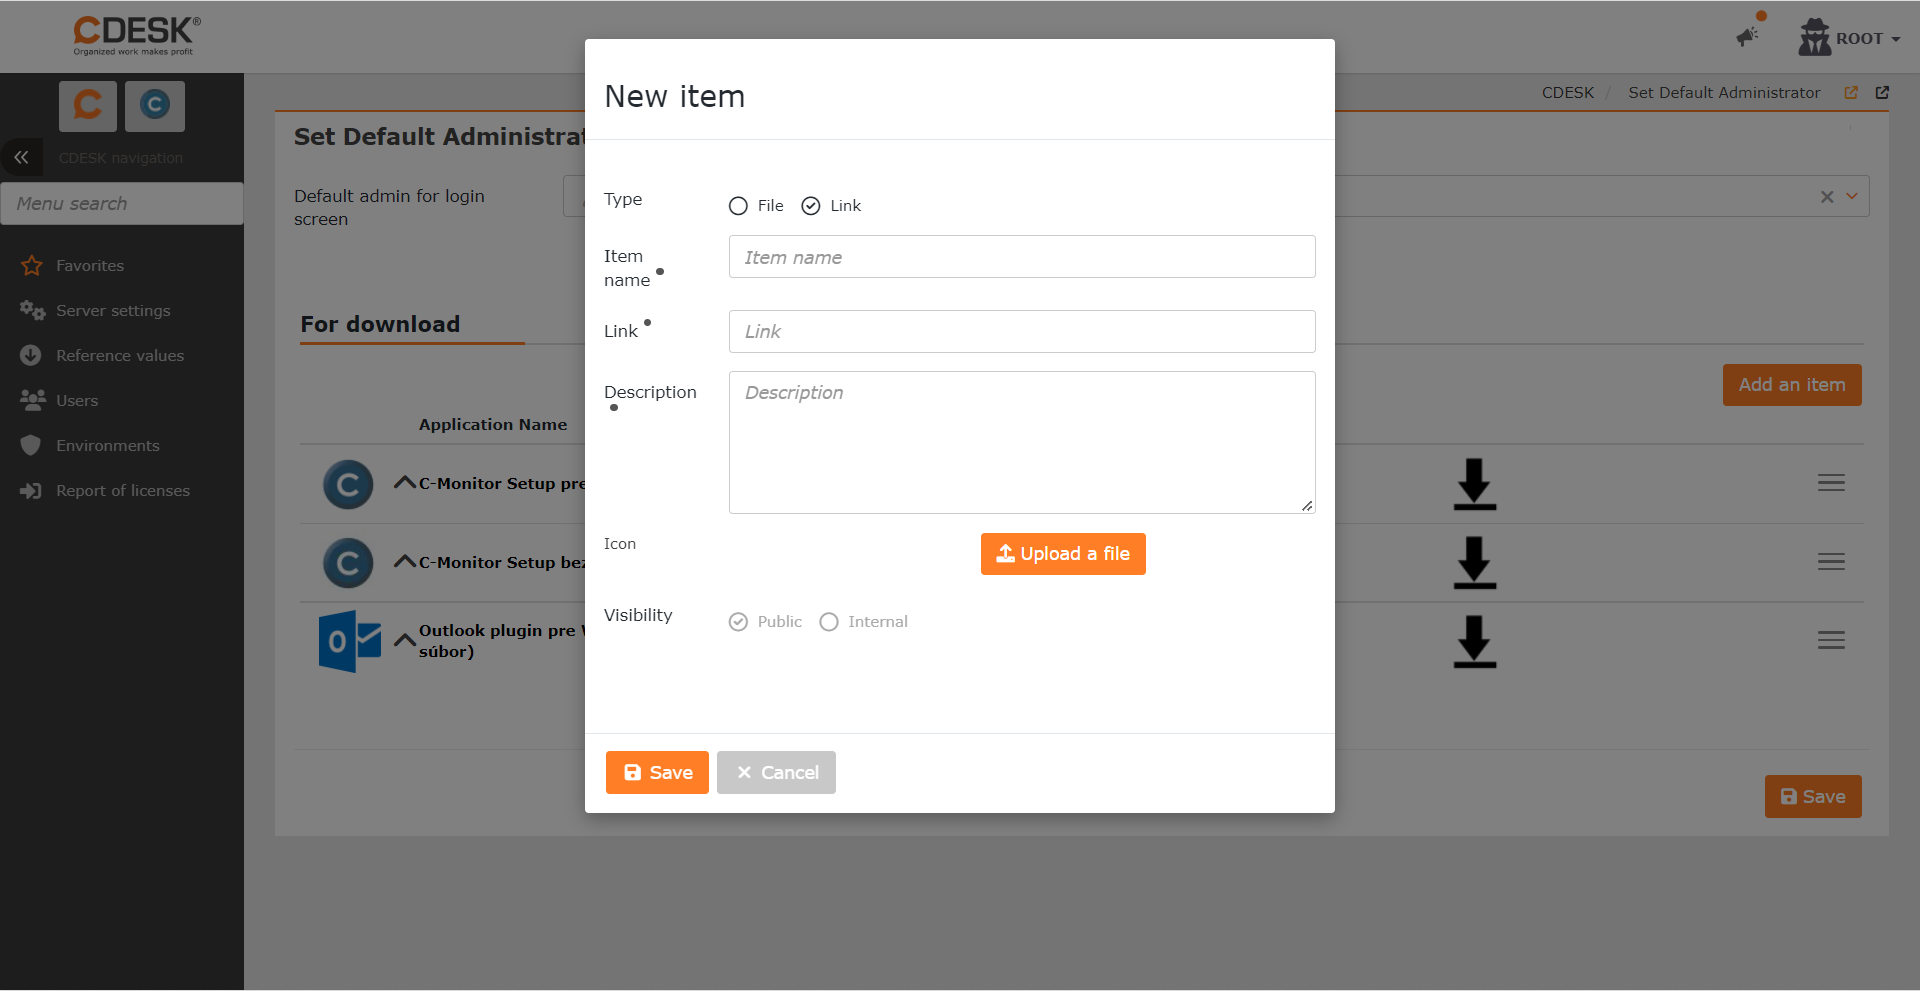
Item name – enter an item name that accurately describes the link.
Link – a field for inserting the link you want to make available.
Description – enter description of the link that will appear below the item name in the list of downloadable items. The description field is used to give more information on the item.
Icon – click Upload File to upload an icon describing the link. The recommended aspect ratio is 1:1. After uploading the icon will be 50×50 px.
Visibility – currently, the visibility cannot be modified and all uploaded links are publicly accessible.
To save the click-through link, click on Save that is displayed in the bottom left corner of the modal window. When you click Save, the modal window is closed and the link is added to the Downloads list.
Edit Download File
You can change parameters of the uploaded file/link after uploading. Click on the context menu icon ![]() ,which appears at the end of the line of the item and select Edit. When clicked, the form is displayed as when uploading an item. All fields in the form can be edited.
,which appears at the end of the line of the item and select Edit. When clicked, the form is displayed as when uploading an item. All fields in the form can be edited.
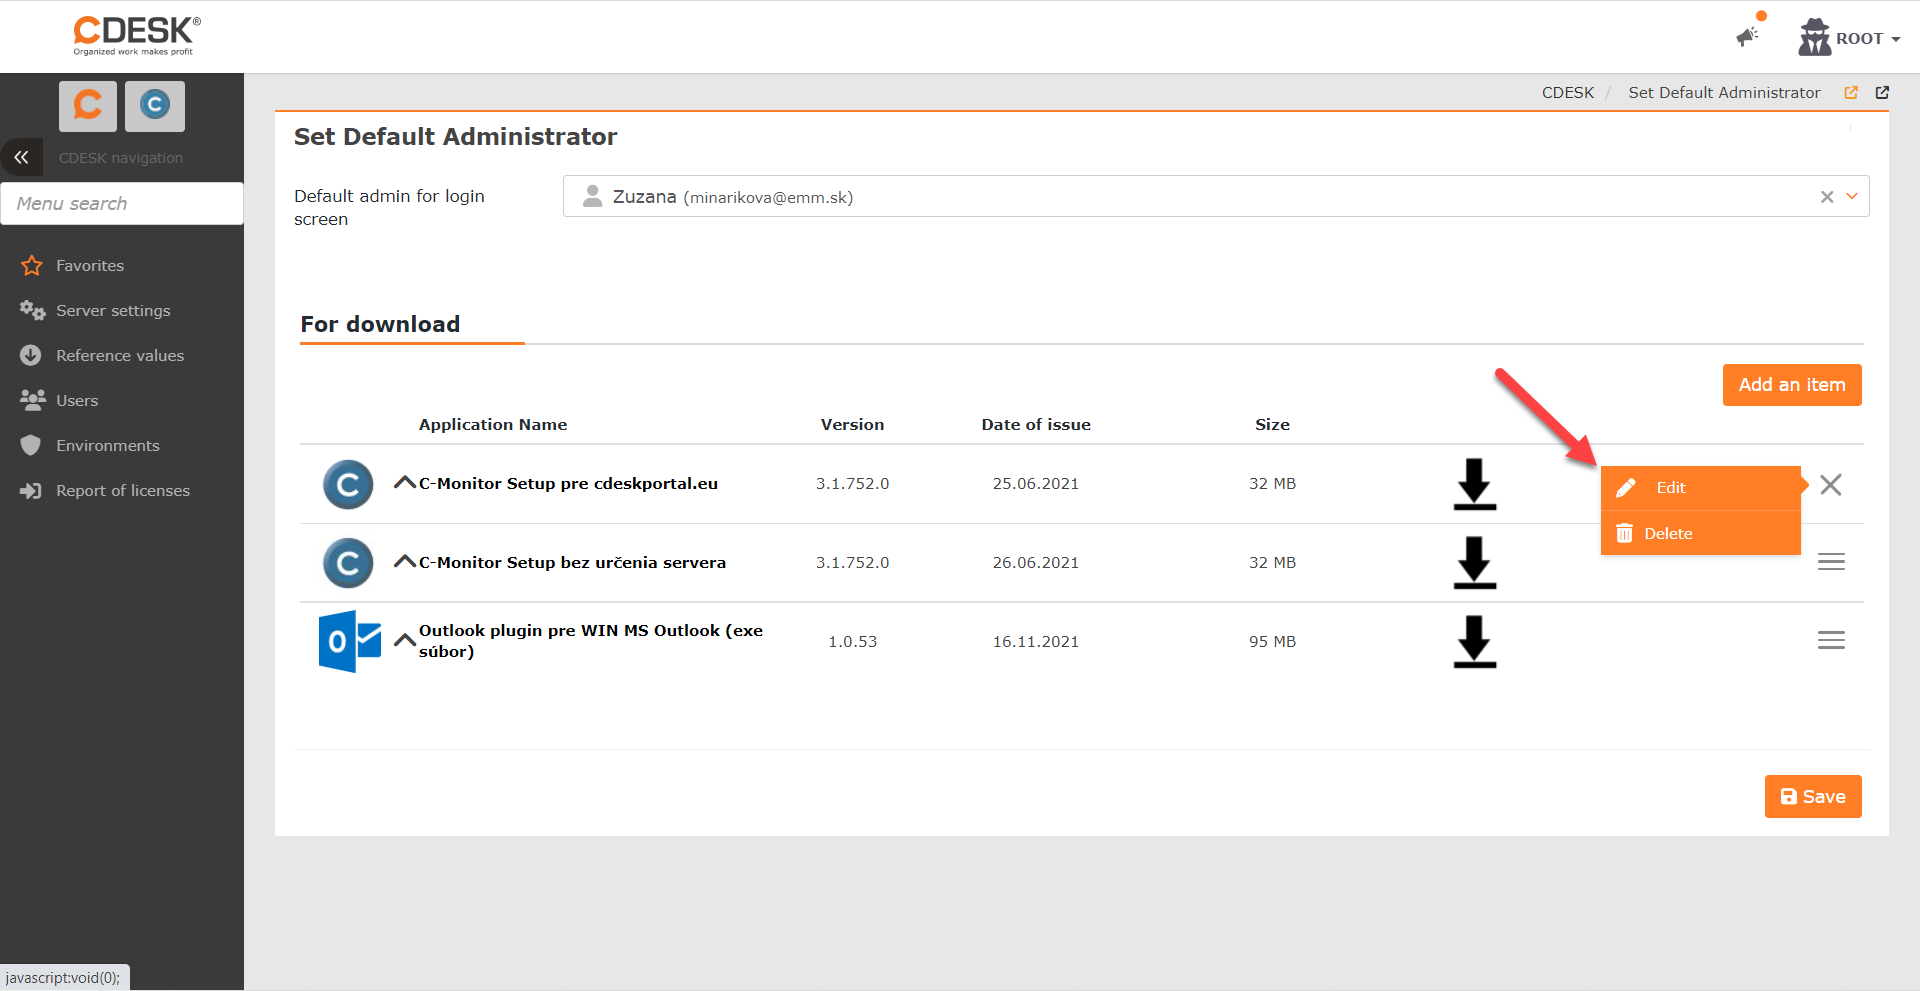
Delete Download File
If necessary, you can delete the item so that it will no longer be offered for download on the login screen. To delete an item, click on the context menu icon ![]() , which appears at the end of the item’s row, and select Delete. When you click this option, you will still be asked the control question Do you really want to delete this? Clicking on it will delete the item.
, which appears at the end of the item’s row, and select Delete. When you click this option, you will still be asked the control question Do you really want to delete this? Clicking on it will delete the item.

Access Downloads from User’s Perspective
You can also access the downloadable items without logging into CDESK. After entering the URL of the server, a login screen is displayed. To view downloadable items, click on the For Download button that is displayed at the bottom of the window.

When clicked, the items that have been uploaded using the procedure described above are displayed.

Add Another Server Domain
To change the environment domain, first log in to CDESK as admin and go to Global Settings -> Logos, Domain, Files. Then under Domain turn on the Custom CDESK/CM server domain toggle. When the switch is set to on position ![]() , a field for entering a custom domain will become available.
, a field for entering a custom domain will become available.

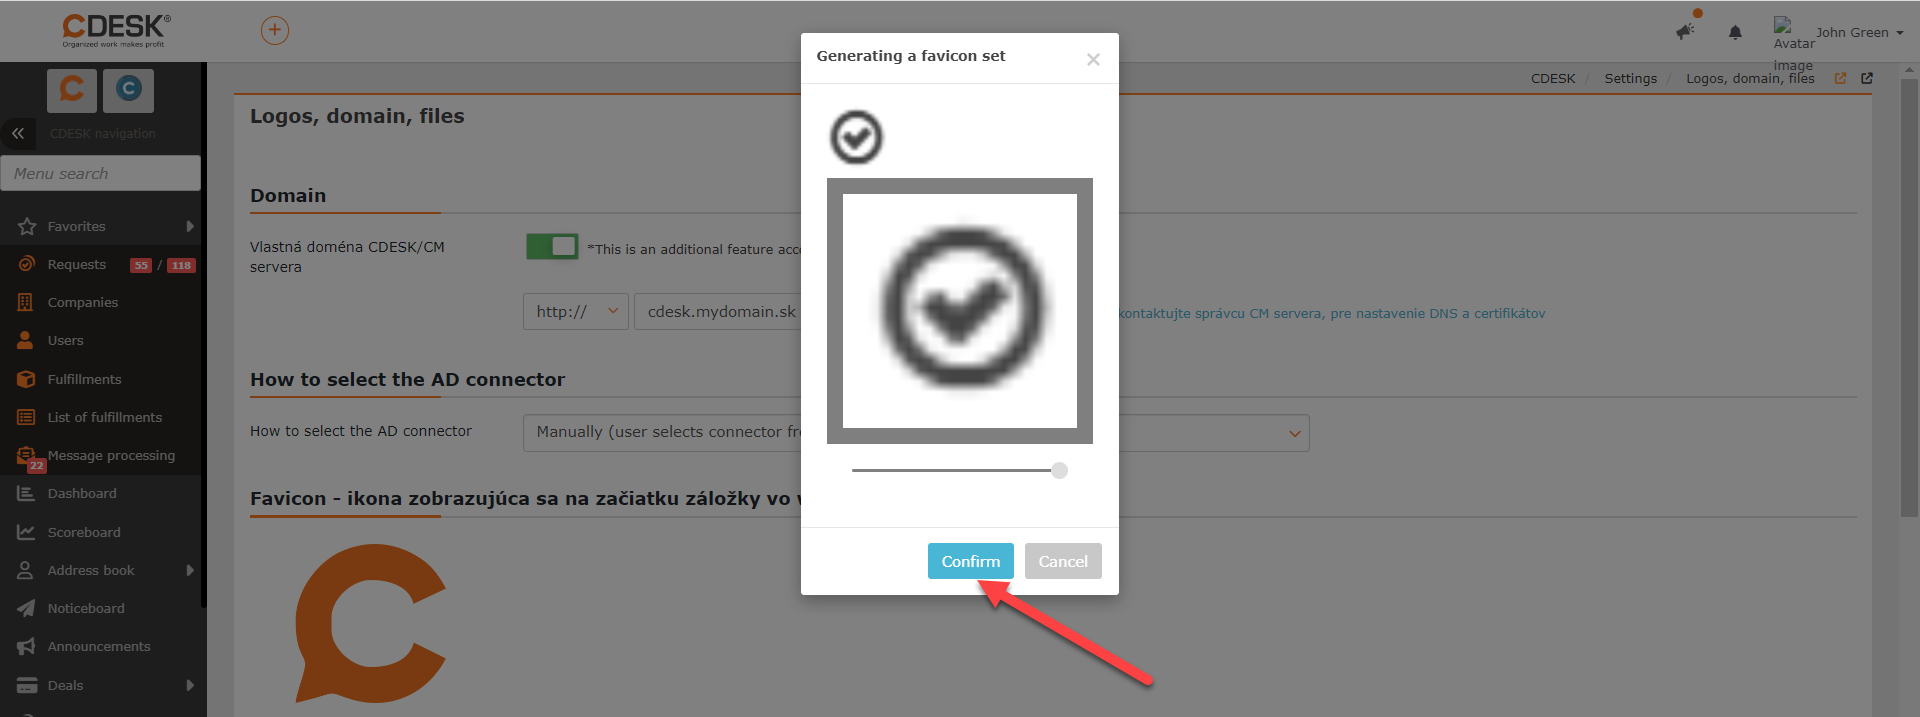
After setting your own server domain, you can also change the favicon, which is the icon that is displayed at the beginning of the tab in the web browser. To change the favicon, go to the Favicon section and click Change.
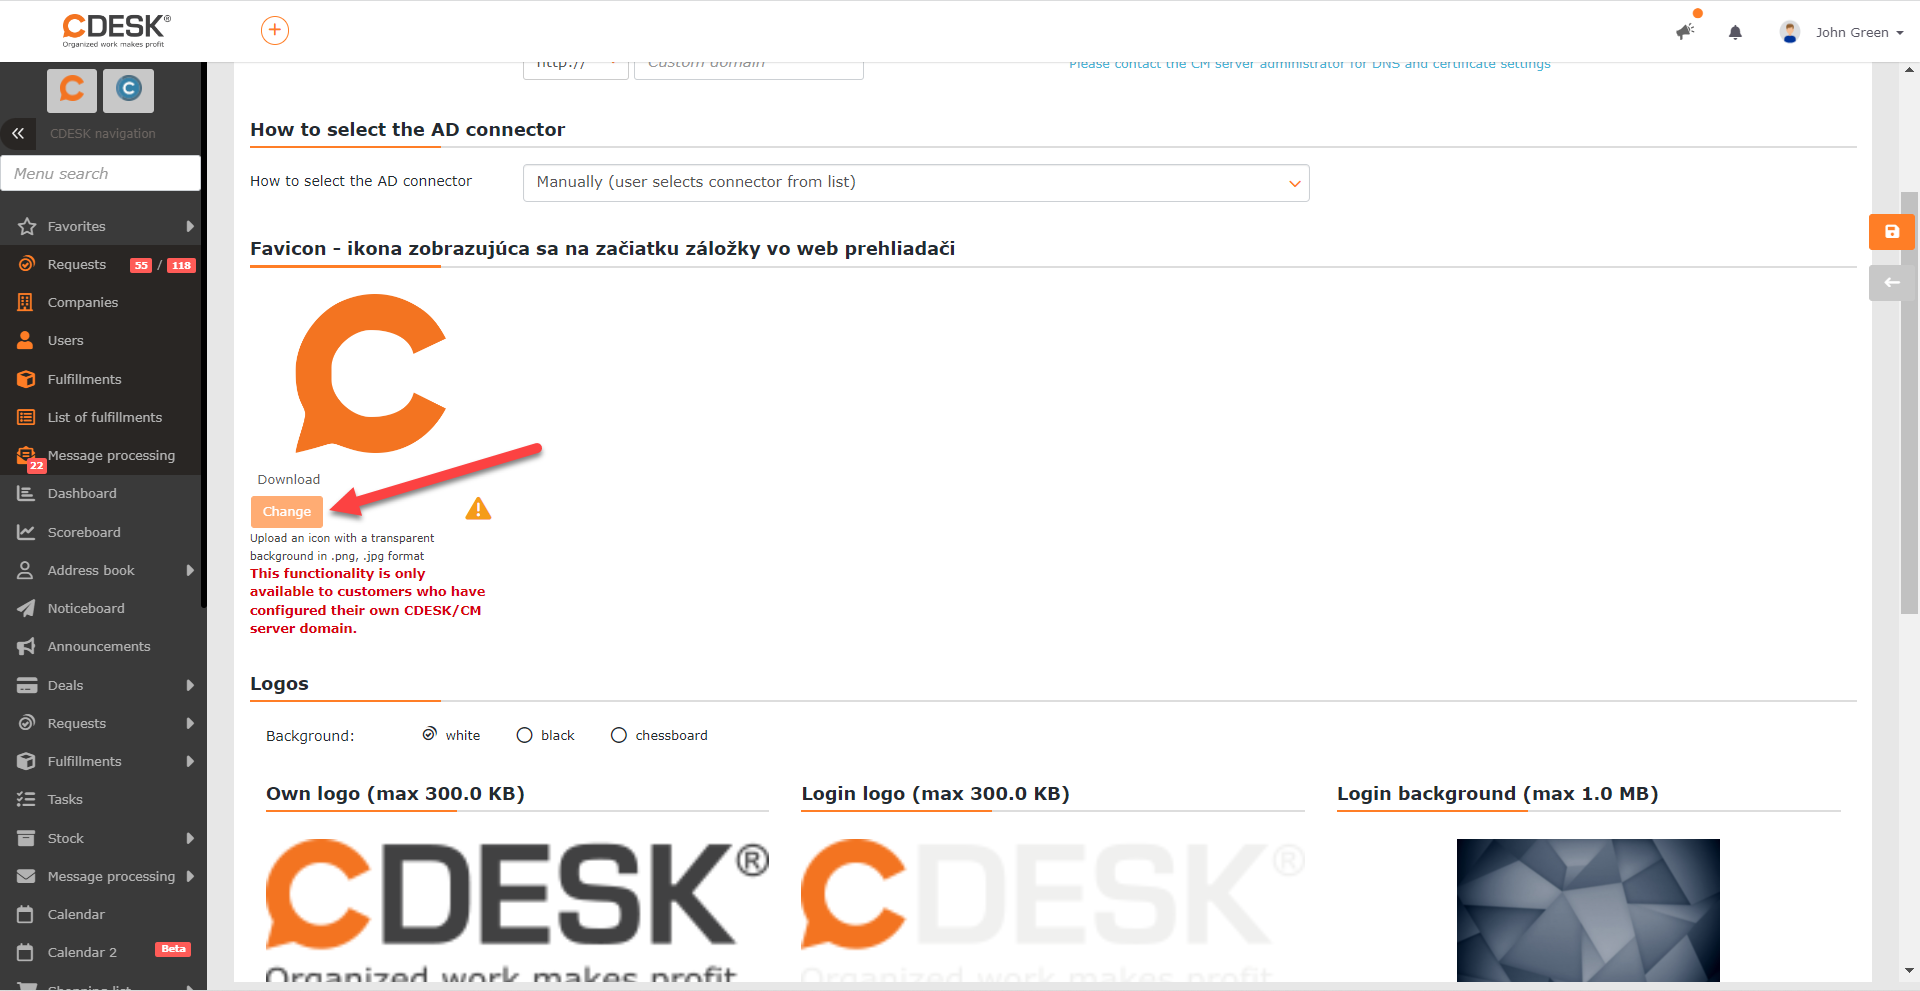
When clicked, a modal window for uploading the favicon is displayed. Clicking the Upload File button will open a window for selecting a favicon from your computer. Select an icon with a transparent background and in .png or .jpg format.
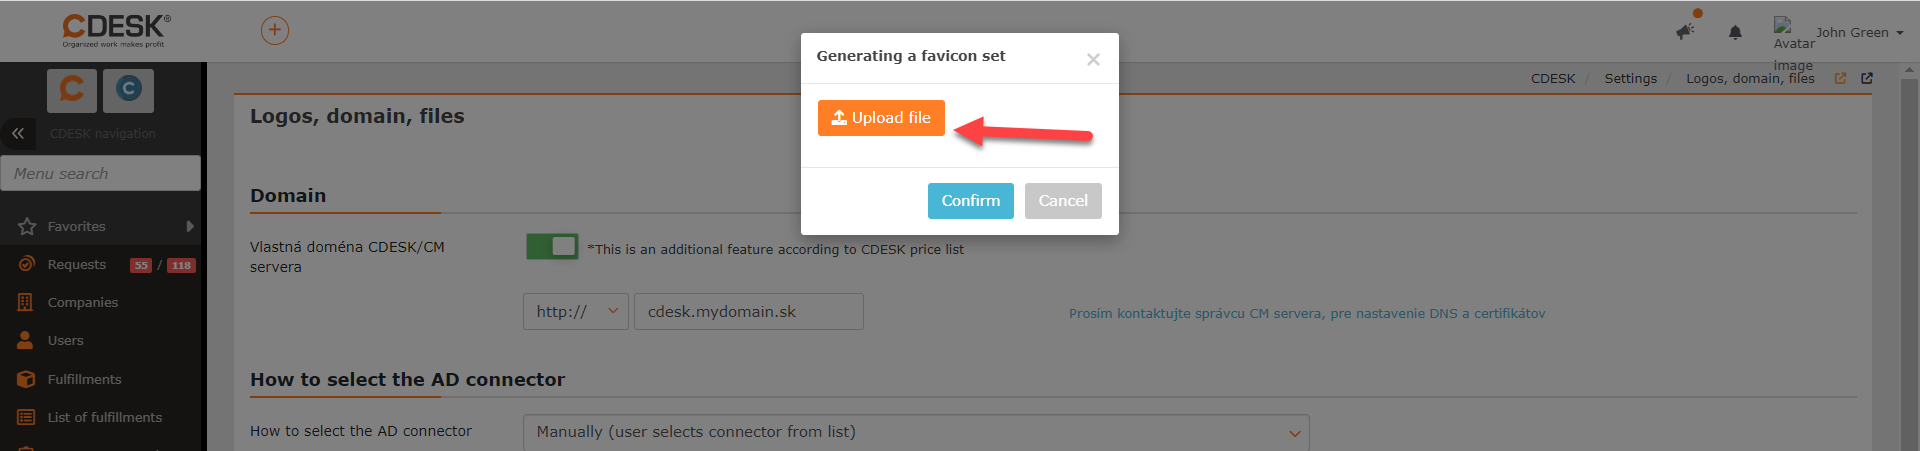
When you select an icon, a window is displayed to crop the selected icon. To confirm the icon, click Confirm.
Possible Configuration Changes during Use
Change Server’s Primary Domain
During server operation, you may need to change the server’s primary domain. A license is bound to this domain, the default mail domain.
For additional information, the CDESK/CM server can be simultaneously run on other domains that can be set up directly in the CDESK environment. For a more detailed description, see Add Another Server Domain.
Before making a change, you need to consider what type of SSL certificate will be operated for the new domain. If you will be running Let’s Encrypt, you do not need to prepare anything beyond the standard settings described in the CDESK/CM Server Installation Procedure.
To change the server’s primary domain, first navigate to the installation folder and type the command:
ll
After entering the command, the following options will be displayed:
- cdesk-server-install-file_name.log
- cdesk-server-install.sh
- config-cdek-server-domain-name.sh
- config-certificate.sh
- config-email.sh
- zip
- docker-files
- imap-management.sh
- outgoing-email-whitelist-settings.sh
To change the server’s primary domain, type the command
./ config-cdesk-server-domain-name.sh
You will then be asked if you wish to continue (yes/no). Type yes to continue. The SERVER DOMAIN NAME (current_server_name.com) field is displayed. The name of the current server is in parentheses. Enter the name of the new primary server domain and confirm the selection by pressing Enter. You will then be asked if the values you entered are correct [yes/no/cancel]. Type yes to continue. The data update will start. After this, the primary domain is changed.

Since the domain has been changed, you need to re-generate the license following the procedure described in the First Start-Up and Insertion of License for the CDESK/CM Server.
Change Deployed Certificate for Custom Certificate
You can also change the certificate you are using during server use. To change it, navigate to the address book where the installation package is located.
cd /file_name
Then enter the certificate configuration command
./config-certificate.sh
After pressing Enter, a menu with the following options is displayed:
- Lets-Encrypt
- Custom-purchased-certificate
- Self-signed-certificate
- Quit
Type 2 and press Enter to confirm. You will then be asked if you wish to continue: Container reload will be necessary. Do you wish to continue? (yes/no). To continue, type yes and continue by pressing Enter. You will be prompted to enter the path to the .crt and .key files. The procedure is identical to using a custom SSL certificate, see the section above.
