UNIVERSAL BILLING VIA DEALS
Page contents
Billing via Deals works independently of requests. Tasks that will be billed via Deals can be linked to any object. This method of billing is typical for services billed after certain period of time, after project completion, or after the delivery of a complete package of work. Another advantage is the ability to bill for one-off work along with periodic fees.
In CDESK, the following invoices can be created:
- final invoice – is recorded in the accounts for tax purposes. The registration is done manually or transferred to the accounting system via the ERP connector, including the automatic dispensing of material from the warehouse.
- fictitious invoice – basis for creating a final invoice in ERP, while the detailed work breakdown is generated from CDESK.
Creating a Deal – the Basis of Any Billing
The first step is to enter a Deal. All the details can be found in Creating a Deal.
Supported Work and Regular Fee Types for Billing via Deals
You can add billing items to the deal on the Billing tab. If the tab does not appear, check your permissions. Set the permissions to access the tab in Users and Groups -> Users -> choose a user -> Permissions tab -> Deals -> Access to Tabs -> Billing.
Accounting units – to invoice deals directly via CDESK, you must first select the accounting unit defined in Global Settings->Billing, under Companies – Accounting Units||.
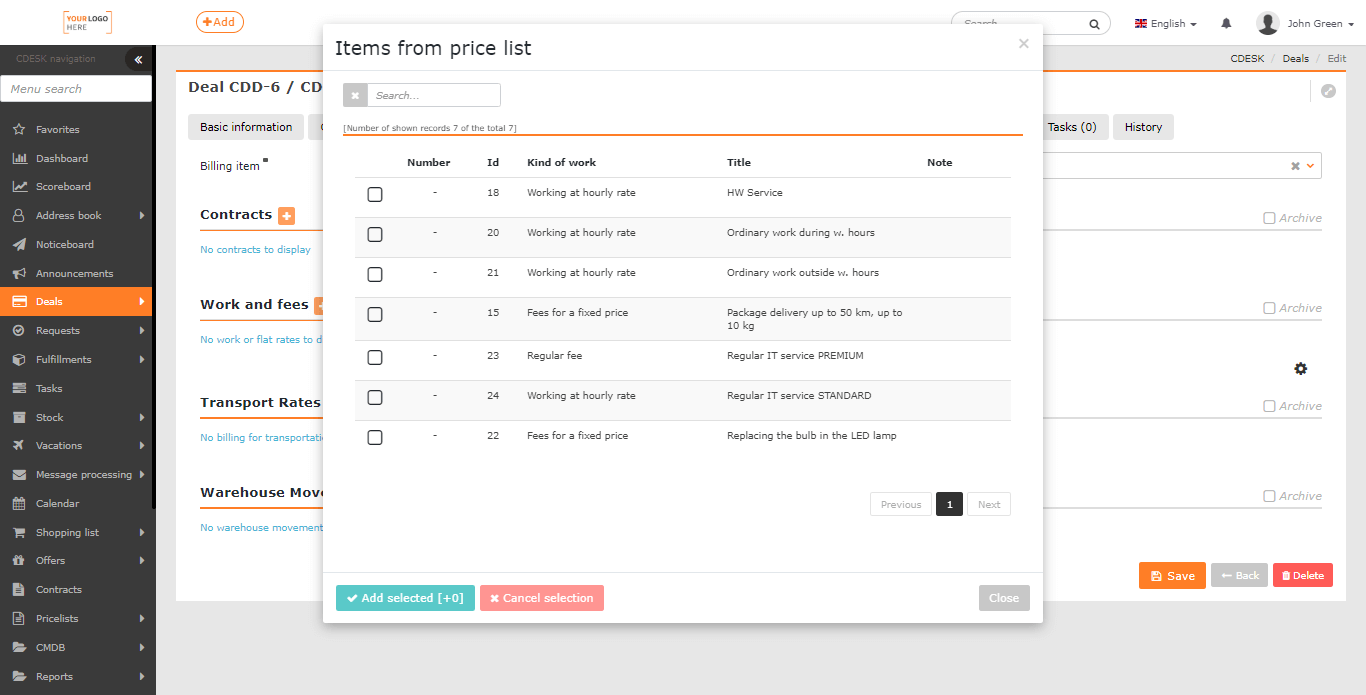
Work and regular fees to be billed can be added in the Work and Fees section. To create a new entry, click the + icon. If you wish to add an item from the price list, use the + From Price List of Work button. When clicked, a window for selecting items will open. For more information on creating price list entries, see Price List of Work and Fees. The button to add work and fees items from the price list is only displayed if you have permission to access the Work and Fees Price List. Permissions can be set in Users and groups -> Users -> choose a user -> Permissions tab -> Price lists -> Price List of Work and Fees.
Work Paid at Hourly Rate
For work that you charge by time worked for a price per hour, use Work at Hourly Rate.
PTo create a new record, click the + button. When clicked, a new window will open. Required entries are marked with *.
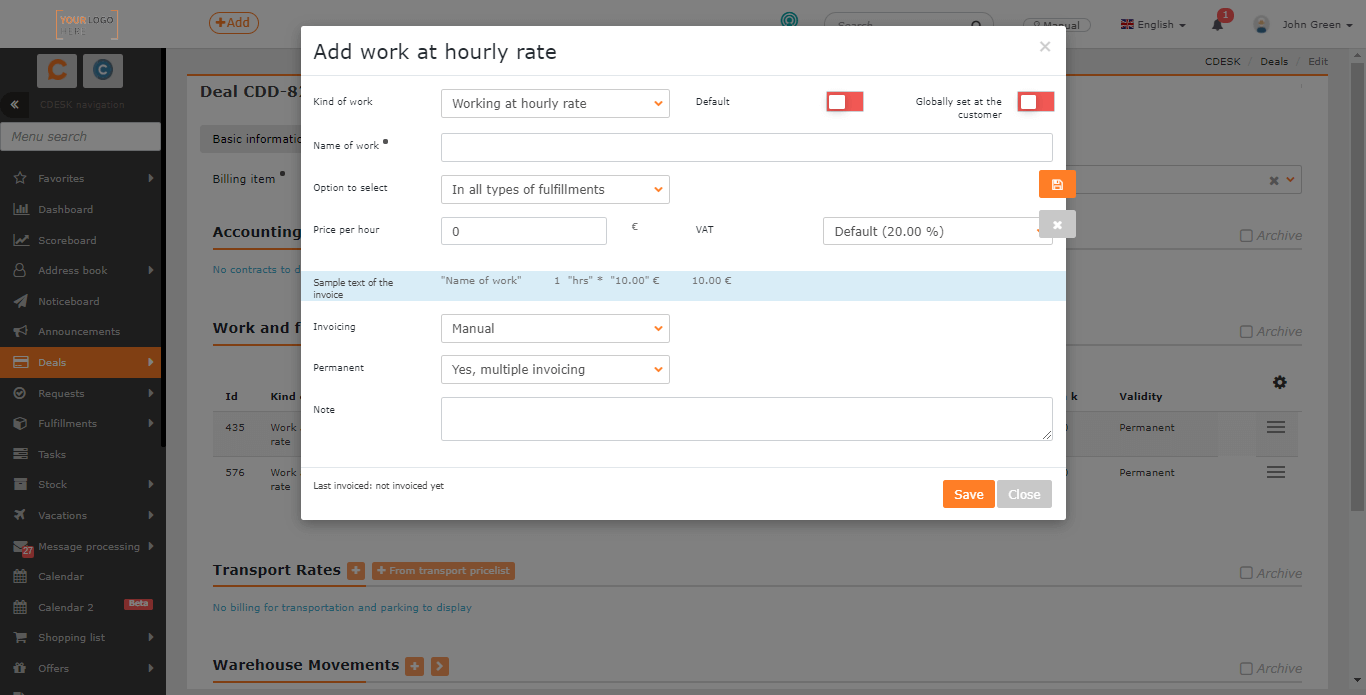
Type of work – select Work at hourly rate.
Workʼs title• – name of the item that will appear in the fulfillment in the billing item selection and will also be used as the line name on the invoice.
Possible to select
- In all types of fulfillments – the item will be selectable in both non-claim and claim fulfillments
- Only in non-claim fulfillments – the item will only be selectable in non-claim fulfillments
Only in claim fulfillments – the item will only be selectable in claim fulfillments. These are fulfillments that are not invoiced. For more information on claim fulfillments, see the article Fulfilments.
Price per hour – hourly rate in currency that is set as default in Global Settings -> Billing in Currency section. This price is without VAT.
VAT – pre-populated default VAT with the possibility to change it according to the defined VAT levels in Global Settings -> Billing in the VAT rates section.
Multiple – select whether you want the item to be offered after invoicing.
- Yes, multiple invoicing – allows continuous invoicing of hours worked under this billing item. Example: work on a deal may take place over several months, but you need to invoice the customer for the hours worked on an ongoing basis after the end of each month.
- No, one-time invoicing – once the invoicing is done, the billing item is archived, and it is no longer possible to select this item on fulfillments. At the same time, the billing item will be archived and hidden in the list of work and fees. If everything within the billing item has been invoiced, you can only find it in the invoice archive.
For explanations of other settings that are common to all billing items, see Common Settings for Billing Items.
Actions at Unit Price
This is for work charged in an agreed unit amount and in the actual quantity worked. For example, the installation of an electrical socket is agreed at a certain unit price and you invoice according to the actual number of sockets installed. At the same time, you can keep track of how long it took you to install a given number of sockets.
To create a new record, click the + button. When clicked, a new window will open. Required entries are marked with *.
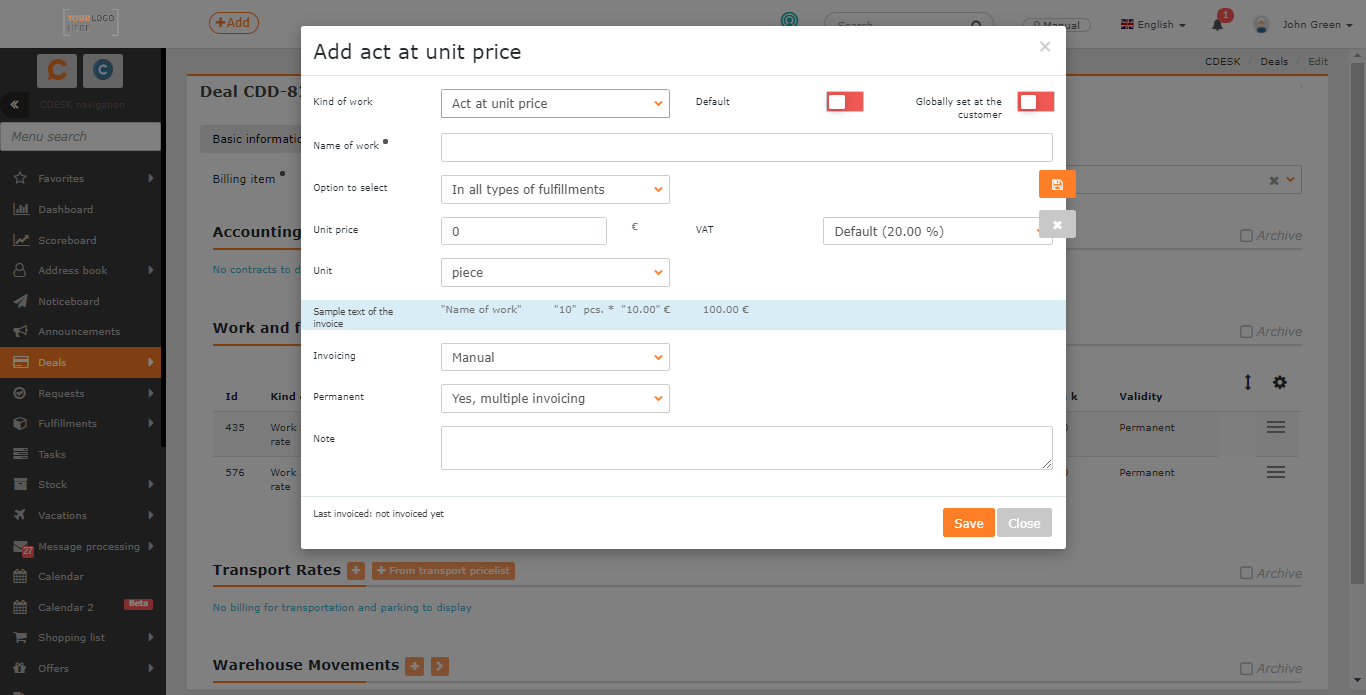
Type of work – select Actions at unit price.
Workʼs title• – name of the item that will appear in the fulfillment in the billing item selection and will also be used as the line name on the invoice.
Possible to select
- In all types of fulfillments – the item will be selectable in both non-claim and claim fulfillments
- Only in non-claim fulfillments – the item will only be selectable in non-claim fulfillments
Only in claim fulfillments – the item will only be selectable in claim fulfillments. These are fulfillments that are not invoiced. For more information on claim fulfillments, see the article Fulfillments.
Unit price – unit rate in the currency that is set as default in Global settings -> Billing|in the Currency section. The unit to which the price is linked can be selected below in the Unit section. You can configure the units offered in this menu in Global Settings -> Billing in the Units section.
VAT – the field is displayed only if the entity is a VAT payer. The default VAT is pre-populated with the possibility to change it according to the defined VAT levels inGlobal settings -> Billing|in the VAT rates section.
Multiple – select whether you want the item to be offered after invoicing.
- Yes, multiple invoicing – allows for continuous invoicing of actions performed. Example: you have agreed to clean a space for a certain unit price and invoice according to the actual cleaning performed. In CDESK you just need to mark the actual cleaning performed and the invoicing process will automatically calculate how many cleanings you have performed in the billing period.
- No, one-time invoicing – once the invoicing is done, the billing item will be archived and it will no longer be possible to select this entry on the fulfillments. At the same time, the billing item will be archived and hidden in the list of work and fees. If everything within the billing item has been invoiced, you will only find it in the invoice archive.
For explanations of other settings common to all billing items, see Common Settings for Billing.
To add an item to the Deal, use the Add button. Selecting Closewill close the window without adding the item.
Fees for a Fixed Price
This billing item is primarily intended for one-off invoicing of services provided at a unit price, e.g. pump repair, server installation. You can also use this billing item for recurring invoicing of fixed charges.
To create a new record, click the + button. When clicked, a new window opens. Required entries are marked with *.

Type of work – select Fee for a fixed price.
Invoice Items• – the name of the item, which will be displayed in the fulfillment in the billing item selection and will also be used as the line name on the invoice.
Possible to select
- In all types of fulfillments – the item will be selectable in both non-claim and claim fulfillments
- Only in non-claim fulfillments – the item will only be selectable in non-claim fulfillments
Only in claim fulfillments – the item will only be selectable in claim fulfillments. These are fulfillments that are not invoiced. For more information on claim fulfillments, see the article Fulfillments.
Fixed price – fixed rate in the currency that is set as default in Global settings -> Billing|in the Currency section. The unit to which the price is linked can be selected below in the Unit field.
VAT – The field is displayed only if the entity is a VAT payer. The default VAT is pre-populated with the possibility to change it according to the defined VAT levels in Global settings -> Billing in the VAT rates section.
Number – enter a numeric figure for the number of fees for a fixed price.
Unit – enter the unit in which the fixed price fees are recorded. You can configure the unit menu in Global Settings -> Billing under Units||.
Multiple – select whether you want the item to be offered after invoicing.
- Yes, multiple invoicing – allows you to invoice a fixed fee repeatedly. Example: you can invoice this way a simple regular fee if you invoice every month.
- No, one-time invoicing – once the invoicing is done, the billing item is archived and it is no longer possible to select this item on fulfillments. At the same time, the billing item will be archived and hidden in the list of work and fees – you will only find it in the invoice archive.
To add an item to Deal, use the Add button. SelectingClose will close the window without adding the item.
For explanations of other settings common to all billing items, see Common Settings for Billing Items.
Regular Fees Without Prepaid Hours
Regular fee with no prepaid hours is for invoicing services where a fixed amount is billed for a specific period, e.g. a month. You do not provide any prepaid time to the customer under this service. Any amount of time worked under such a regular fee service will not affect the amount of invoicing as the service has a fixed rate. You can use the time worked records to evaluate the profitability of the service provided.
To create a new record, click the + button. When clicked, a new window will open. Required entries are marked with *.

Type of work – select Regular fee.
Package name• – name of the item that will appear in the fulfillment in the billing item selection and will also be used as the line name on the invoice.
Possible to select
- In all types of fulfillments – the item will be selectable in both non-claim and claim fulfillments
- Only in non-claim fulfillments – the item will only be selectable in non-claim fulfillments
- Only in claim fulfillments – the item will only be selectable in claim fulfillments. These are fulfillments that are not invoiced. For more information on claim fulfillments, see the article Fulfillments.
Regular fee – price in the currency that is set as default in Global Settings -> Billing under Currency.
VAT – the field is displayed only if the entity is a VAT payer. The default VAT is pre-populated with the possibility to change it according to the defined VAT levels in Global Settings -> Billing in the VAT rates section.
Number – indicate the number of times the fee is charged within the billing period.
Unit – select from the code list in which unit the fee will be charged (e.g. pcs)
Prepaid hours – to create a regular fee record without prepaid hours, set the switch to off position ![]() .
.
Invoice period – specify the interval at which the regular fee is to be billed. The figure stands for the number of months.
Prepaid transport – it is likely that you will not use prepaid transport on a regular fee plan without prepaid hours. You can read more about prepaid transport in the section Regular Fee with Prepaid Hours.
Valid from• – select the date from which the regular fee will be charged and invoiced.
Valid until – select the date until which the regular fee will be charged and invoiced. The item is optional. If you leave the field blank, it will be charged until the deal is completed.
For explanations of other settings common to all billing items, see Common Settings for Billing Items.
To add an item to Deal, use the Add button. Selecting Closewill close the window without adding the item.
Regular Fee with Prepaid Hours
The customer is charged a fixed amount at regular intervals, within which you commit to provide your time – prepaid hours. Time worked excessing the prepaid hours is automatically billed at the rates you select in the billing items associated with that regular fee. (See Invoicing Beyond Prepaid Hours at Different Rates). The system configuration offers additional options for processing prepaid hours – such as carrying over unused hours, resetting unused hours.
To create a new record, click the + button. When clicked, a new window opens. Required entries are marked with *.
Type of work – select Regular Fee.
The meaning of fields that appeared in the window after selecting the Regular fee option is described above in the section Regular Fee Without Prepaid Hours.
Prepaid transport – it’s likely that with a regular fee with prepaid hours, you’ll also negotiate prepaid transport with the customer. Putting the switch in the on position ![]() makes the fields available for entering the extent of transport that is prepaid. It is deducted from the transport entered on the fulfillments.
makes the fields available for entering the extent of transport that is prepaid. It is deducted from the transport entered on the fulfillments.

Prepaid distance – enter a number in kilometers if you want to record prepaid distance as part of the regular fee. If the distance travelled is also recorded when performing linked fulfillments, the figure entered on the fulfillment will be deducted from the prepaid transport. For instructions on how to record the distance travelled on fulfilments, please refer to the text Fulfillments.
Prepaid time – enter a number in kilometers if you want to record prepaid transport time as part of the regular fee. If transport time is also recorded when performing linked fulfillments, the figure entered on the fulfillment will be subtracted from the prepaid transport. For instructions on how to record transport time on fulfillments, see the text Fulfillments.
Prepaid Fixed Transport – if you record fixed transport on linked fulfillments, enter the number of fixed transport available here. In the case of fixed transport, neither the distance travelled, nor the duration is taken into account. For instructions on how to record fixed-price transport on fulfillments, see Fulfillments.
Prepaid price of parking – if you record parking charges on the linked fulfillments, enter the prepaid parking price here. For instructions on how to record the parking charge on fulfillments, see Fulfillments.
To enter a regular fee with prepaid hours, you need to turn on the switch in the Prepaid hours part. When the switch is on ![]() additional fields for setting prepaid hours become available.
additional fields for setting prepaid hours become available.

Prepaid hours – this field indicates the amount of prepaid hours within the regular fee.
Rate at overdrafts – enter the hourly rate when prepaid hours are exceeded.
Transfer of unused hours
- Add to the next period – unused hours will be added to the next period, so you will have more prepaid hours in the next period.
- Do not transfer – forfeit – unused hours will not be added to the next period. You will have the same number of prepaid hours available in each period, regardless of whether you use them or not.
Transferred hours from past – if the customer had some unused hours from the past that they wish to carry over to the new regular fee, please indicate the amount. This setting is useful for making adjustments for the next invoicing
For explanations of other settings that are common to all billing items, see Common Settings for Billing Items.
To add an item to the Deal, use the Add button. Selecting Close will close the window without adding the item.
Invoicing Beyond Prepaid Hours at Different Rates
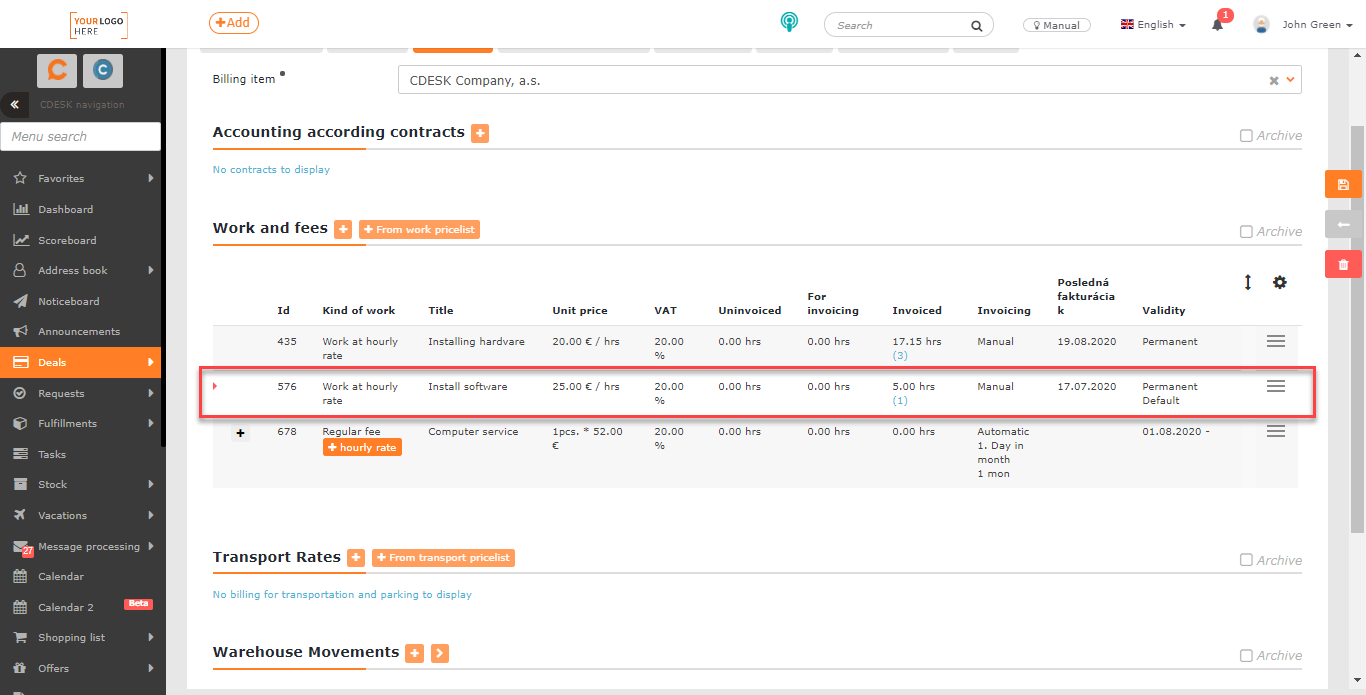
If you only create a billing item Regular fee with prepaid hours, time beyond the prepaid hours will be charged at one rate only. To charge this time at multiple rates, you need to create additional billing items under the regular fee of Work at Hourly Rate type. The work entered in all billing items belonging to the regular fee is added up chronologically at invoicing. Fulfillments are sorted according to the time they were performed, and the moment the summation exceeds the number of prepaid hours, the additional fulfillments are invoiced according to the billing item they belong to.
To add a new work at hourly rate to the regular fee, use the + button next to the name of the regular fee. When clicked, a window will open to enter the work at hourly rate. The meaning of each field is described in the Work at Hourly Rate paragraph.
After adding an hourly rate, + will be displayed in the regular fee line, which you can use to view all the work at hourly rate assigned to that regular fee.
Common Settings for Billing Items
Setting the default billing items in the fulfillment
When creating custom items, you can set how the item are offered in linked forms. The toggles in the upper right corner are used for this.
Default in fulfillment – if the switch is on ![]() , the item is offered by default when a new fulfillment is entered. Such an item is flagged as
, the item is offered by default when a new fulfillment is entered. Such an item is flagged as ![]() in the list of work and fees on the deal.
in the list of work and fees on the deal.
Global work at customer – if the switch is on ![]() , the item is offered in all customer fulfillments regardless of the selected deal. If the switch is off
, the item is offered in all customer fulfillments regardless of the selected deal. If the switch is off ![]() , the item is only offered in fulfillments entered in requests or tasks with a link to the deal or in a fulfillment entered directly in the deal.
, the item is only offered in fulfillments entered in requests or tasks with a link to the deal or in a fulfillment entered directly in the deal.
Invoicing – select how the item will be invoiced:
- Manual – the item can be invoiced from Deals -> Invoicing manually – when the invoicing process is initiated by the user.
- Automatic – the item will be invoiced automatically on the selected invoicing day of the month.
- Automatic with confirmation – a preview of the invoice is automatically created for the item in Deals -> Invoicing for the selected invoicing day of the month, the user confirms the issuance of the final invoice.
- Blocked – select if you do not wish to invoice the billing item at the next invoicing.
Note – a note on the item. It does not appear on the invoice or elsewhere in the CDESK system.
Material Invoicing
Issue slips directly added to the deal are offer for invoicing. Stock documents added to the fulfillment with a link to the task or request attached to the deal are not offered for invoicing.
Material to be billed can be added in the Stock documents section. Use the + button to create a new item. To select from existing stock movements, use the > button.
Adding a New Stock Document – Issue Slips
To add a new stock document, click the + button. This will then open the form for filling in the stock movement parameters. The meaning of individual fields is described in Stock documents.
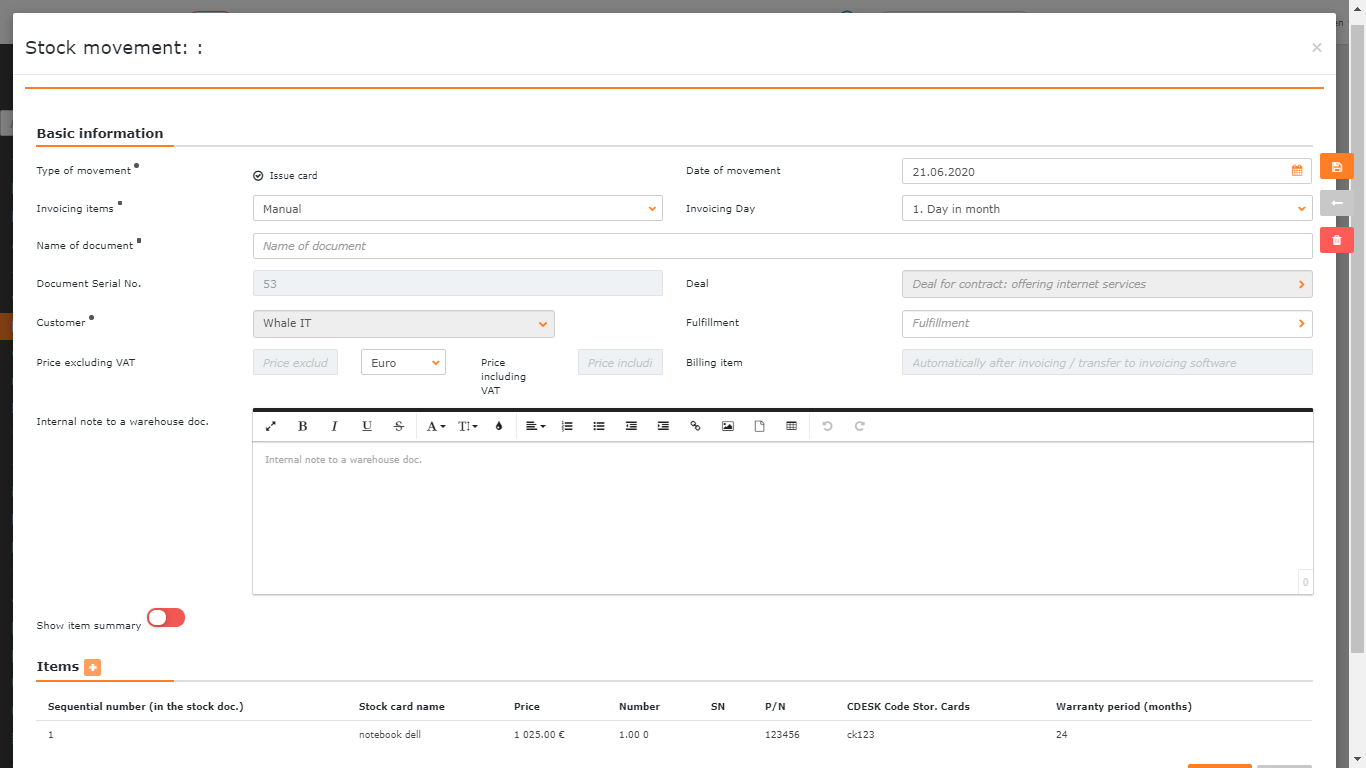
To add a new stock movement to the deal, click the Create button. Selecting Back will close the window without adding the new item.
Adding from Existing Stock Movements
If you want to add an existing stock movement to the deal, click the > button. A window will open to select the stock movements available to the customer that is filled in the deal.

To select stock documents from the list, click on the checkbox ![]() To add the selected stock documents to the deal, click on the Add Selected button located in the bottom right corner. Click the Cancel button to close the window and none of the selected items will be added to the deal. You can expand the list offered by adding more items using the + New Issue Slip button. When clicked, the form to add a new issue slip opens. The meaning of fields is described in Stock documents
To add the selected stock documents to the deal, click on the Add Selected button located in the bottom right corner. Click the Cancel button to close the window and none of the selected items will be added to the deal. You can expand the list offered by adding more items using the + New Issue Slip button. When clicked, the form to add a new issue slip opens. The meaning of fields is described in Stock documents
||.
Creating an Invoice
To create an invoice for a deal, go to the Invoicing module, located under the Deals module. If the module is not in the menu, check your permissions. Permissions to access the module can be set in Users and Groups -> Users -> choose a user -> Permissions tab -> Deals -> Invoicing.
Selecting a Deal to Be Invoiced
VIn Invoicing, there is a list of invoices to be approved (assuming you have selected automatic invoicing with confirmation in Billing followed by a list of deals that contain items ready for manual invoicing (those with manual invoicing selected in Billing) If you wish to review or edit deals before invoicing, use ![]() , to redirect you to the selected deal in the Billing tab.
, to redirect you to the selected deal in the Billing tab.
Above the list, there may be invoices awaiting confirmation. These are marked with the DRAFT flag. You can delete all drafts at once using the Delete all upcoming invoices button.
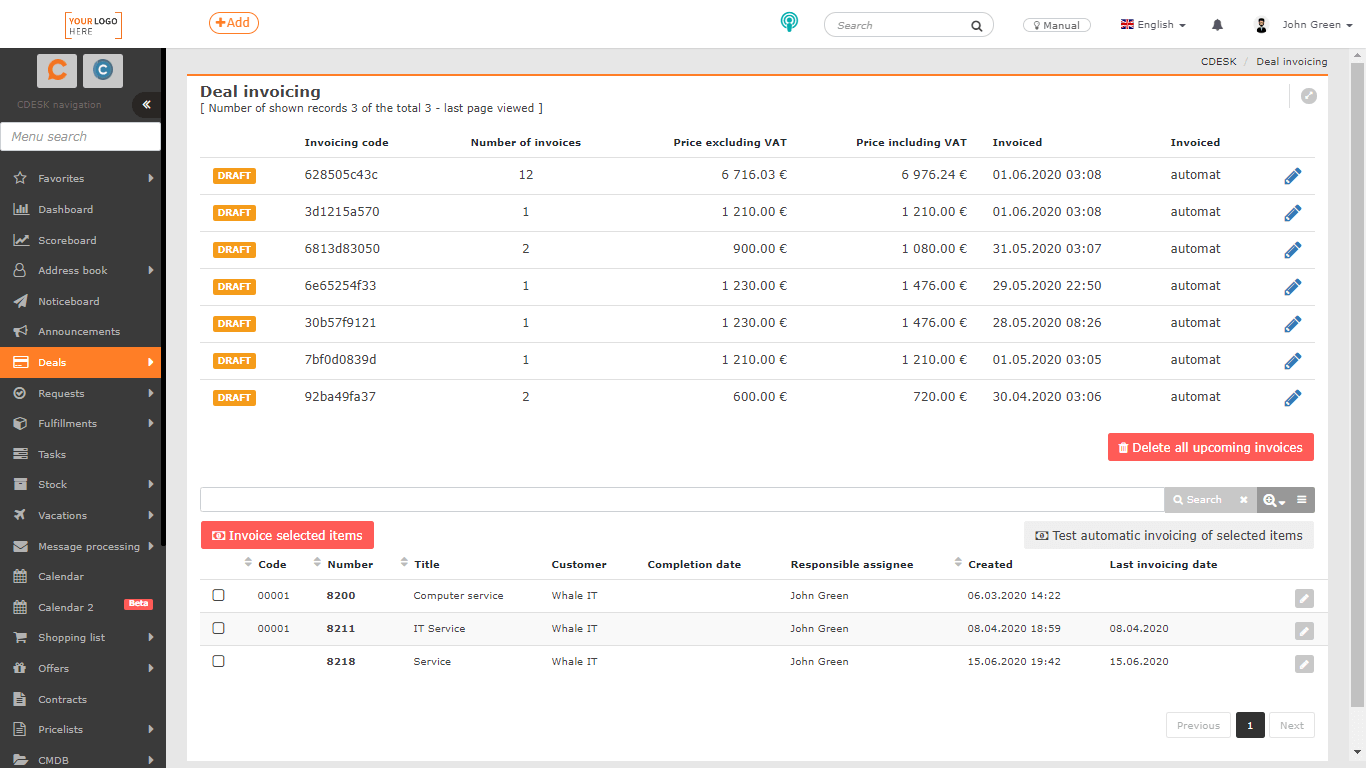
To continue invoicing the prepared draft, click on ![]() , located at the end of the line. A new window will open to set up the invoice.
, located at the end of the line. A new window will open to set up the invoice.
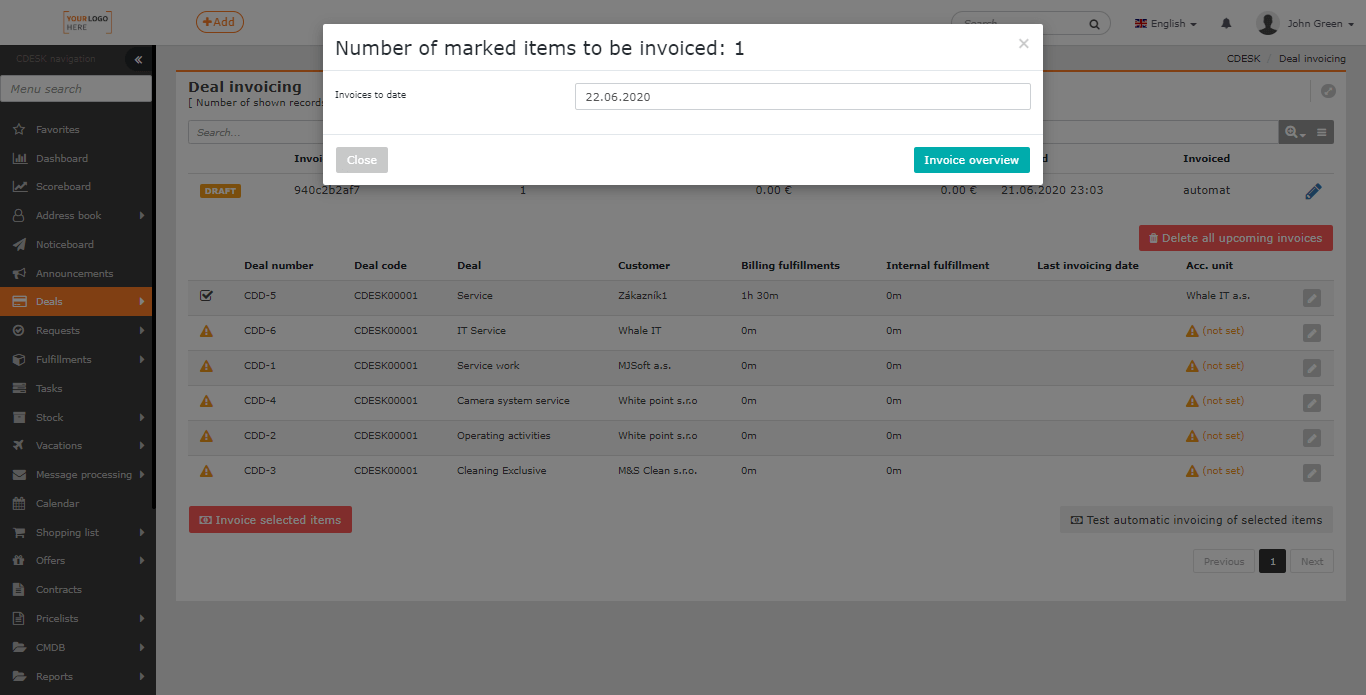
If there are no drafts in the list, or if you want to invoice a different deal(s), mark them in the list by clicking on ![]() . Once marked, click on the Invoice Marked button located on the top left. A window opens to set the invoice date. Once the date has been set, click the Preview Invoicing button. Selecting Close will close the window without creating a preview of the invoicing.
. Once marked, click on the Invoice Marked button located on the top left. A window opens to set the invoice date. Once the date has been set, click the Preview Invoicing button. Selecting Close will close the window without creating a preview of the invoicing.
Modifying Selection of Fulfillments and Goods Items to Be Invoiced
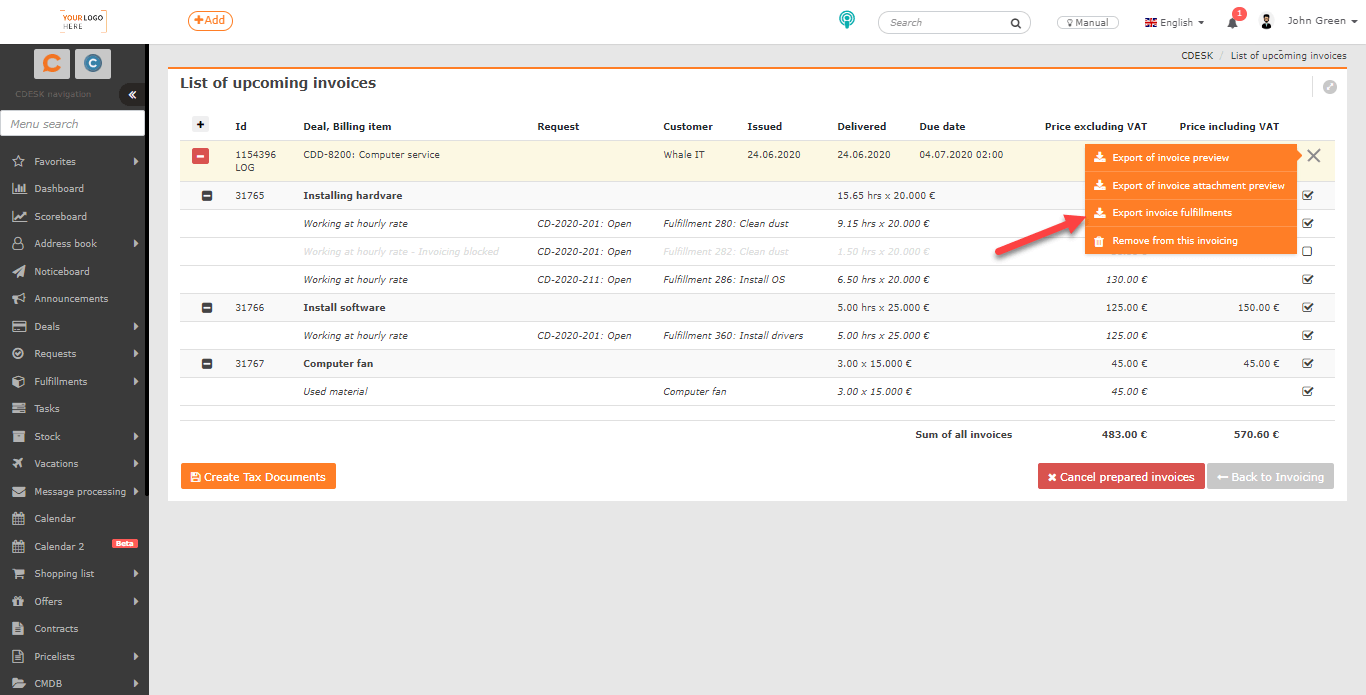
In the invoicing preview, a list of billing and goods items on the deal and their associated fulfillments is displayed. In the row of each line item there is + to view details. If it is a work or a fee, the fulfillments associated with the item are displayed.

All items on the upcoming invoice, including fulfillments under billing items, have an icon with a label on the right side of the line. If you do not want any of the items to be billed, click to unmark them.

Invoice Preview Export
In the line with the deal name, there is a context menu ![]() with functions to create various XLS reports. To export the invoice preview, select Export invoice preview.
with functions to create various XLS reports. To export the invoice preview, select Export invoice preview.


Export of Regular Fee Usage
In the line with the deal name, there is a context menu ![]() with functions to create various XLS reports. To export an invoice attachment, select the Export of regular fee usage option.
with functions to create various XLS reports. To export an invoice attachment, select the Export of regular fee usage option.


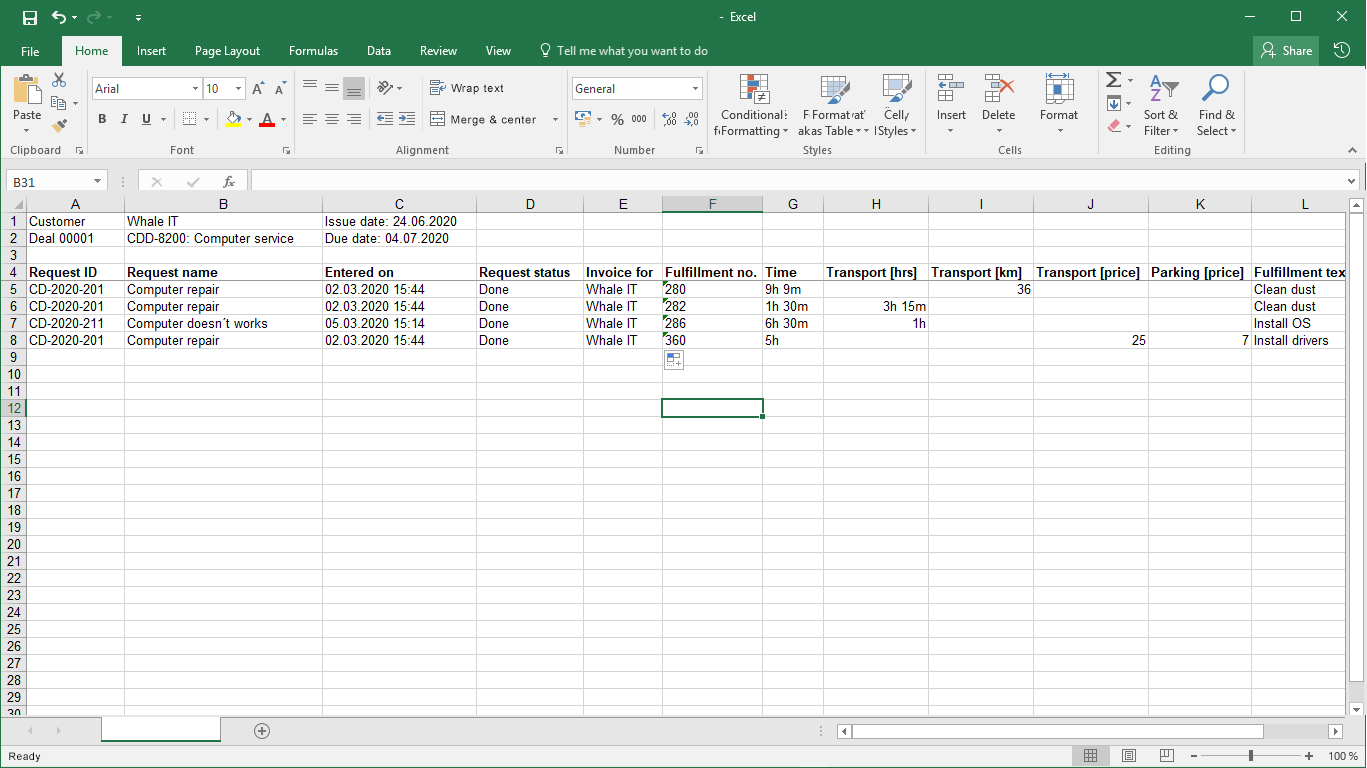
Export of Invoiced Fulfillments from Invoice Preview
In the line with deal name, there is a context menu ![]() with functions to create various XLS reports. To export fulfillments on the invoice, select Export invoice fulfillments.
with functions to create various XLS reports. To export fulfillments on the invoice, select Export invoice fulfillments.
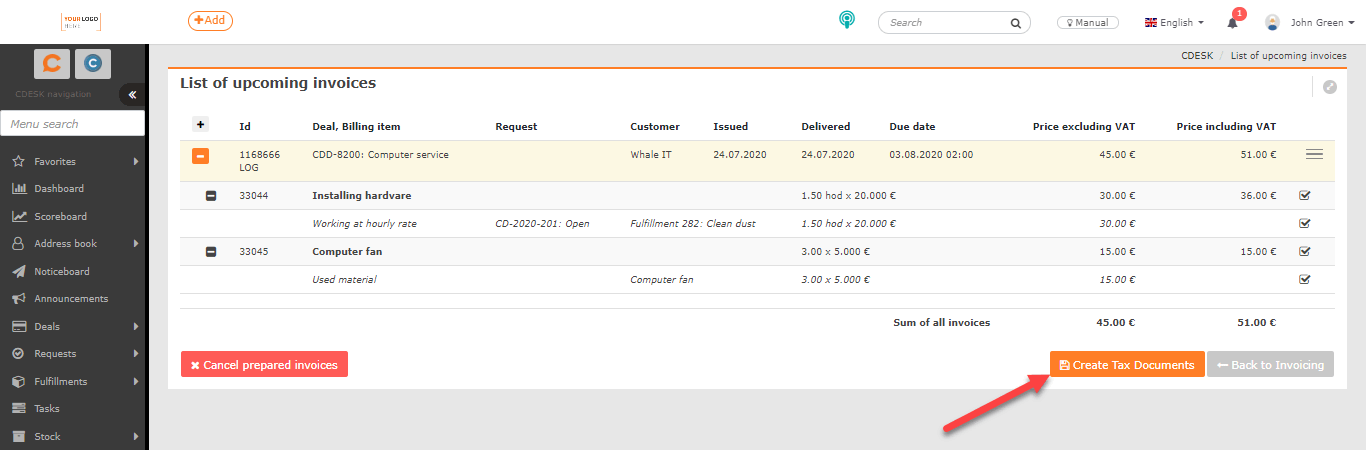
Issuing an Invoice
Once you have created an invoice preview and edited the items you want to invoice, you can start creating an invoice. You can create the invoice from the preview of upcoming invoices using the Create Tax Documentsbutton located in the bottom right corner below the list. Once clicked, you are redirected to the list of issued invoices. Search for the invoice in the list. When you open it, the invoice form will be displayed. The meaning of each field is described in Invoicing.
To delete a pending invoice, use the Delete upcoming invoices button located in the bottom left corner of the list of upcoming invoices. Once clicked, you will be returned to the list in the Invoicing module. If you select the Back to Invoicing option on a pending invoice, you will also be returned to the list in the Invoicing module and a draft will be created from the pending invoice.