WORK WITH REQUESTS FOR OPERATORS
PAGE CONTENT
- Change the Assignee and the Request Creator
- Change the Request Status
- Change Request Dates
- Record the Solution and the Internal Note
- Request Completion
- Accept the Request Completion When Logged in to CDESK
- Denial – Claim a Request When Logged in to CDESK
- Complete the Request Using Email Notification
- Accept the Request Completion Using Email Notification
- Deny the Request Completion Using Email Notification
Ways of Making a Request:
- Log into CDESK – accessible to CDESK users and customer accounts after logging into the CDESK system using a web browser.
- Email (message processing) – requests created based on an email sent to the address designated for reception of to-be-processed messages – available to all users who know the email address.
- Easyclick (CUSTOMER MONITOR) – easy and quick entry of requests without the need to log into the system. Possible to insert a screenshot when making a request. Easyclick account is accessible to users with C–Monitor client installed.
- CDESK client – desktop application for operational work
- Mobile app – a mobile app that lets you work with CDESK anytime, anywhere
- Outlook Plugin – fast request entry and archiving of discussion directly from Outlook
There are several ways to create a new request. In each of them it is possible to enter the request either directly or using the catalog of requests.
- Make a request manually – standard way of creating requests: the user fills in all the details of the request
- Make a quick request from the Catalog of Requests – the user chooses from pre–made templates in which most of the fields of the request are already pre–filled according to the selected scenario
Meaning of Fields When Making a Request
To distinguish which fields are a basic part of each request and which can be optionally enabled, optional items are marked in blue in the following text, along with information on how to enable them.
Depending on the user’s access settings for each field in Users and Groups–>Users in Permissions, some of the basic fields in the request form may be hidden.
Basic Information
Customer• – only companies with the customer flag are offered in the selection. Click > to view a window with a selection of companies and the option to filter records. If the company is not in the list, click + to create a new one.
Branch – if there is a branch in the CMDB defined for the customer, it is offered for selection. This field can be enabled in Global Settings–>Requests–>Basic Settings. The Branch field is part of permissions and you can enable/disable it to certain users or groups in CDESK. (In permissions: Requests–>Access to Fields–>Branch).
Request weight – a field where you can enter a number (also decimal) that can be used to influence the order of requests in the list of requests. When you select advanced search by company in the list of requests, requests are sorted by weight from highest to lowest. If the priority view is enabled, the records will be sorted into categories (unassigned, waiting for response, overdue, etc), within which they are sorted by weight.
Place – if the customer has a defined place in the CMDB, it is offered for selection. If the Branch field is enabled, place is offered only after the branch is selected. The field can be enabled in Global Settings–>Requests–>Basic Settings. It is also part of permissions and you can enable/disable it to certain users or groups in CDESK. (In permissions: Requests–>Access to Fields–>Place).
Request name •– a brief description of the requested service. The request will usually appear under this name in the list of requests and in other CDESK modules linked to requests.
Request Description •– field for stating the problem / subject of the request, with the possibility to format the text and insert an image.
Deal – a list of deals belonging to the selected customer are offered – by selecting a deal, a link with the request will be created. The related request is also displayed in the deal in the Requests section. The Deal field is displayed only if the Deals module is enabled in Global Settings–>Deals.
Request type – offers a choice of request types defined in Global Settings–>Requests–>Types and Service Areas, where it is also possible to enable this field and specify which types to offer to operators/customer accounts.
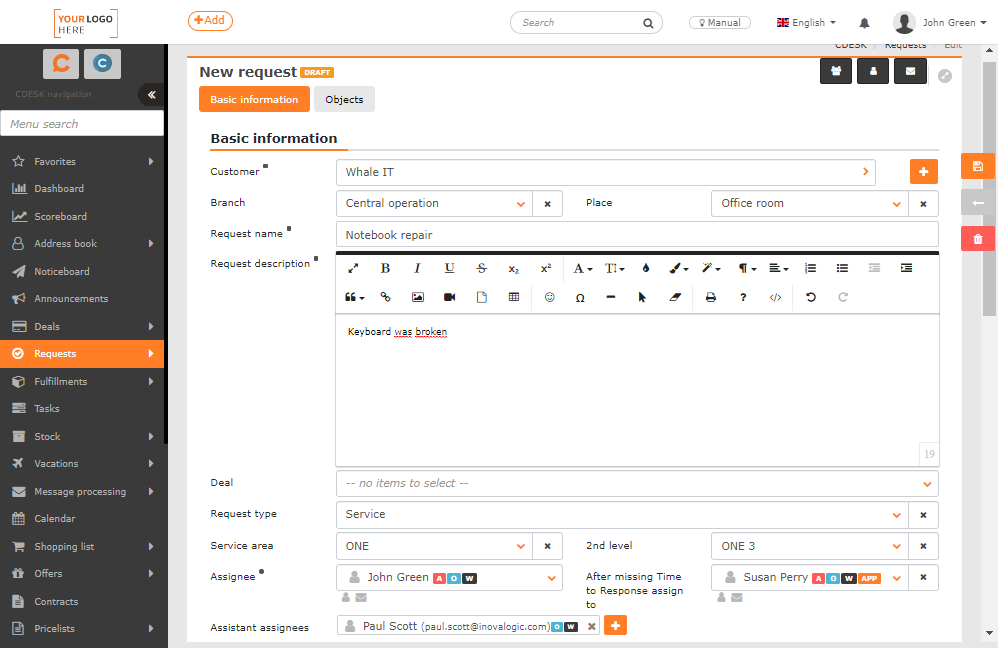
Service area / 2nd level – selection of the service area defined in Global Settings–>Requests–>Types and Service Areas, where it is also possible to enable these fields.
SLA• – this field appears only if you assign multiple objects with different SLAs to the request. It offers the possibility to select SLA according to which settings of request deadlines should be applied. After the request is saved, the selected SLA is applied and this field is hidden. For more information on using and setting SLAs, see the article SLA.
Assignee group • – select an assignee group. The Assignee Group field is only accessible when the Limit assignee selection by assignee group feature is enabled. The selection of groups offered depends on the type of user account:
- Administrator – sees all groups and can assign requests to all groups
- Operator – sees only groups that are visible to the selected customer*
- Customer / Easyclick account – sees only the groups that are assigned to the customer*
Assignee group is preconfigured according to the following criteria:
- If the request is made from a template that has a default assignee and a default service area to which the environment admin has set a default assignee group, the assignee group from the set service area is pre-filled in the request.
- If the request is created from a template with a default assignee group and a default service area that does not have a default assignee group set, the assignee group from the template will be pre-populated in the request.
- If the request is not created from a template and the environment admin has set a default assignee group for the selected service area, the assignee group from the service area will be pre-filled in the request.
- If the request is not created from a template and there is no default assignee group set for the selected service area, the assignee group assigned to the customer will be pre-populated in the request.
Assignee• – select an assignee. Selection of assignees depends on the type of user account:
- administrator – sees all assignees and can assign requests to all assignees
- operator – sees only assignees that are visible to the selected customer*
- customer / easyclick account – sees only assignees assigned to the customer*
*) Setup visible and assigned customers in Users and Groups–>Users in the Companies section, or in Address Book–>Companies in the Assignees section
Assignee selection on the request depends on several settings:
- If the request is made from a template that has a default assignee and a default service area to which the environment admin has set a default assignee, the assignee from the set service area is pre-filled in the Assignee request field.
- If the request is created from a template with a default assignee and a default service area that does not have a default assignee set, the assignee from the template is pre-populated in the Assignee request field.
- If the request is not created from a template and the environment administrator has set a default assignee for the selected service area, the assignee from the service area is pre-filled in the Assignee field of the request.
- If the request is not created from a template and there is no default assignee set for the selected service area, the assignee assigned to the customer is pre-populated in the request. If there are multiple assignees assigned to the customer, the first assignee is pre-populated in the Assignee Customers can change pre-populated assignees.
Assistant assignee – allows you to assign an assistant or a group to the request in addition to the assignee. These people are notified of changes on the request (depending on notification settings) and can access the request as assignees. The field can be enabled in Global Settings–>Requests–>Basic Settings. It is also part of permissions and you can enable/disable it to certain users or group in CDESK. (In permissions: Requests–>Access to Fields–>Assistant Assignees).
After missing time to response assign to – if assignee or assignee group misses the deadline for responding to the request, this will be assigned to another assignee or group. If you wish to keep the original assignee after the missed response deadline, leave the field blank. This field can be enabled in Global Settings–>Requests–>Basic Settings.
Responsible person – allows you to assign a responsible person to the request, who is accountable for the results of assignees and is notified, for example, in case of non–compliance with deadlines. The field can be enabled in Global Settings–>Requests–>Basic Settings. The Responsible Assignee field is part of permissions and you can enable/disable it to certain users or groups in CDESK. (In permissions: Requests–>Access to Fields–>Responsible Assignee).
Assistant assignees – additional assignees or groups of assignees can be added to the request assignee, who can edit the request and are notified of changes to it. The field can be enabled in Global Settings–>Requests–>Basic Settings in general settings.
Requested by – select who made the request. The currently logged in user is pre-filed by default. In case the request is created based on (e.g. telephone) inquiry of another user or customer, you have the option to select another operator / customer account. The field can be enabled in Global Settings–>Requests–>Basic Settings. It is also part of permissions and can be enabled/disabled to certain users or groups in CDESK. (In permissions: Requests–>Access to Fields–>Requested by).
Requested for – if the request was initiated by someone other than the person specified in the Requested by field, use this field to enter their name: it does not have to be a registered CDESK user. Depending on the settings in Global Settings–>Requests–>Basic Settings, you can also enter free text. Requested For field is part of permissions and you can enable/disable it to certain users or groups in CDESK. (in permissions: Requests–>Access to Fields–>Requested for).
Priority •– request priorities are defined in Global Settings–>Requests–>Basic Settings. If the SLA is defined, changing the request priority can also change the request dates, such as TTO, RT, TTAS, TTR. If the Prioritization of Requests according to Urgency and Impact feature is enabled in Global Settings, the request priority can be pre-filled based on the specified urgency and impact.
Priority settings according to ITIL.
Urgency – the urgency of the request is determined by the customer. It can be selected from a code list that is defined in Global Settings–>Requests–>Basic Settings. The Urgency field is available if Prioritization by Urgency and Impact is enabled in Global Settings.
Impact – the impact is determined by the assignee. It can be selected from a code list, which is defined in Global Settings–>Requests–>Basic Settings. The Urgency field is available if Prioritization by Urgency and Impact is enabled in Global Settings.
Time to own • – (TTO) – the deadline by which the request is to be assigned to a specific assignee (not to an assignee group). TTO countdown is activated in Global Settings–>Requests–>Basic Settings, and you need to enable the Show TTO/TTAS dates for a specific customer in Address Book–>Companies, the SLA section. The possibility to change the deadline depends on the settings in the SLA.
Response time• – (RT) – the deadline by which a response from the assignee is required. A response can be: changing the request status, adding a fulfillment, or a discussion post. The possibility to change the deadline depends on the settings in the SLA.
Time to Alternative Solution• – (TTAS) – the deadline by which an alternative solution is to be provided to the customer. TTAS countdown is activated in Global Settings–>Requests–>Basic Settings, and Show TTO/TTAS dates has to be enabled in Address Book–>Companies under SLA tab of a specific customer. The possibility to change the deadline depends on the settings in SLA.
Resolve from – allows you to set the start of the request fulfillment interval. The option of setting the from-to interval can be activated in Global Settings–>Requests–>Basic Settings – Possible to define Time to resolve from.
Time to Resolve• – (TTR) – the deadline by which the request must be resolved. The possibility of changing the deadline depends on the settings in SLA.
Fixed times to resolve from – this field is only displayed if the customer has enabled Show TTO/TTAS dates in Address Book–>Companies, SLA section. A switch that is on will fix the Time to Alternative Solution (TTAS) and Time to Resolve (TTR) even if the request is in a status where time is not counted in TTAS/RT. Switching the toggle to the OFF position activates the postponement of these request deadlines. Turning off the countdown of the times in TTAS / TTR can be done in Global Settings–>Requests–>Basic Settings.
Desired Date – this is the date when the end user wishes the request to be fulfilled. If this deadline is shorter than the Time to Resolve, no change is made to the request and it is at the discretion of the assignee to shorten the Time to Resolve. If the desired date is longer than the Time to Resolve, the Time to Resolve is automatically adjusted to it. The desired date field can be activated in Global Settings–>Requests–>Basic Settings.
Visibility
- Regular – the request is also seen by the assigned customer and notifications are sent to them (unless the customer notification is blocked)
- Internal – the customer does not see this request and the customer notification is automatically blocked.
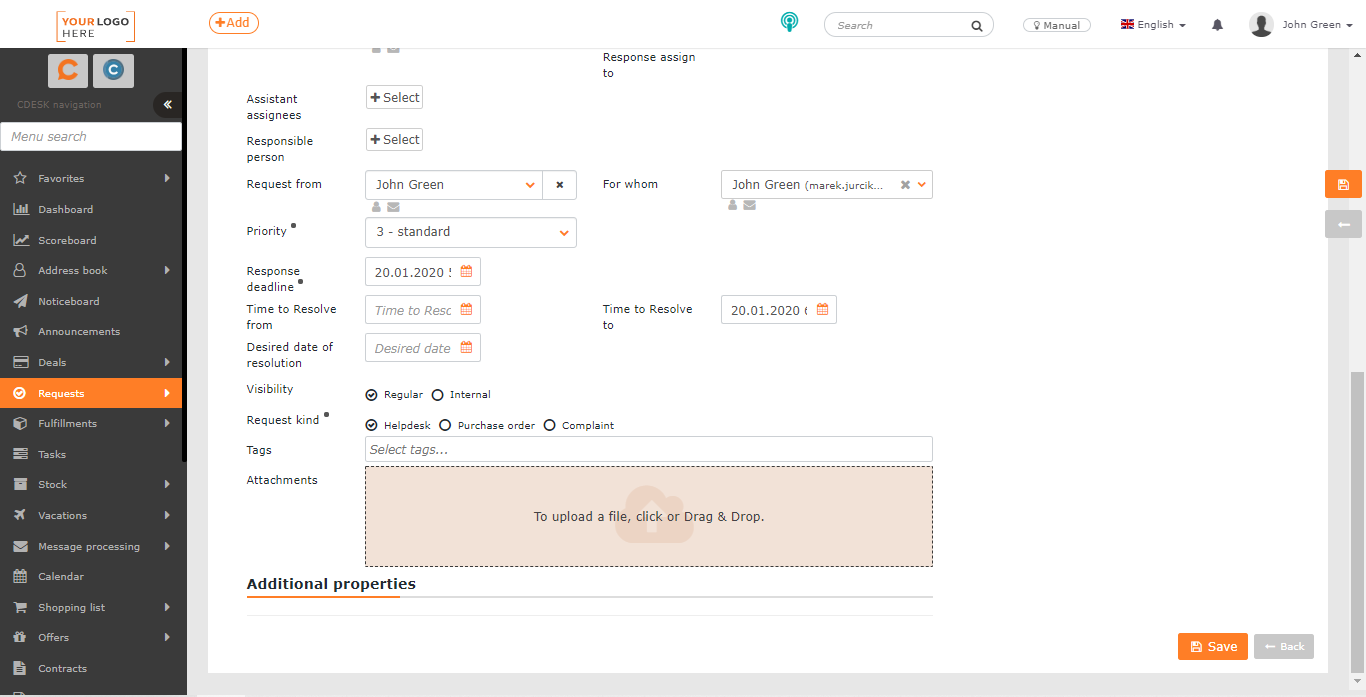
Tags – labels by which related documents can be easily found in CDESK. List the keywords describing the selected request. Tags that have not yet been used will be created when the request is saved.
Solution – the field is accessible only after the request is saved. It is a text field where you can record the solution. The solution field can be activated in Global Settings –>Requests–>Requests. It is also part of permissions and you can make it available/unavailable to certain users or groups in CDESK. (In permissions: Requests–>Access to Fields–>Solution).
Internal note – the field is accessible only after the request has been saved. It is a text field where you can record a note to the request. It will not be accessible to customer accounts unless you grant them permissions to do so in permissions: Requests–>Access to Fields–>Internal Note. The internal note field can be activated in Global Settings–>Requests–>Basic Settings.
Attachments – possibility to join an attachment (for example a screenshot). To attach a file, either drag it with the mouse to this field or click to select the file from the disk. It is also possible to add multiple attachments, a list of attached files will then be displayed below this field.
Preview of images – if you have placed an image in the attachment, a preview of the image will be displayed in this section after the request has been saved.
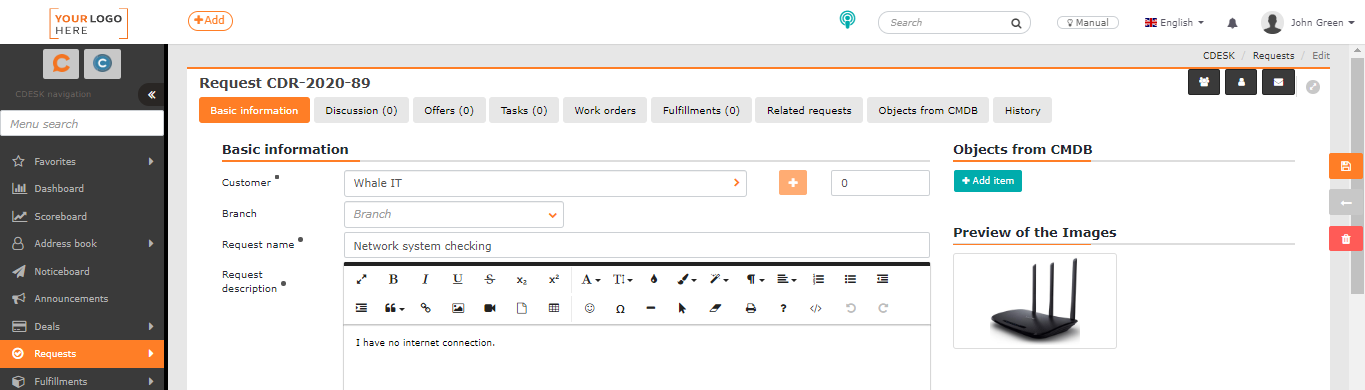
Additional Properties
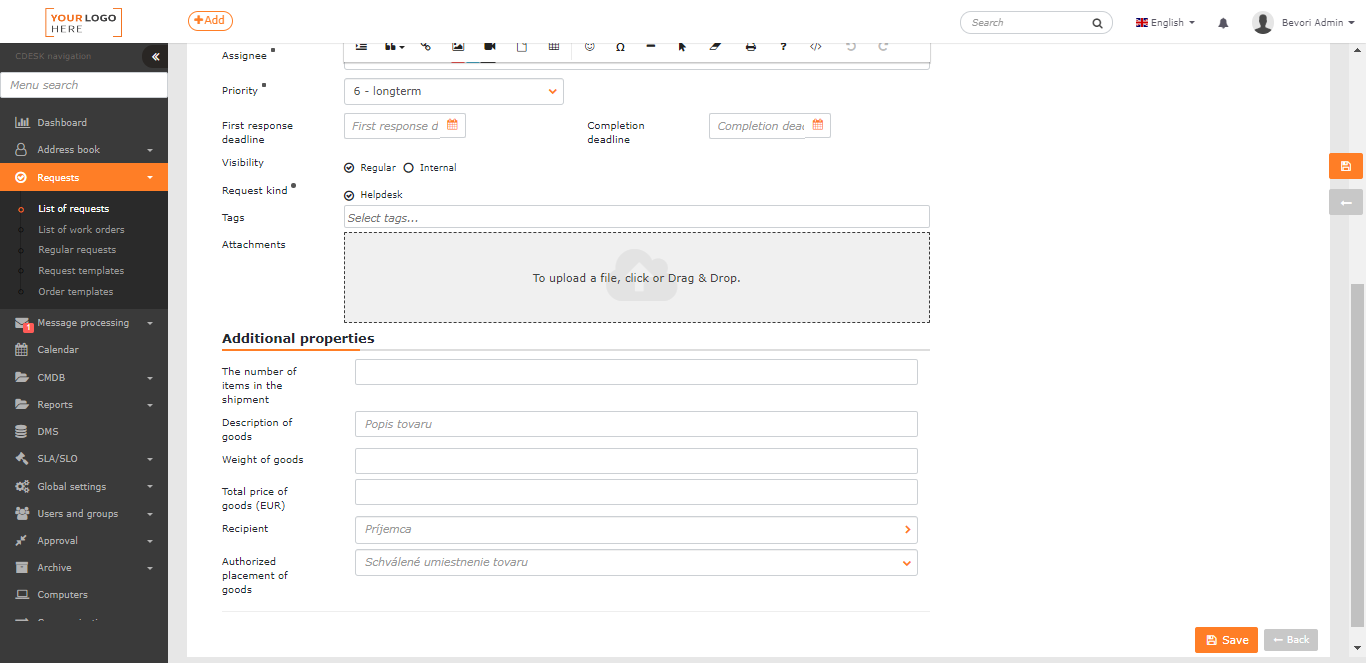
If additional properties are predefined in Global Settings–>Requests–>Basic Settings, they allow to extend the request with additional information. For more information on defining additional properties, see the article Configuration Database CMDB–>Additional Properties.
Create a New Request When Logged in to CDESK Using a Web Browser
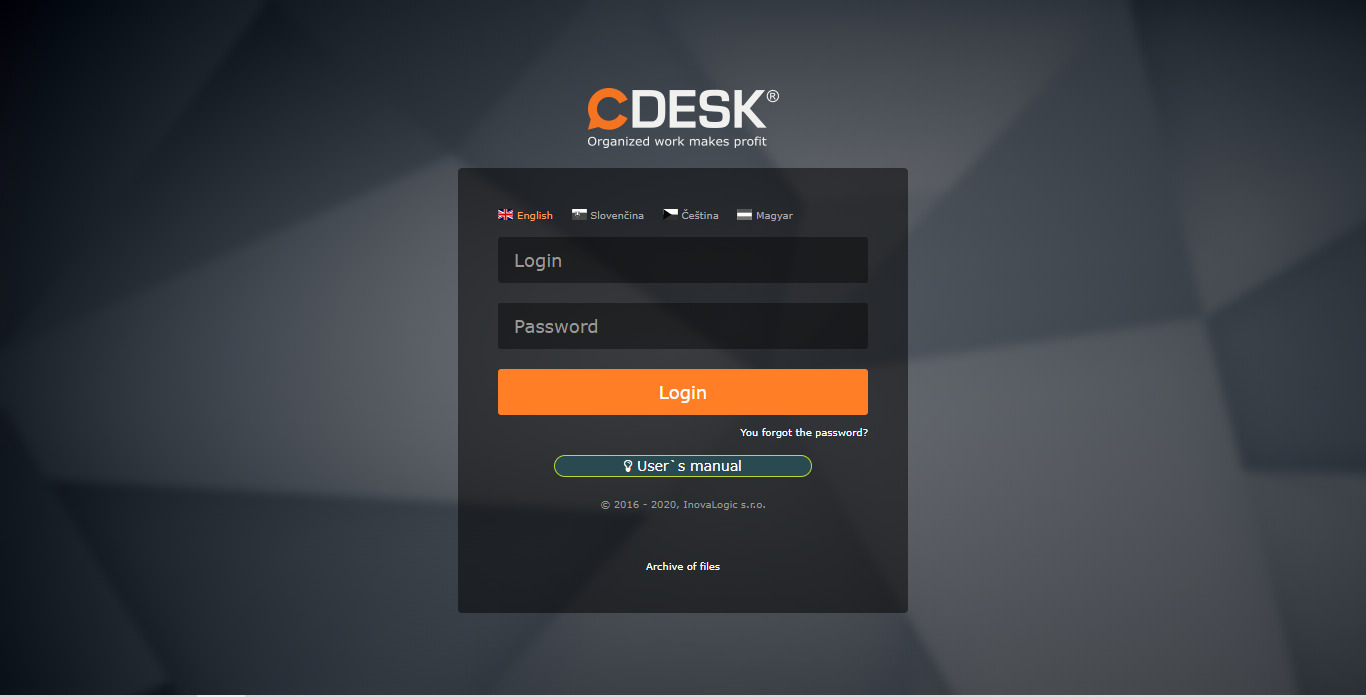
Before making a new request, you need to log in to the CDESK system – your administrator will provide you with the address as well as the login details.
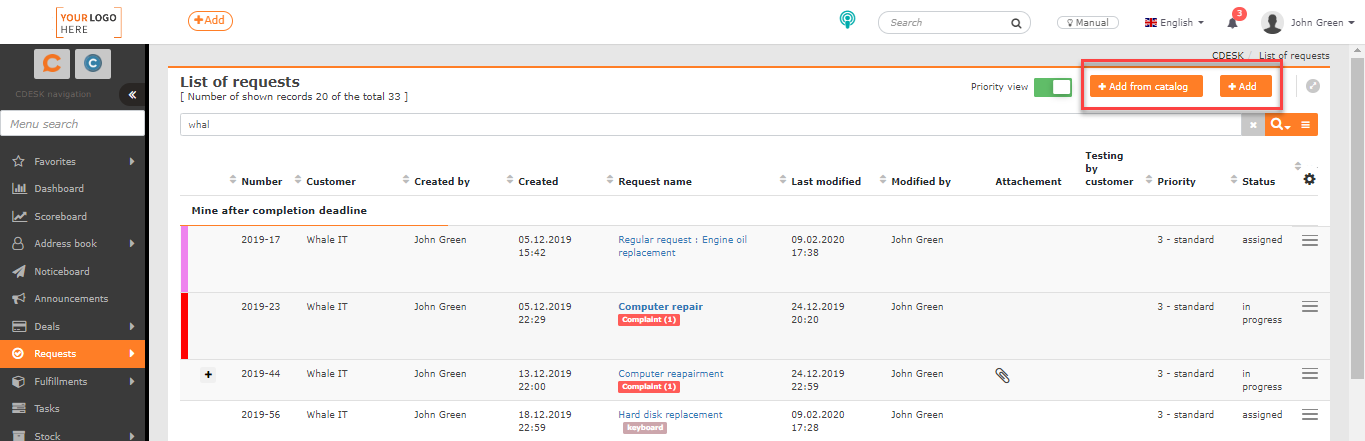
After logging in to CDESK, a new request can be created in Requests–>Requests, clicking the +Add button. If only the +Add from Catalog , button is displayed, continue with the Requests from the Catalog of Requests .
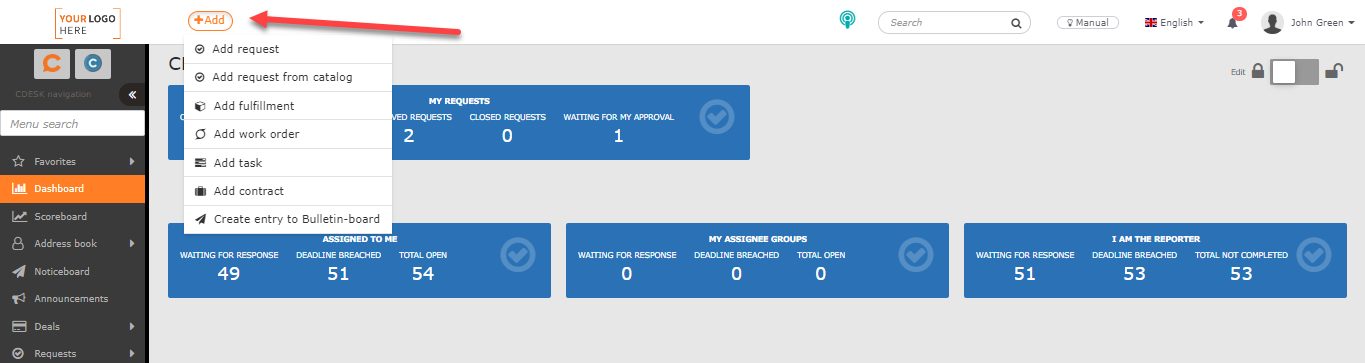
You can also add a request using the quick select button located on the top bar of CDESK.
Click on the +Add button to open a new window with a form to enter the request. The meaning of individual fields is described in the paragraph Meaning of Fields When Making a Request.
Request from the Catalog of Requests
To add a request from the catalog of requests you need to be logged in. After logging in to the CDESK system, you can create a new request from the catalog in Requests–>Requests by clicking on the +Add from catalog button.
The first step is to select the customer, then load the catalog of requests with associated templates.

When you click on a tile, a form will open to create a request. Depending on the template settings, some fields are pre–populated, some may be hidden. The meaning of each field is described above in the section Meaning of Fields When Making a Request.

Click Save to enter the completed request into the system.
Create a New Request Using Email (Message Processing)
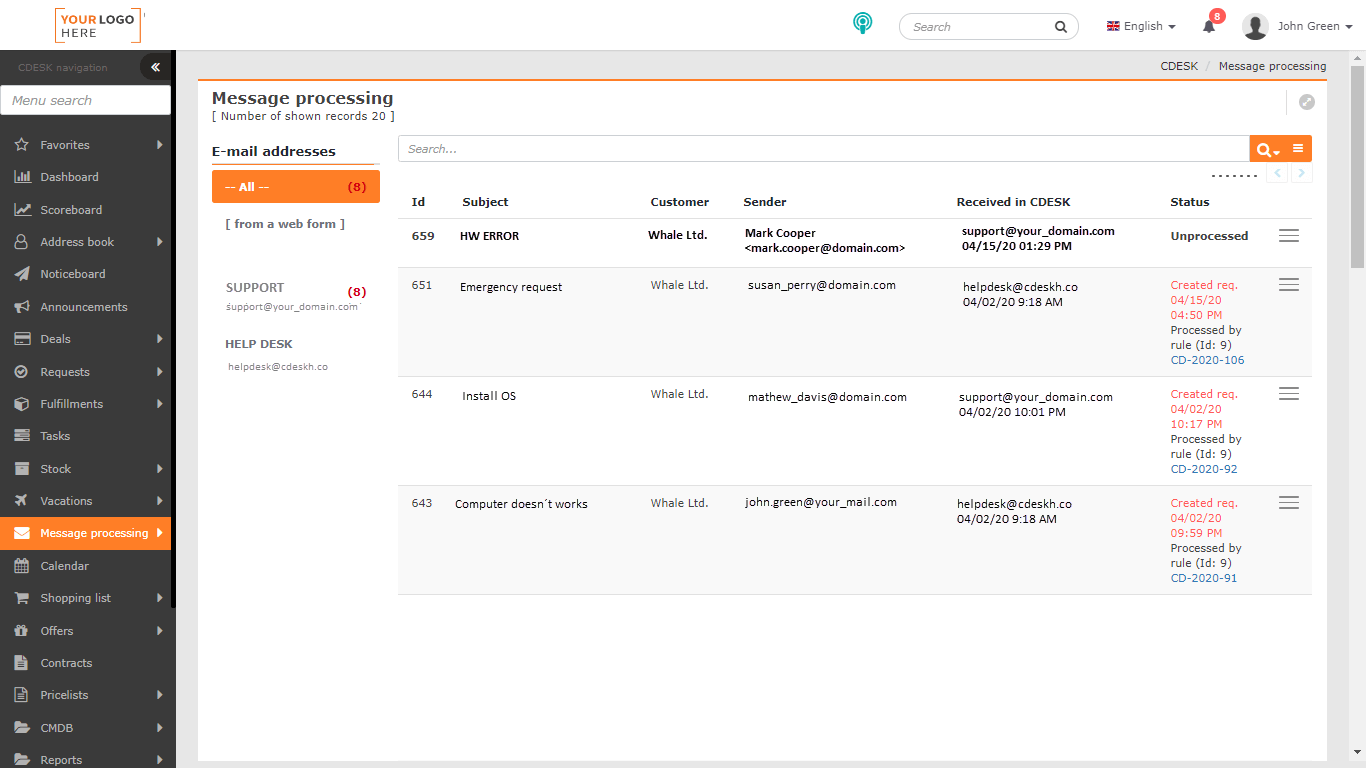
Requests can be made by e–mail to a predefined public e–mail address, from which e–mails are forwarded to the internal CDESK server address – either automatically or manually by the operator. These messages will appear in CDESK under Message Processing–>Message Processing.
The message can then be processed as a request in two ways:
- automatically – by setting the rules according to which the request should be created automatically after receiving the message – these are set in the Message processing–>Rules of Processing.
- manually – messages in the Unprocessed status can be converted to a request by editing the message and selecting Create a Request available under the Action button. This will then open the same form as when creating a new request when logged in to CDESK, with pre-populated fields: Request Name (subject of the message) and Request Description (text of the message) with the possibility of editing them. Fill in the form and click Save to enter the request into the system.
Create a New Request Using Easyclick (CUSTOMER MONITOR)
This functionality requires the C–Monitor client to be installed and registered. This is the fastest way to make a request, usually related to the PC on which the C–Monitor client is installed. You can initiate a new request via Easyclick by double–clicking on the C–Monitor client icon in the taskbar, or by right–clicking on it and selecting Easyclick Request–>Add a New Easyclick Request (with screen).
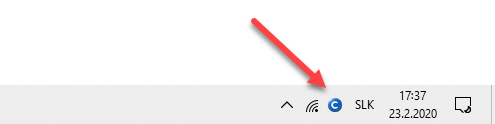

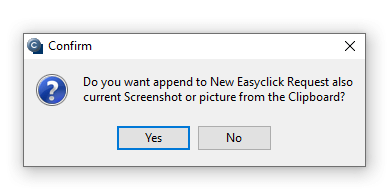
If you double–click, a dialog box asks whether you want to take a screenshot of the current screen or not.
With the version 3.1.744.9 of the C-Monitor Client, the ability to crop the screenshot and insert an image from the clipboard has been added.
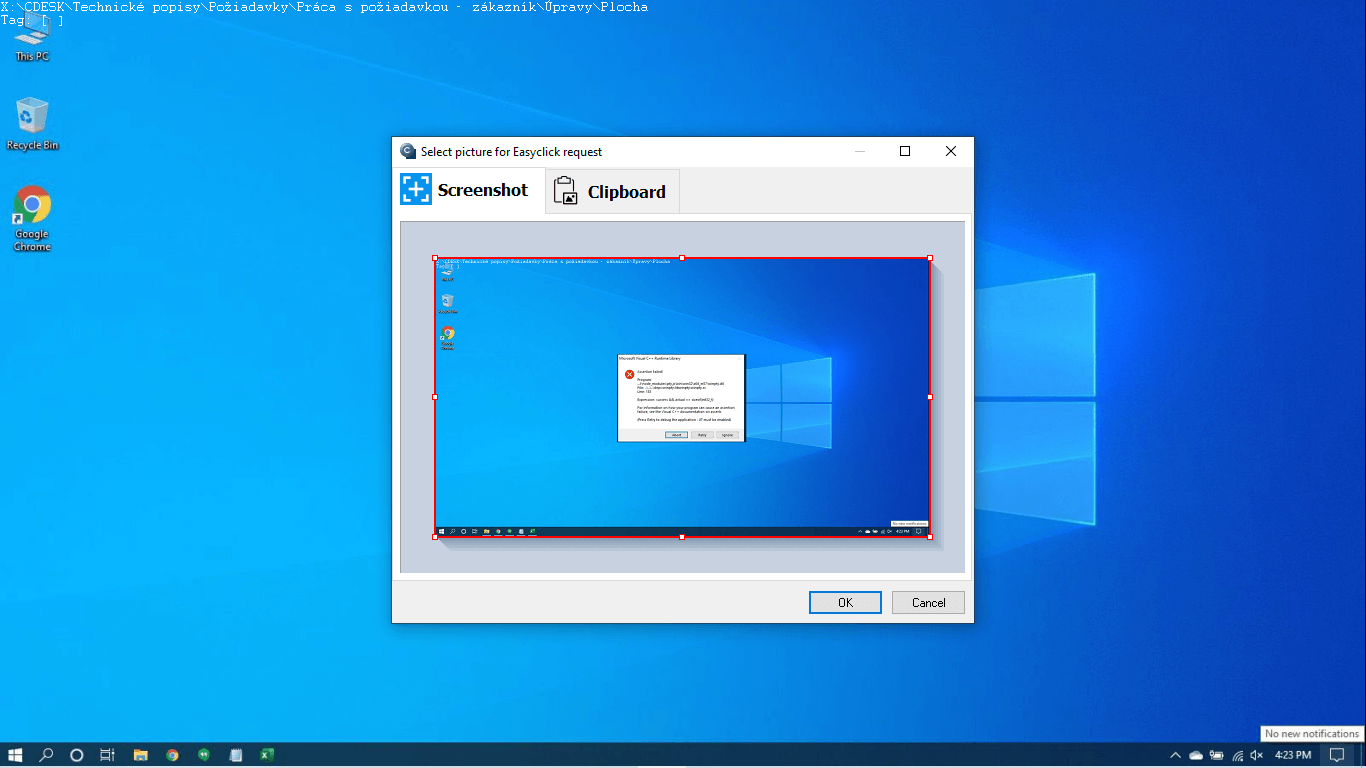
To insert an image from the clipboard, go to the Clipboard tab. If there is already an image in the clipboard at the time of the request creation, it is inserted automatically as soon as you open the tab. If you insert the image into the clipboard after navigating to this tab, it will be inserted into the clipboard when you click the Paste picture from the clipboard button located in the bottom left corner.

After inserting a screenshot or a picture from the clipboard, click OK.

After confirming the option, the CDESK application opens in the default web browser:
- If the Catalog of Requests is enabled and the creation of requests outside the catalog is disabled, the catalog is loaded as described in Requests from the Catalog of Requests above.
- If the Requests catalog is disabled or creating requests outside the catalog is enabled, the form for entering a request opens. The meaning of each field is described in Meaning of Fields When Making a Request.
Click Save to submit the completed request.
Display Easyclick Requests
Right-click on the C-Monitor client icon in the taskbar and select Easyclick Requests–>List of Easyclick Requests to view all requests entered through Easyclick. You can look through the entered requests (without the possibility of editing) or join the discussion on the request.
Create a New Request Using the CDESK Client
The CDESK desktop application (hereafter CDESK client) extends the way of working with the CDESK system. It is mainly used for fast operative work. It also has differently customised views that may suit you better for certain tasks.
You must log in to the CDESK client application before entering a new request. Use the same login as for the website.
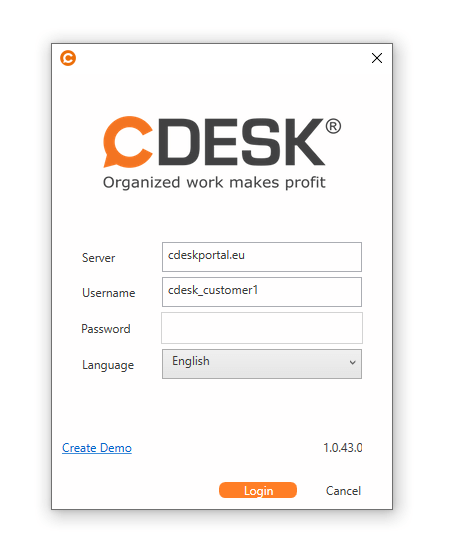
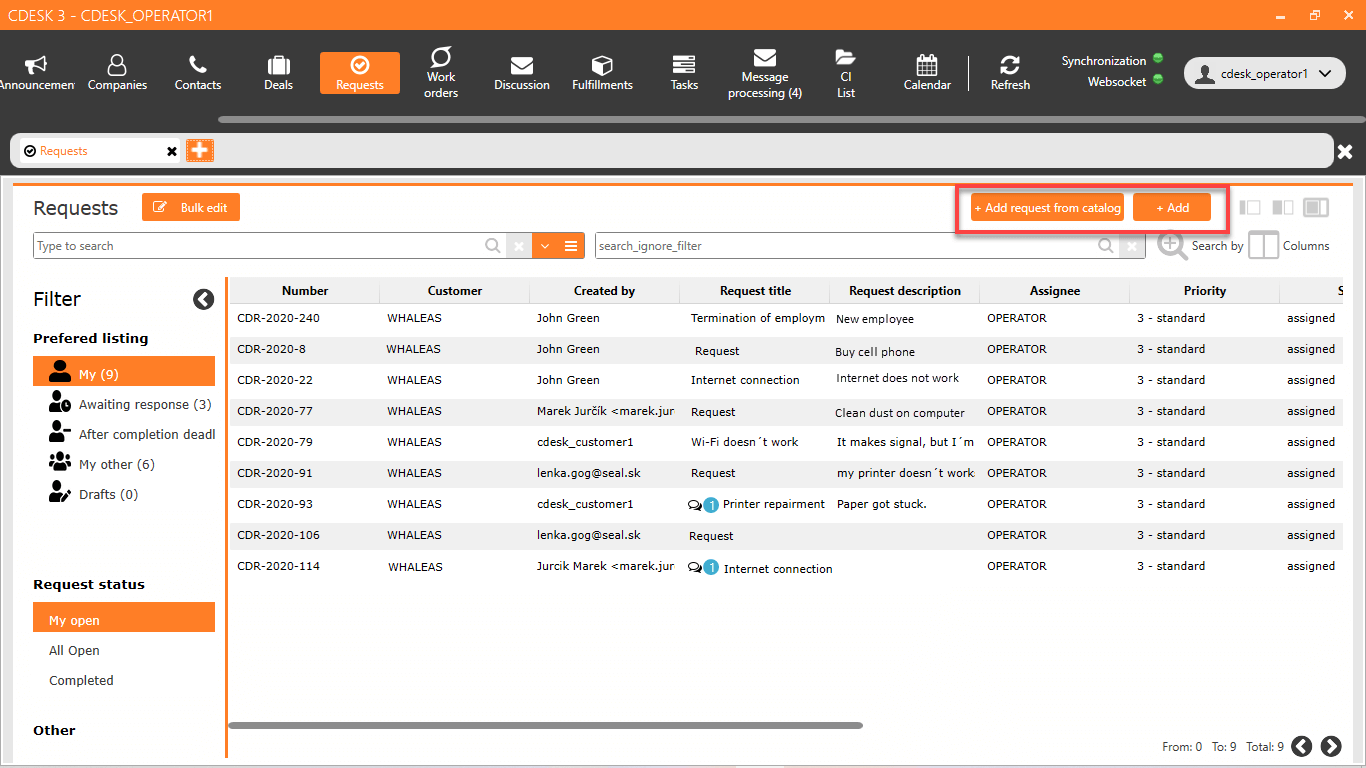
The CDESK client allows you to create manual requests (so-called general requests) as well as requests from the catalog. Requests are created in the Requests module. The following options may be available:
- +Add – request created by a user logged in to the CDESK client
- +Add request from catalog – create a request according to a predefined template from the Catalog of Requests.
- +Add request from catalog and +Add
Create a General Request Using the CDESK Client
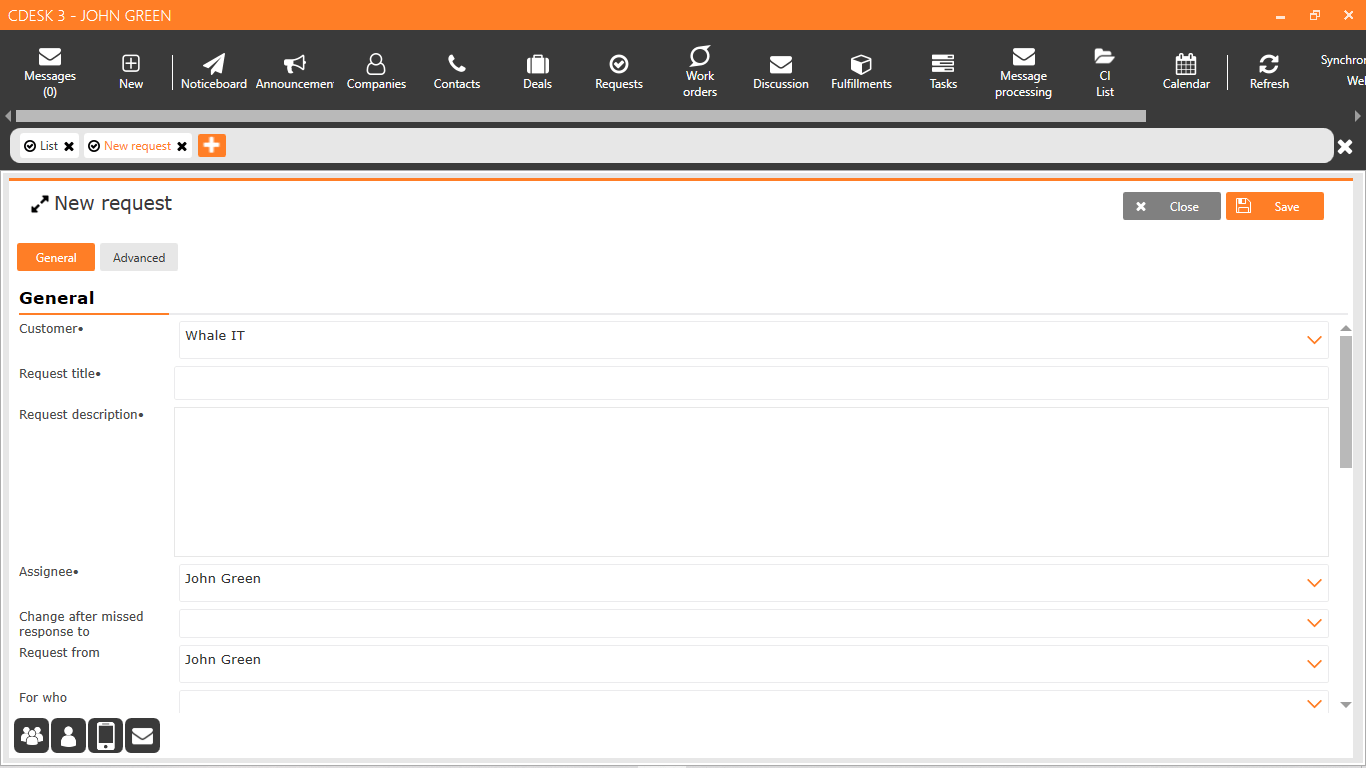
To add a general request, click the +Add button in the top right corner above the list of requests. Once clicked, a new window will open to specify request parameters. The window is divided into two tabs: General and Advanced. The meaning of each field is described in the section Meaning of Fields When Making a Request. .
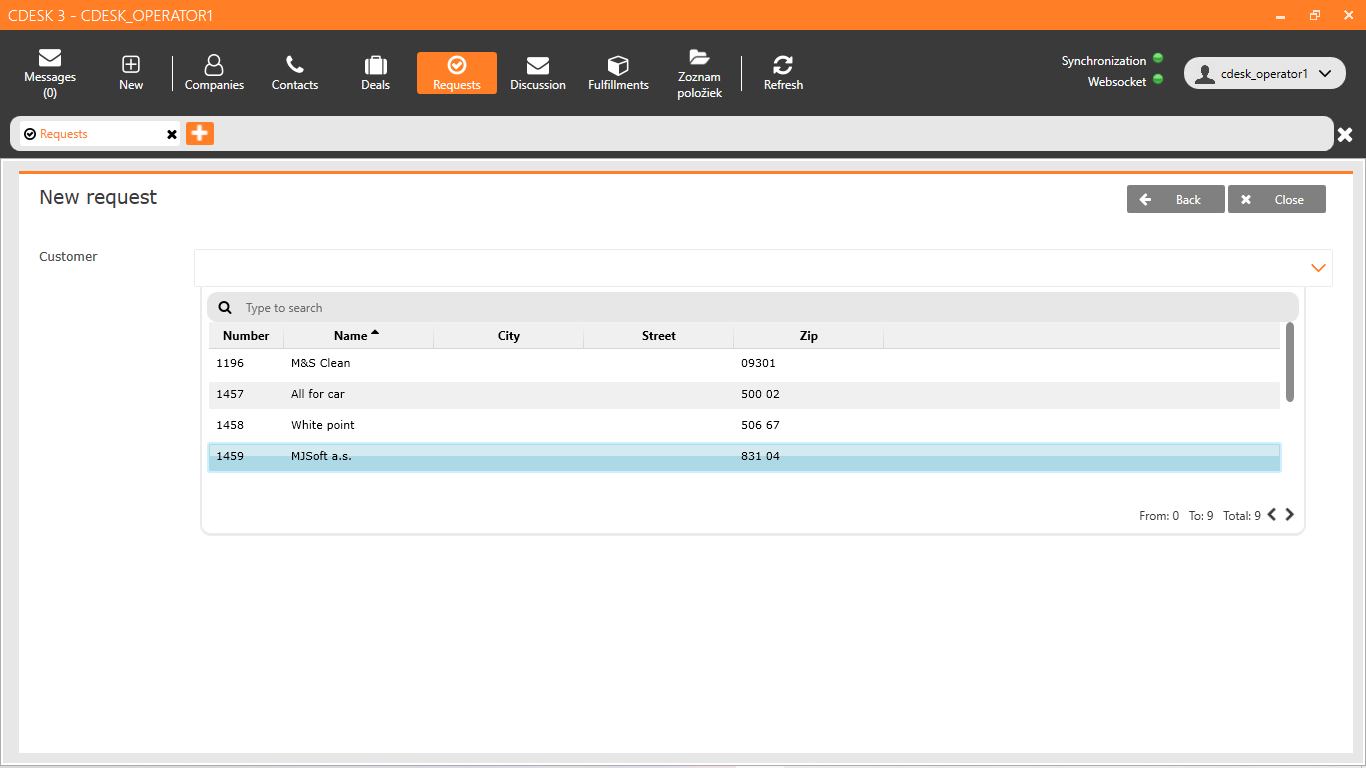
To add a request from the catalog of requests, go to the Requests module and click the +Add from catalog, button located above the list of requests.
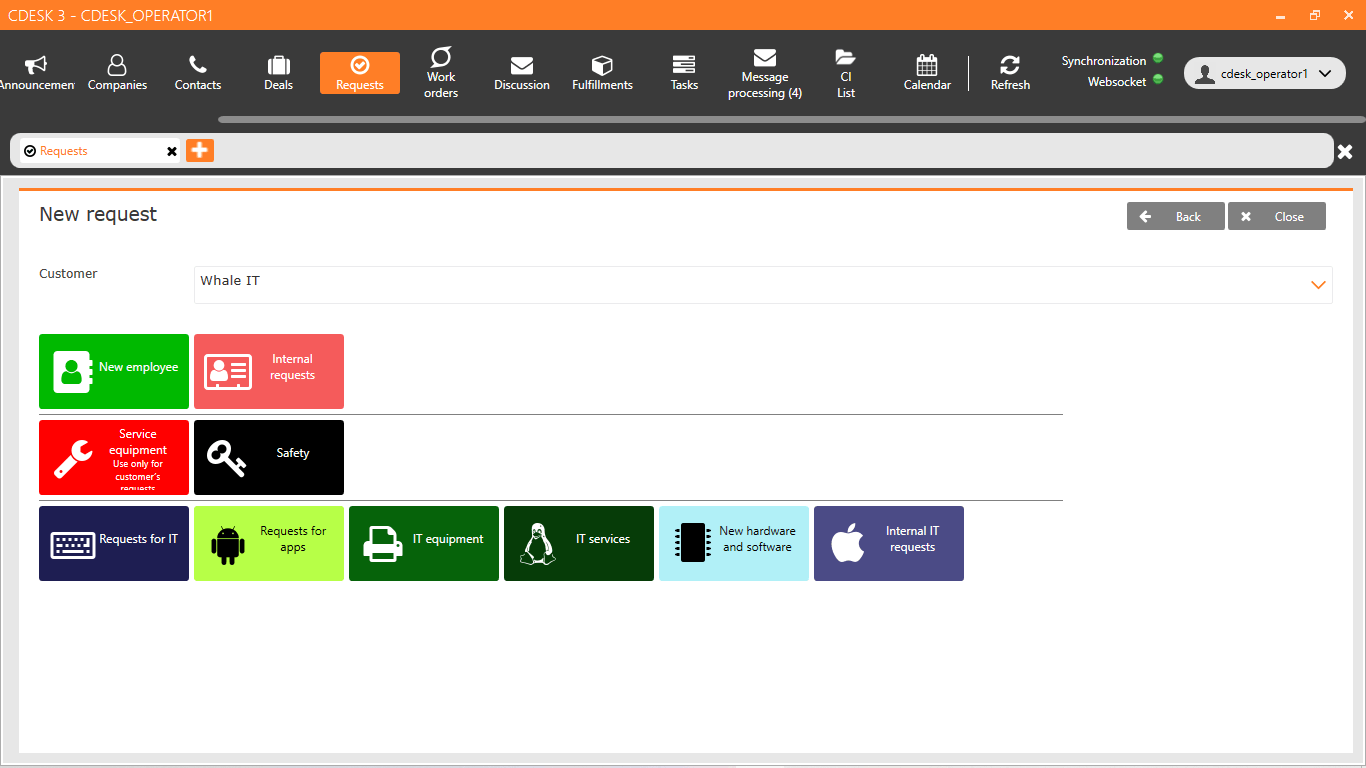
The first step is to select a customer. Then select tiles with associated templates
When you click on a tile, a form will open to create a request. Depending on the template settings, some fields are pre-populated, some may be hidden. The meaning of each field is described above in the section Meaning of Fields When Making a Request.
Create a New Request Using the Mobile App
Before making a new request, you need to log in to the CDESK application. Use the same login as for the website.
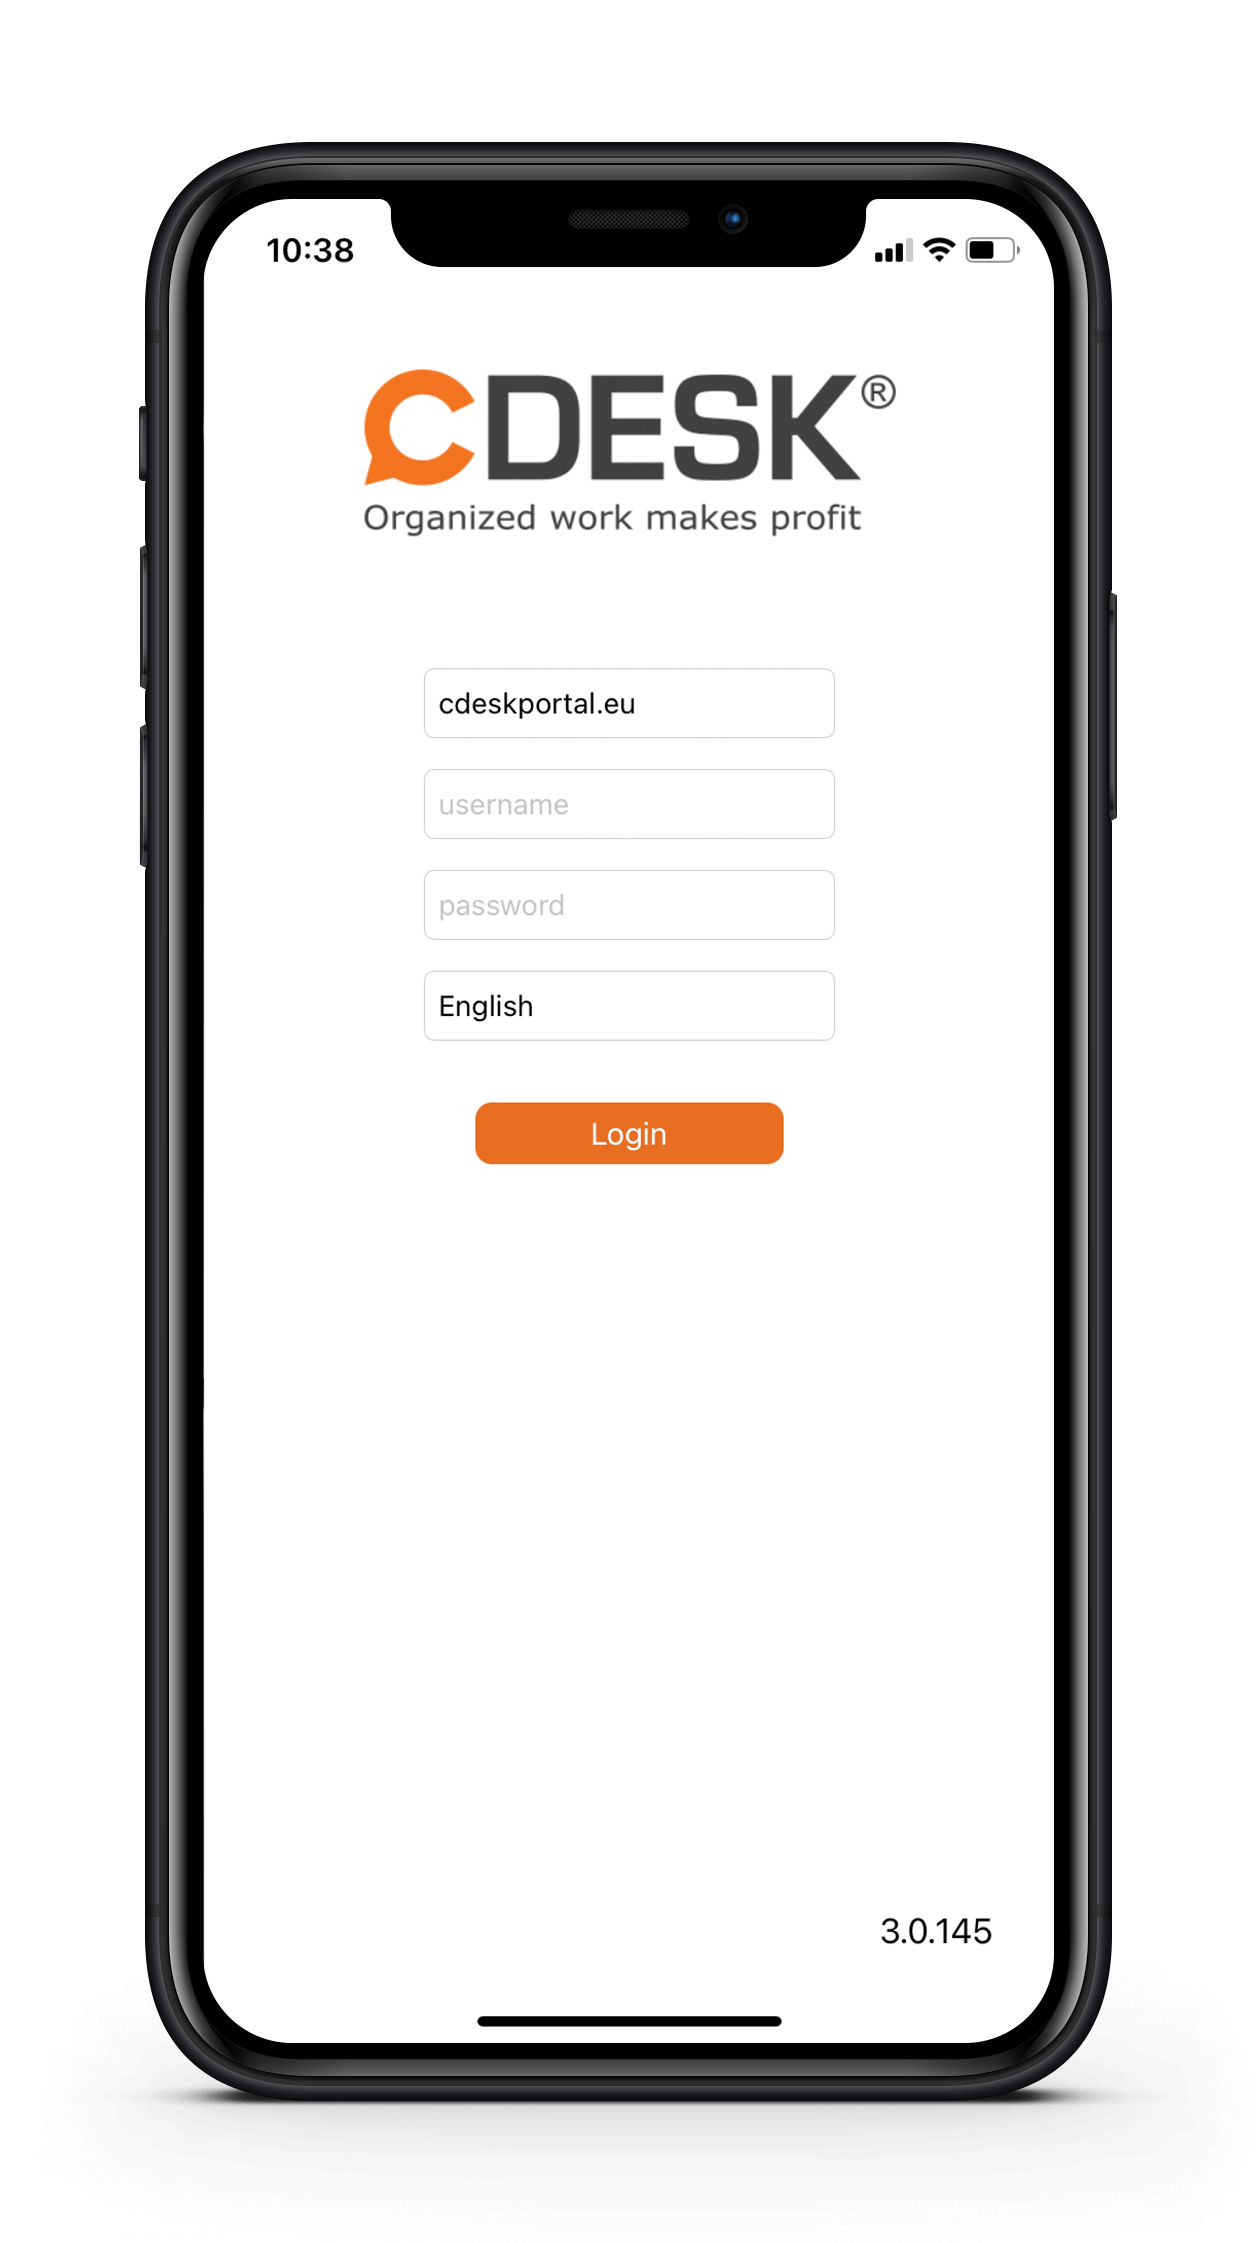
After logging in to the CDESK system, you can add a new request using the quick select button on the bottom bar.
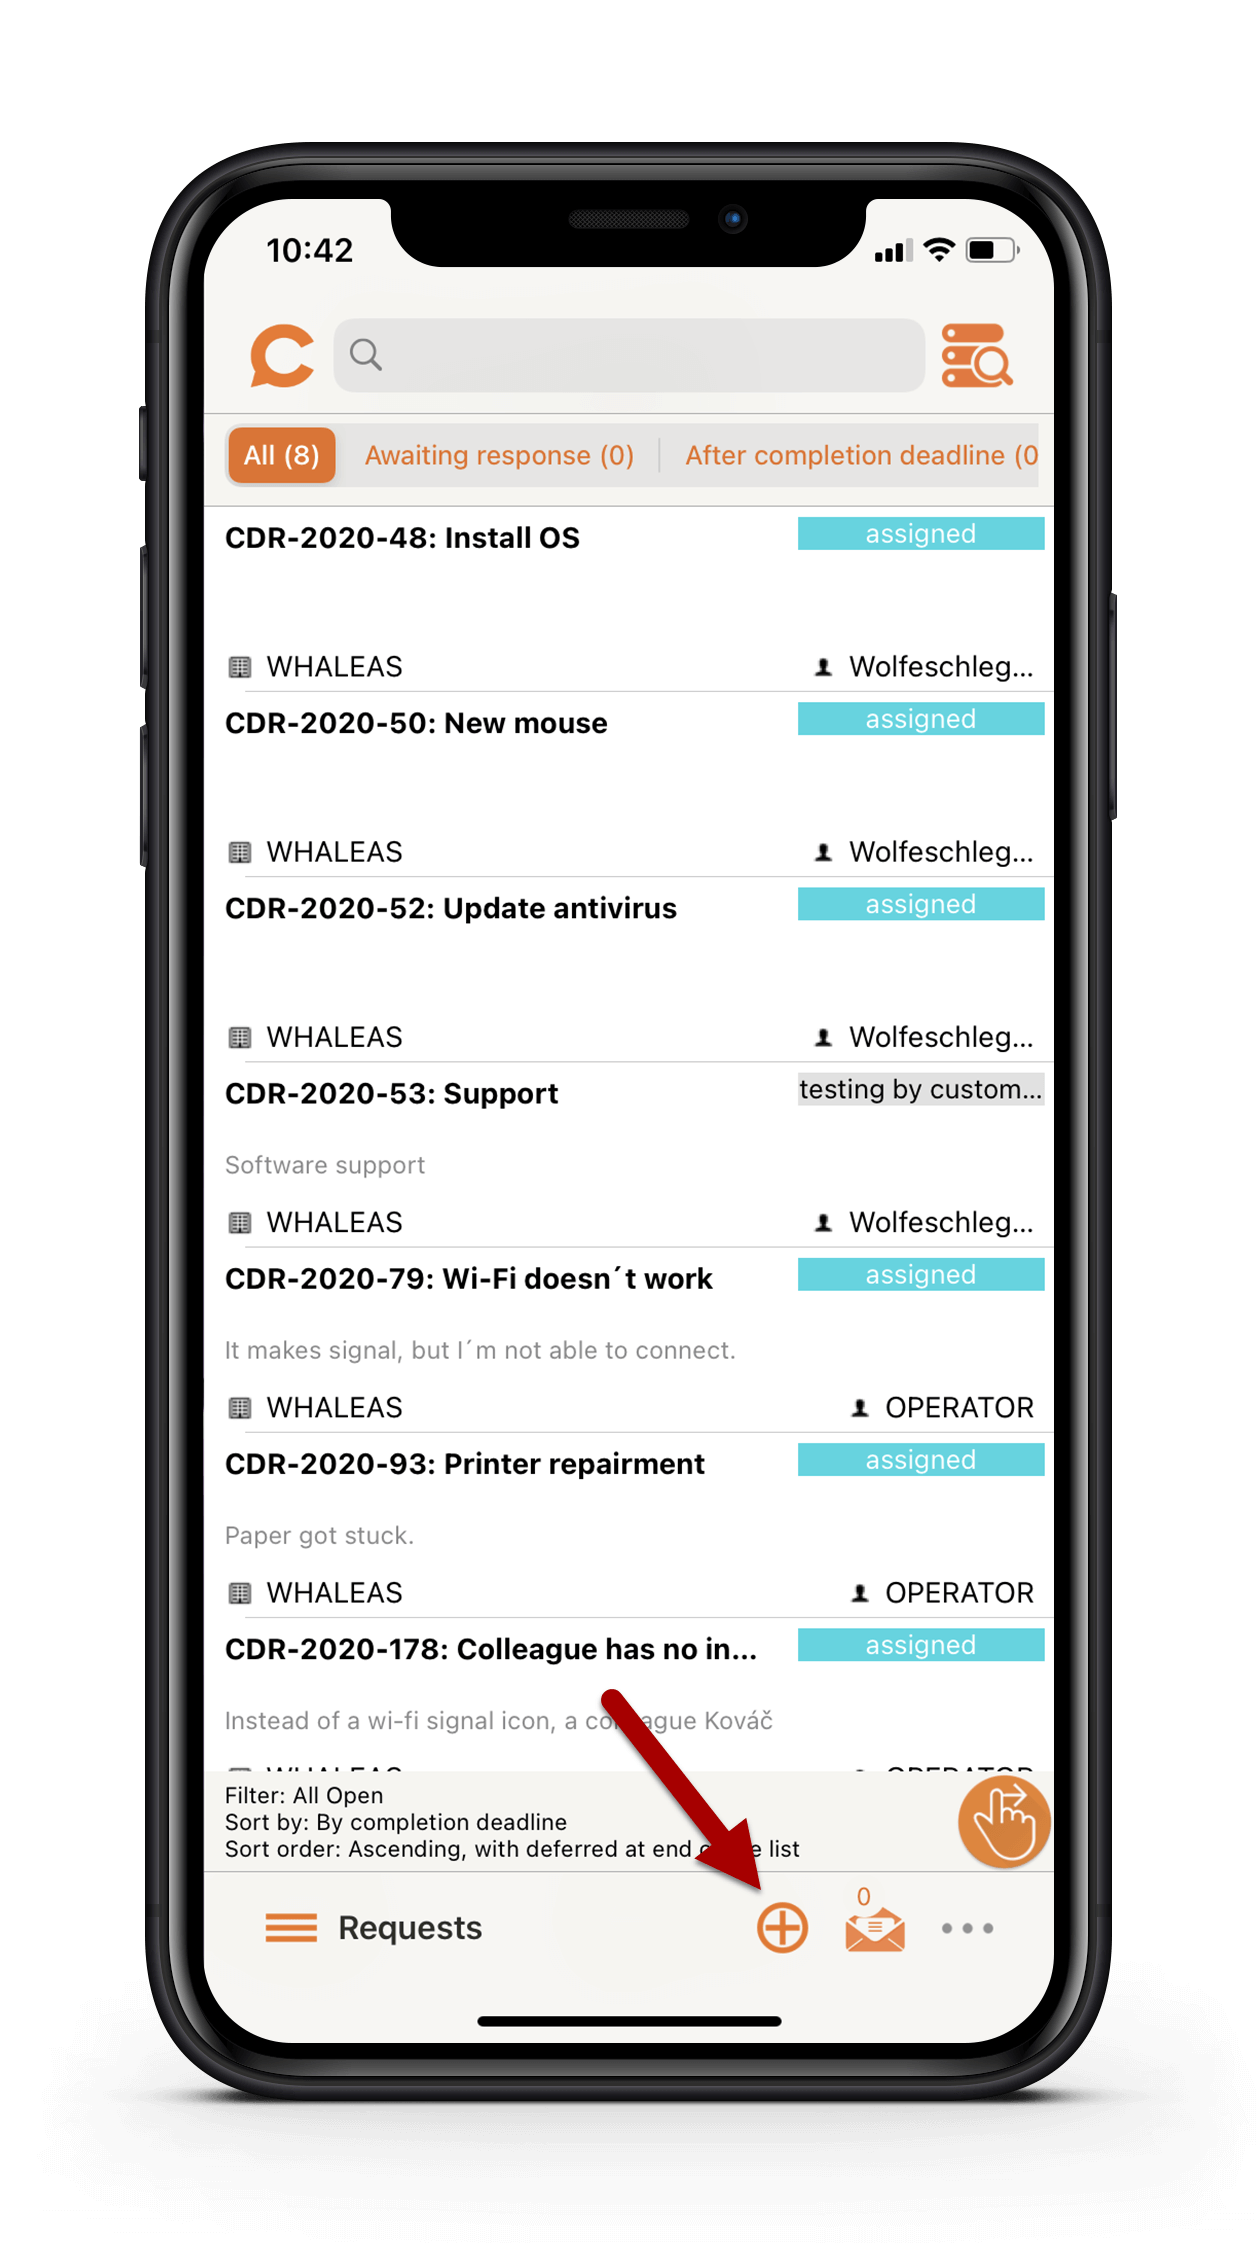
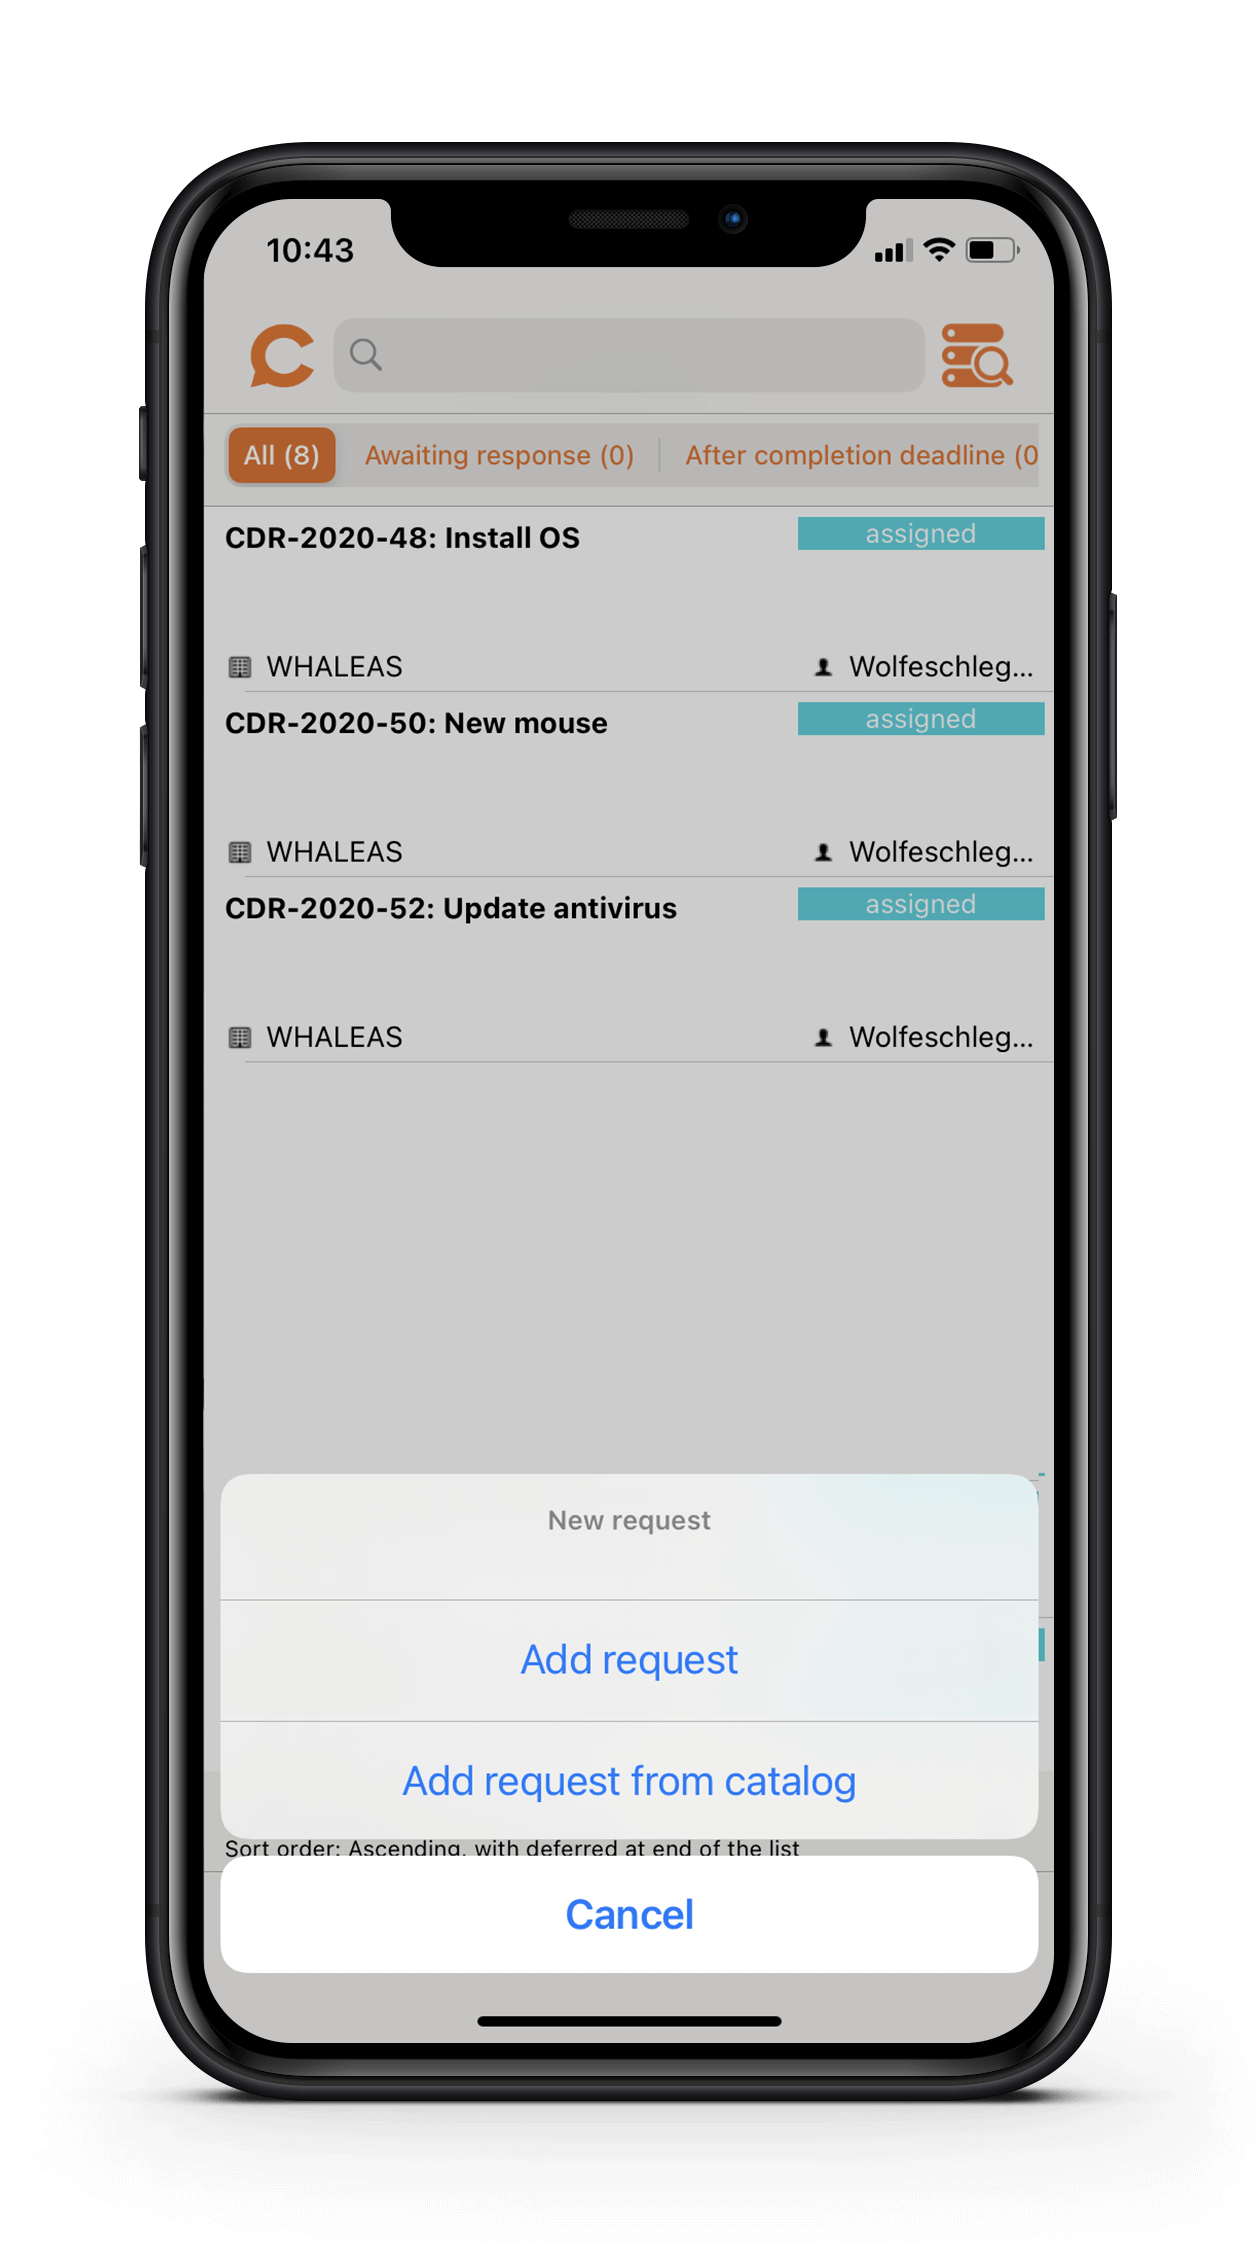
After clicking, select the Requests option and then Add request. If only the Add request from catalog button is displayed, continue with the paragraph Request from the Catalog of Requests via the mobile app.
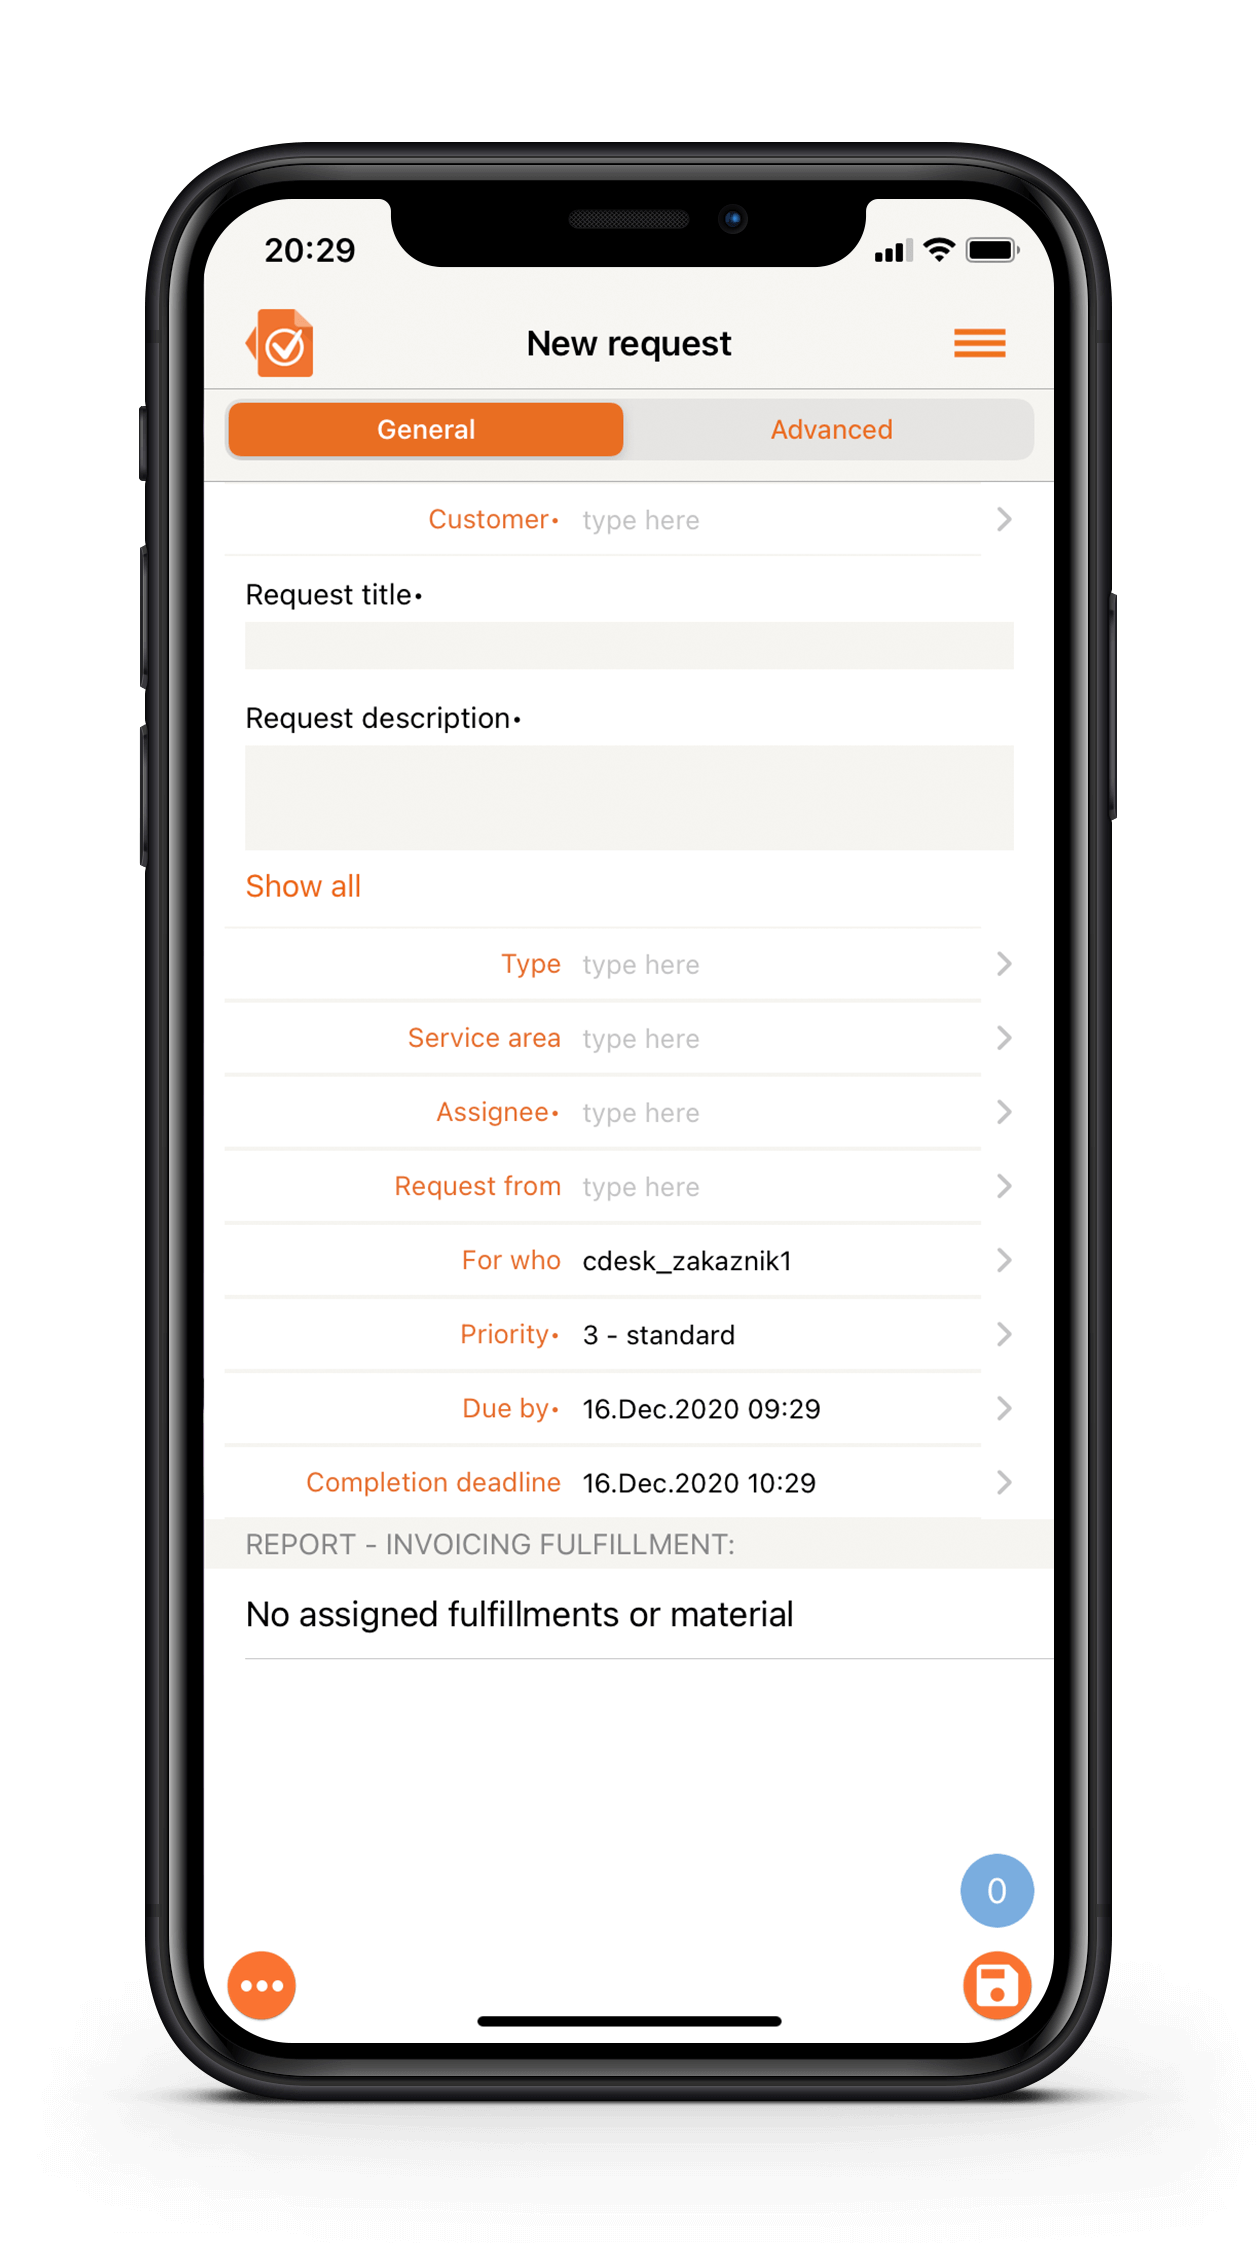
After selecting the Add request option, a form for entering the request opens. The meaning of each field is described in the paragraph Meaning of Fields When Making a Request.
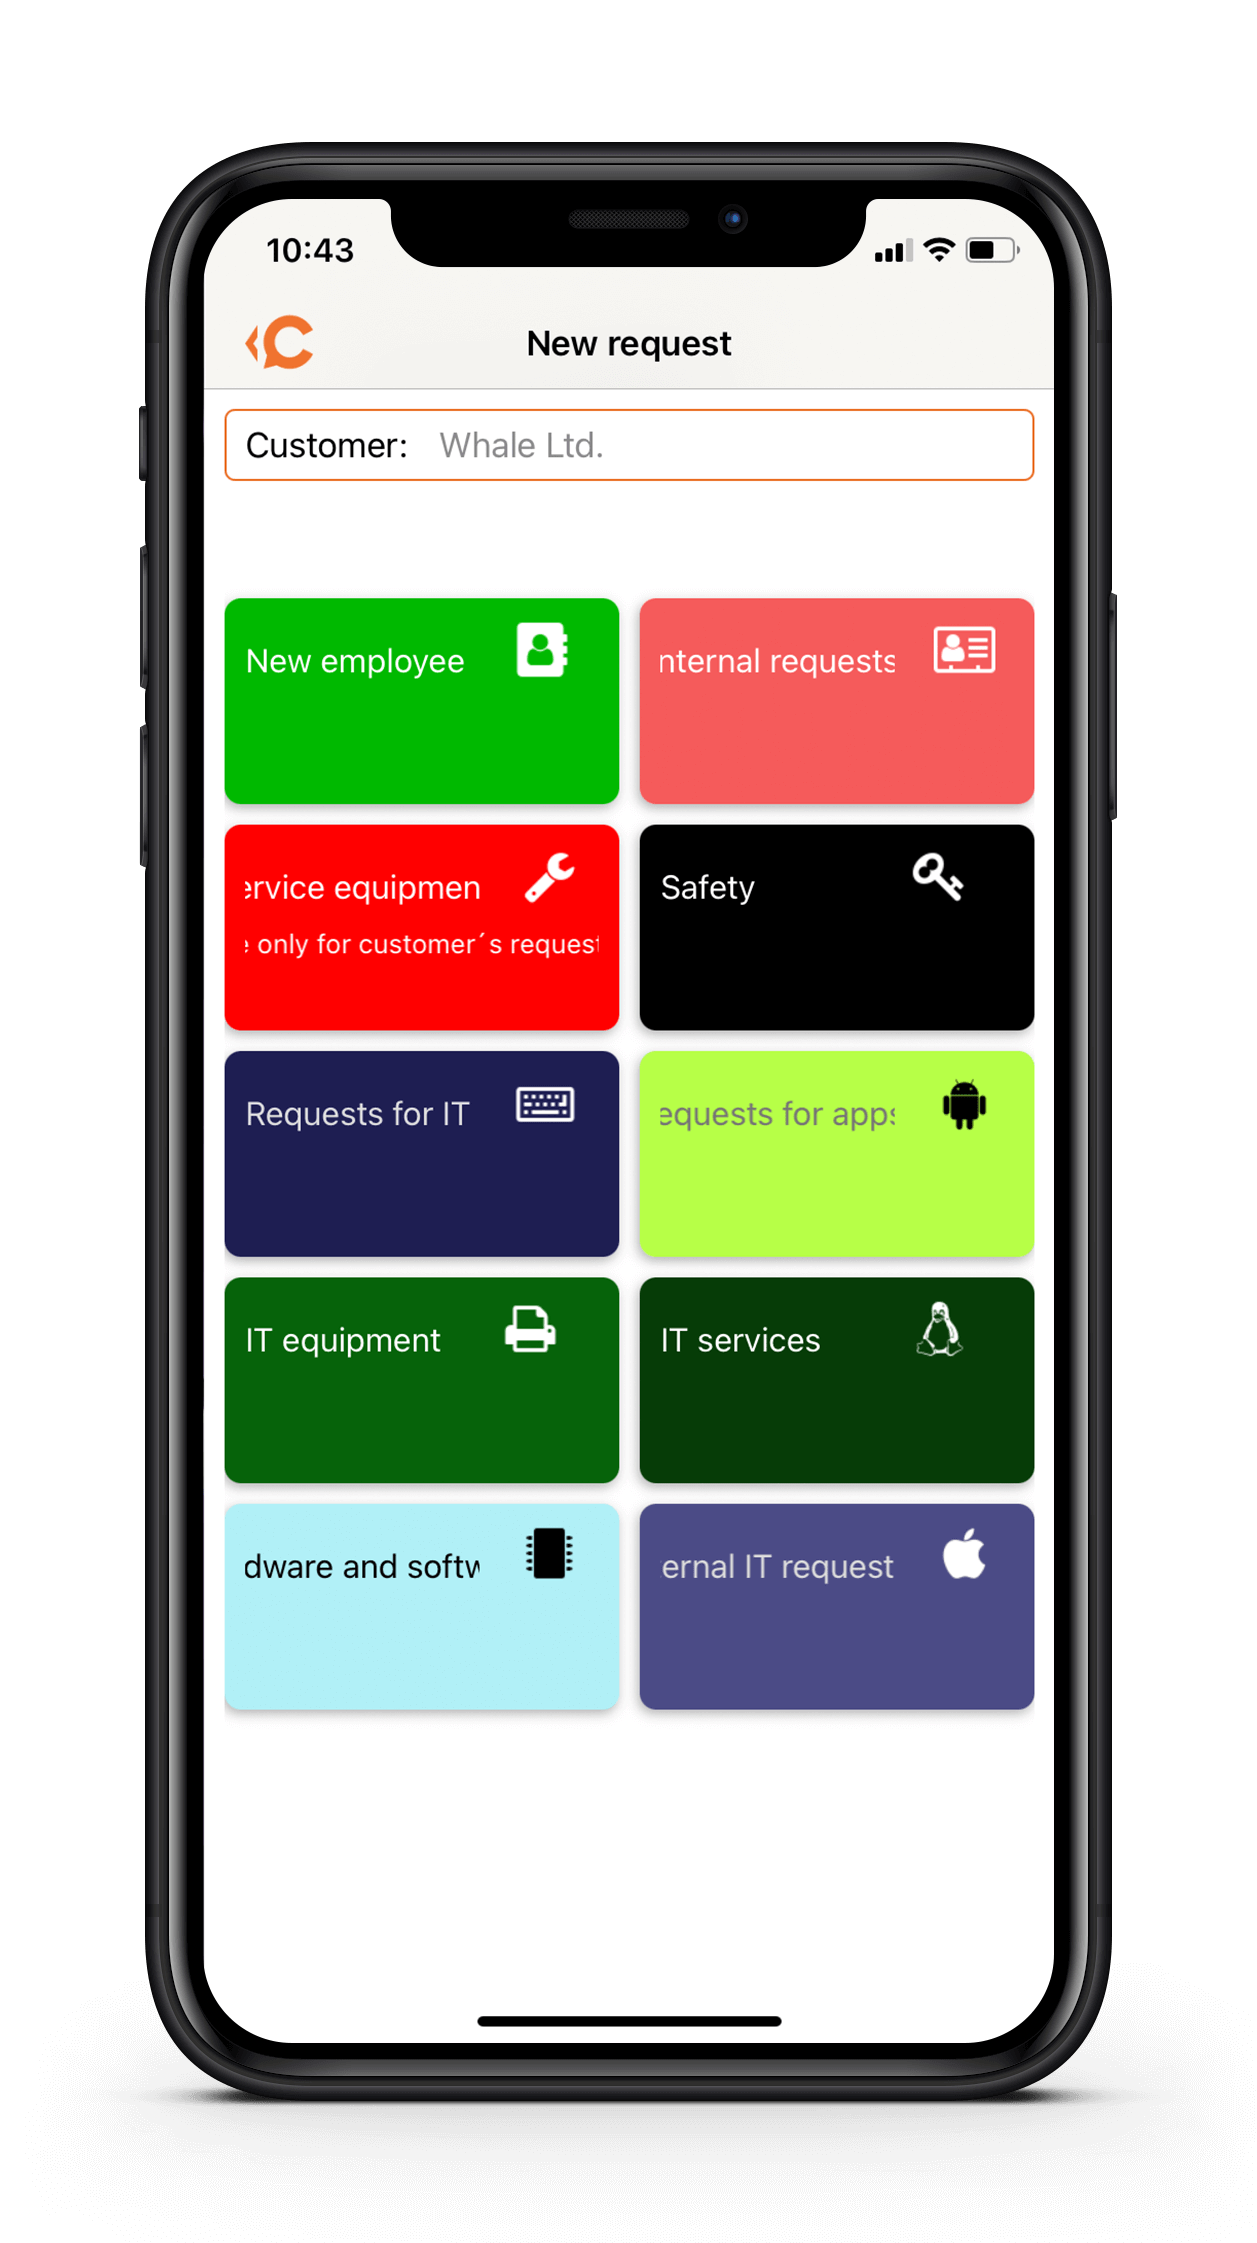
Requests from the Catalog of Requests via the mobile app
To add a request from the catalog of requests, click the quick select button and select the Add request from catalog option.
The first step is to select the customer and then the tiles with the associated templates.
When you click on a tile, a form will open to create a request. Depending on the template settings, some fields are pre-populated. The meaning of each field is described above in the section Meaning of Fields When Making a Request.
Create a New Request Using the Outlook Plugin
The Outlook Plugin is an extension of CDESK into Outlook. It enables fast request entry and archiving of discussion directly from this email client.
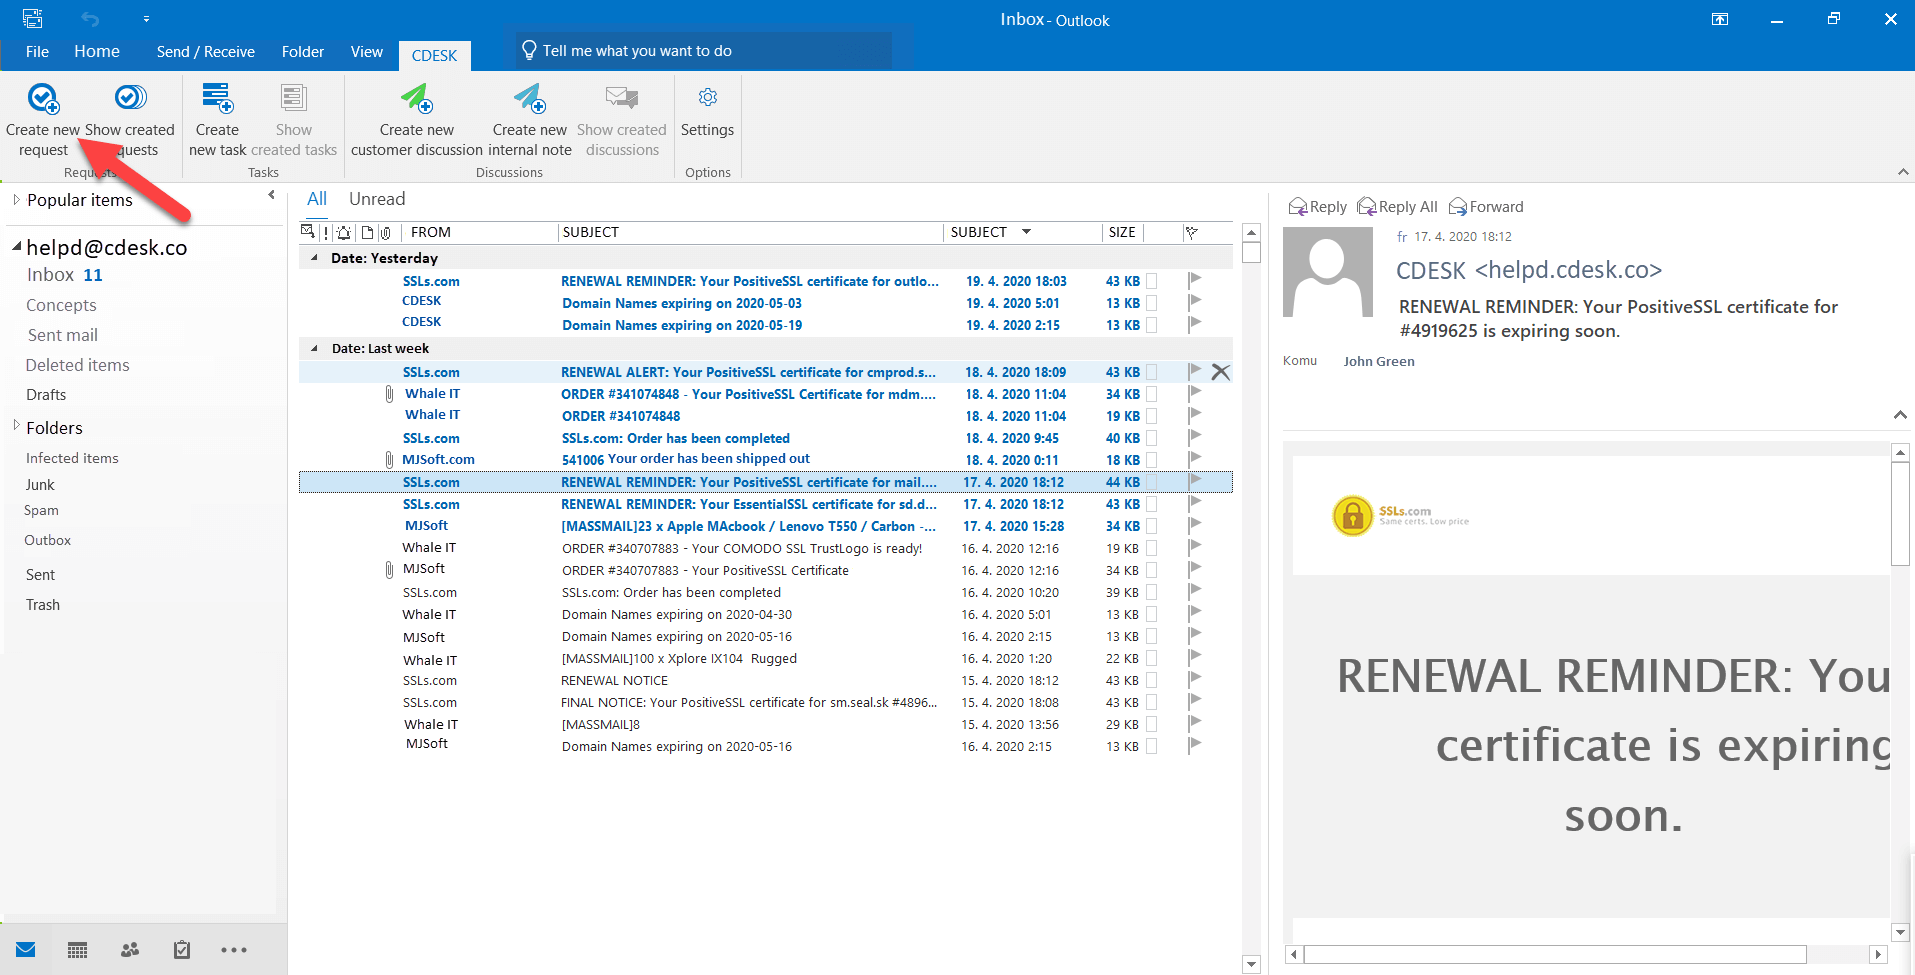
After installing the Outlook Plugin package, a new toolbar – CDESK – is added to the toolbar in Outlook. Clicking on it gives access to several options. You create a new request by clicking the Create a new request button located at the start of the toolbar.
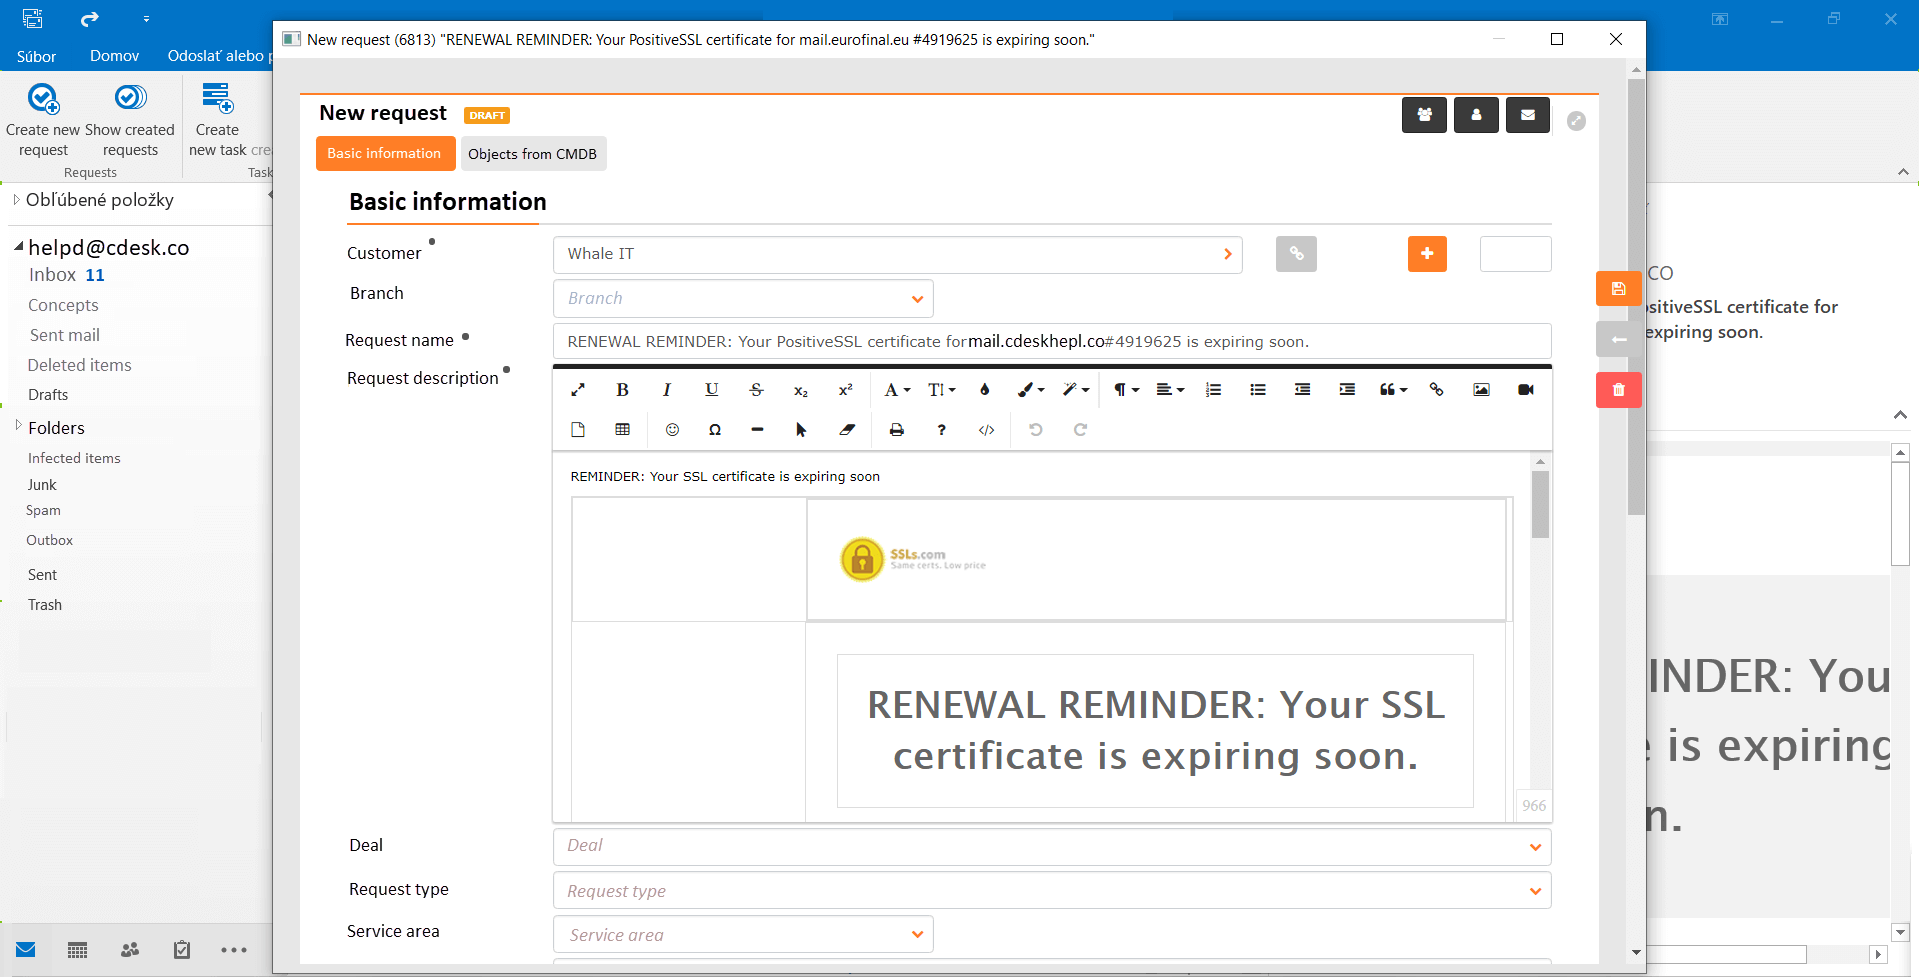
After clicking, a form like the one for entering a request is displayed. The meaning of each field is described HERE.
Create a Request from the Catalog of Requests Using the Outlook Plugin
The Outlook Plugin also offers the option to enter a request from the catalog of requests.
The button for creating a request from the catalog is displayed only if you have the catalog of requests enabled in CDESK. You enable the catalog of requests in Global Settings→Requests→Catalog of Requests. If the button still does not appear, check whether you have permission to create requests from the catalog of requests. You set permissions in CDESK in Users and Groups→Users→the specific user→the Permissions→Requests→New records via the Catalog of Requests tab.
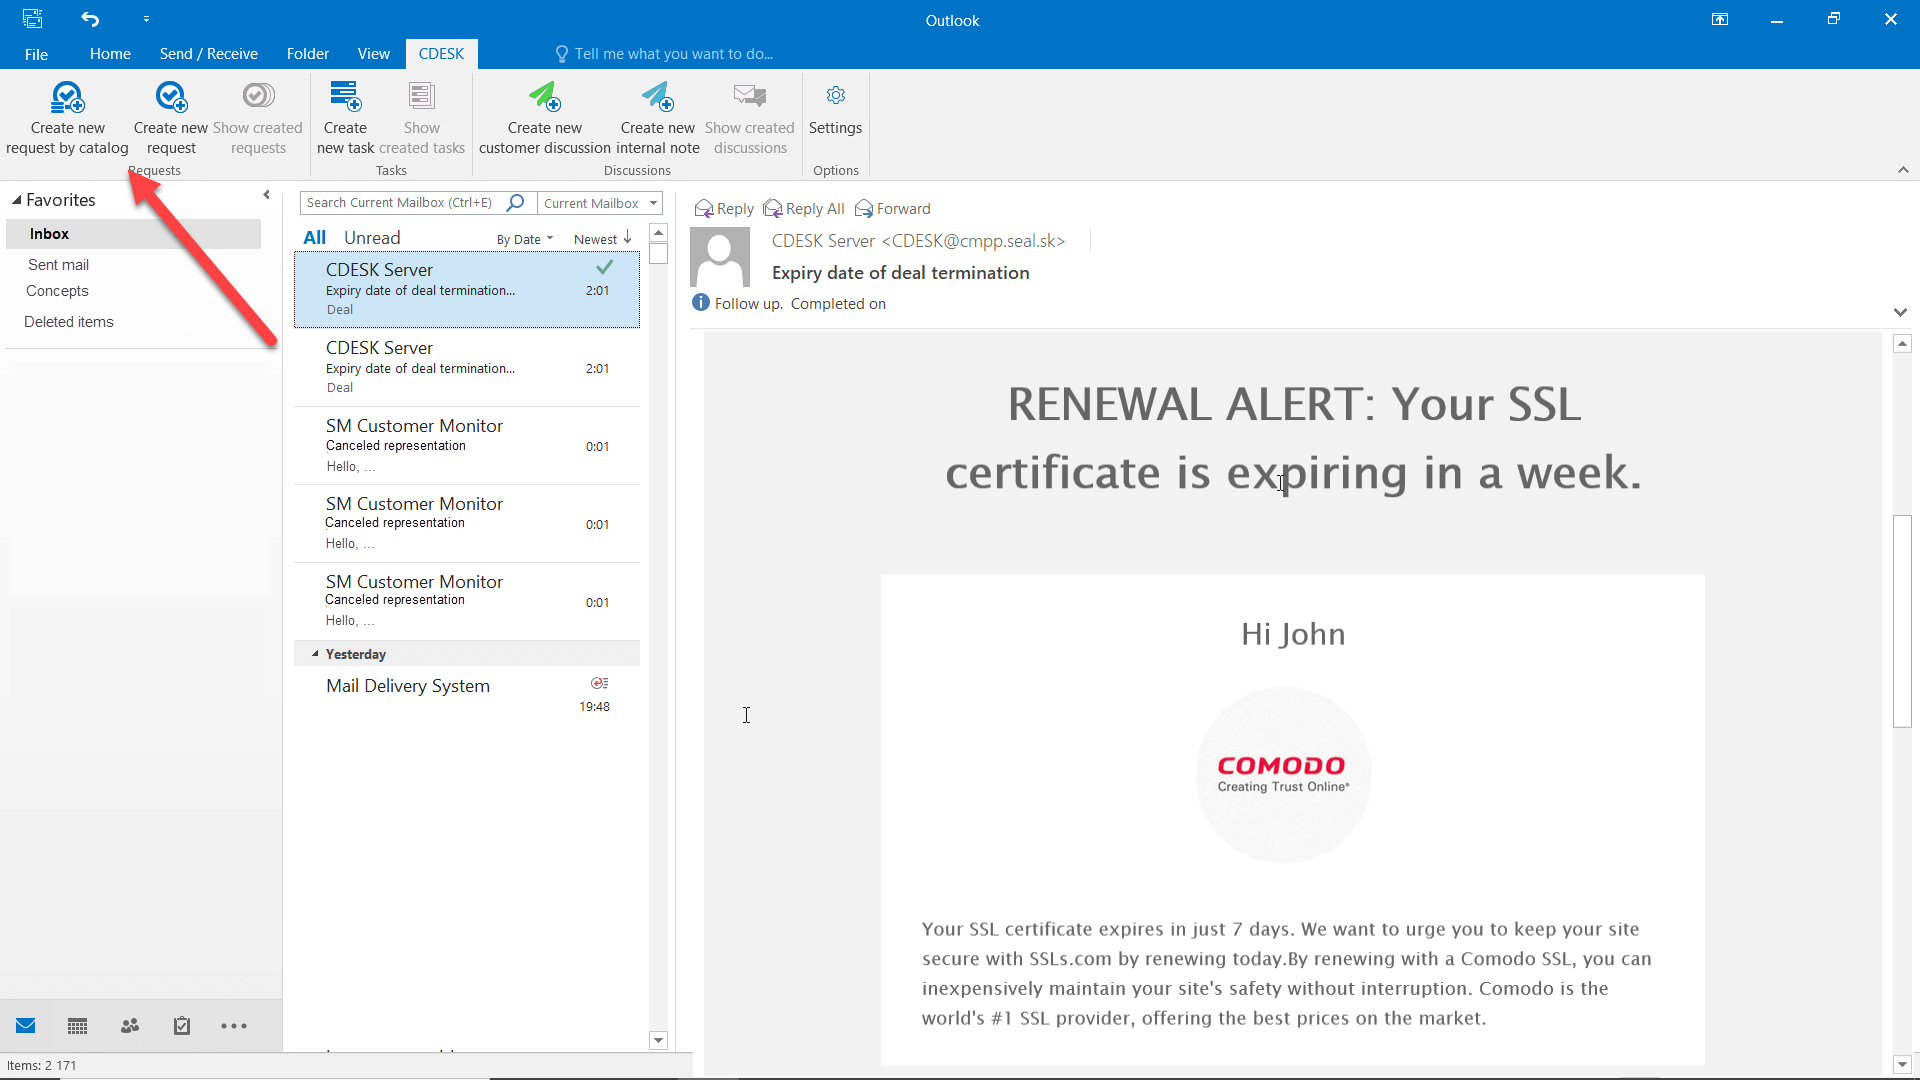
After clicking the Create a new request according to the catalog button, a new modal window opens where you select the customer.
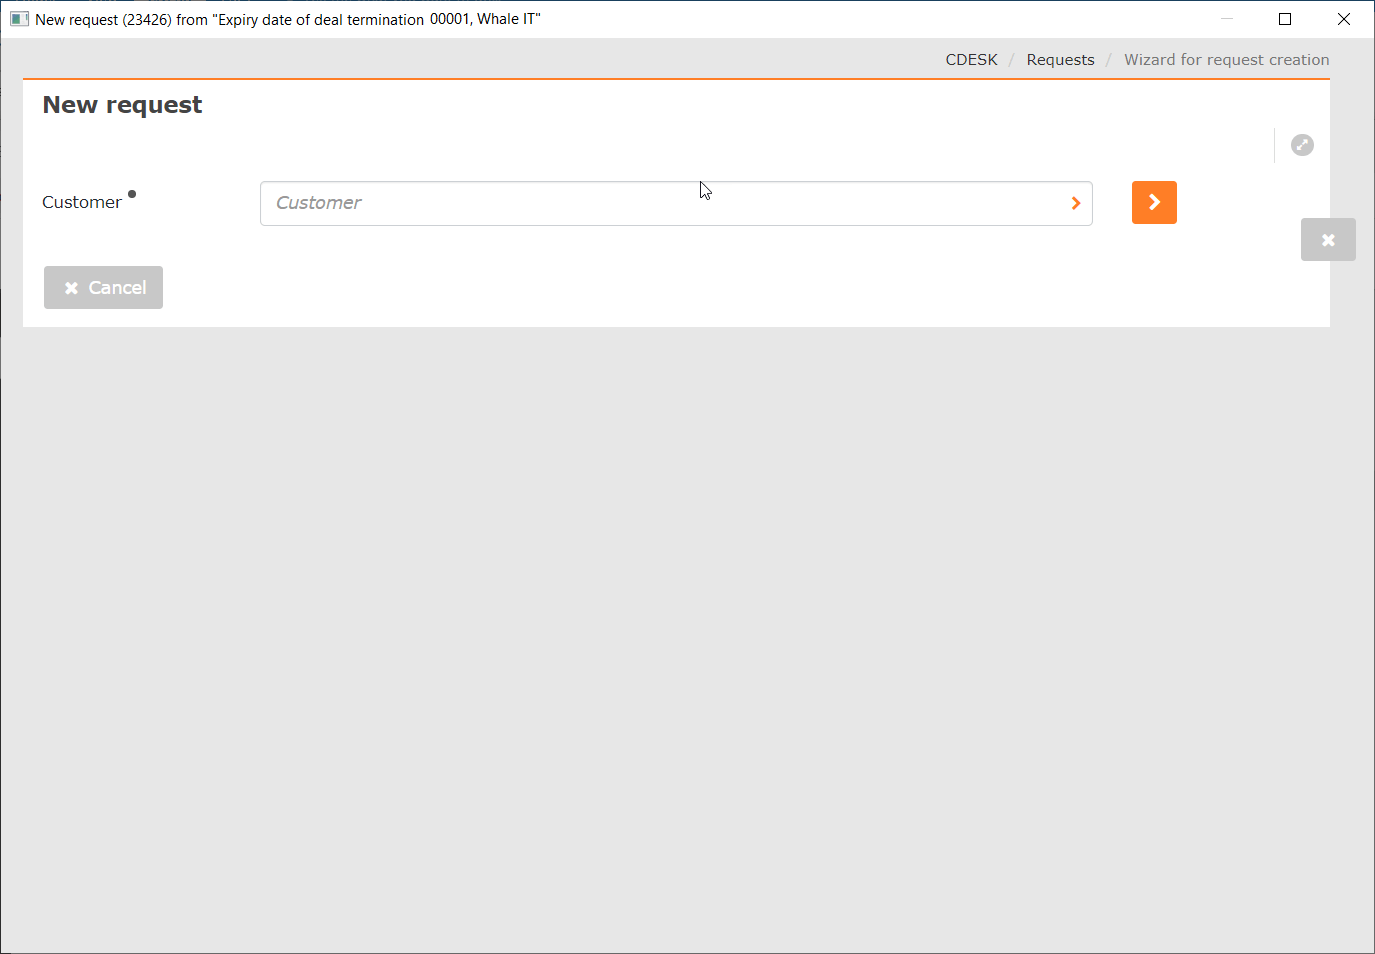
After selecting the customer, the tiles accessible for that customer are displayed. After selecting a tile, a form like the one for entering a request is displayed. The meaning of each field is described HERE.
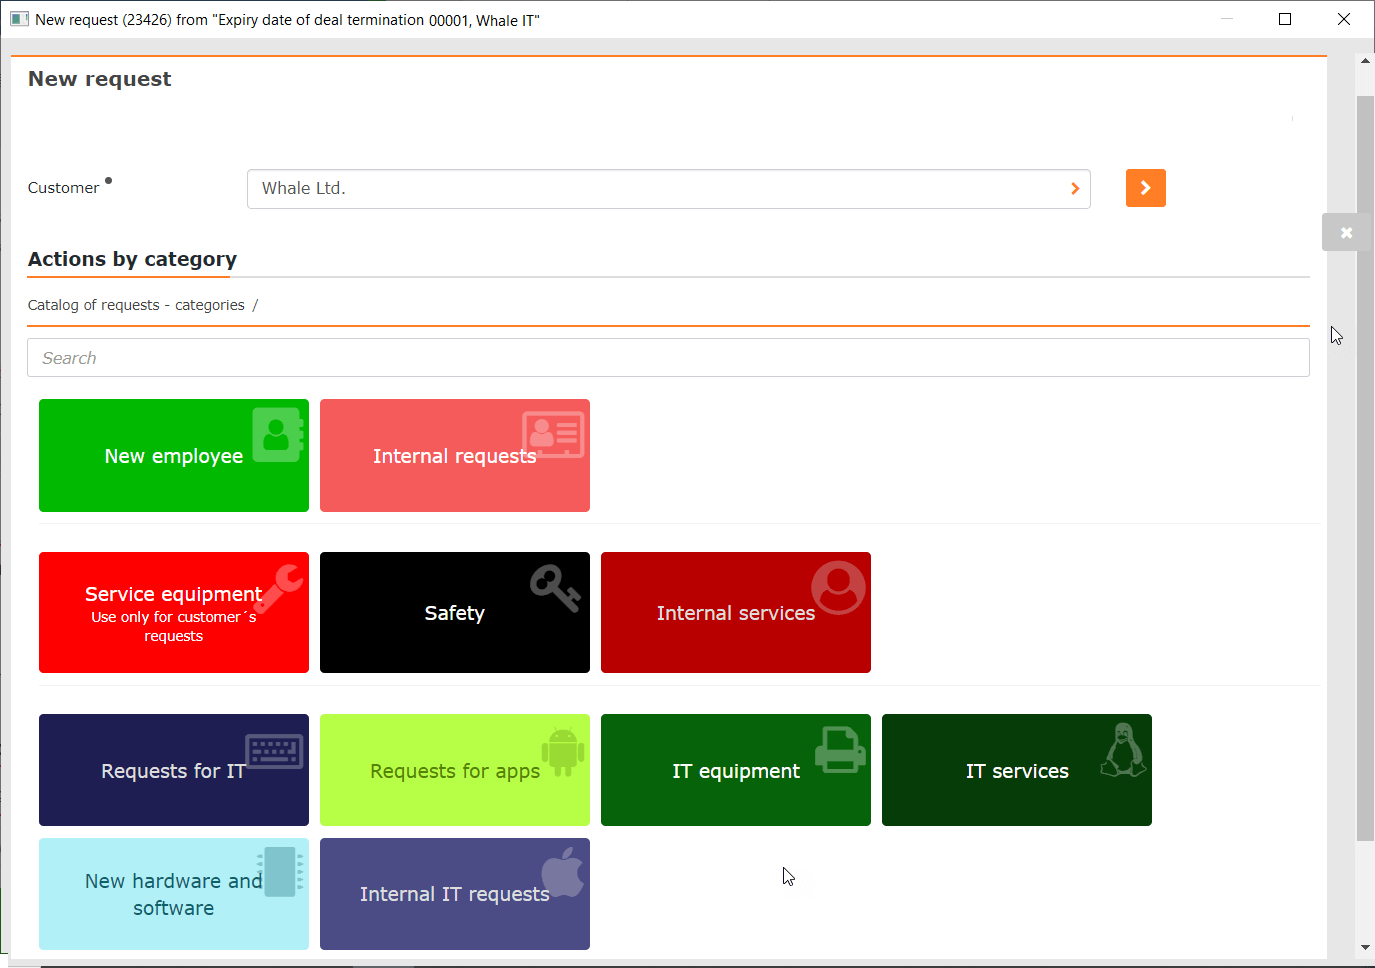
Most Common Actions on a Request
Requests created by any of the methods are displayed in Requests→List of Requests, from where you can work with them further.
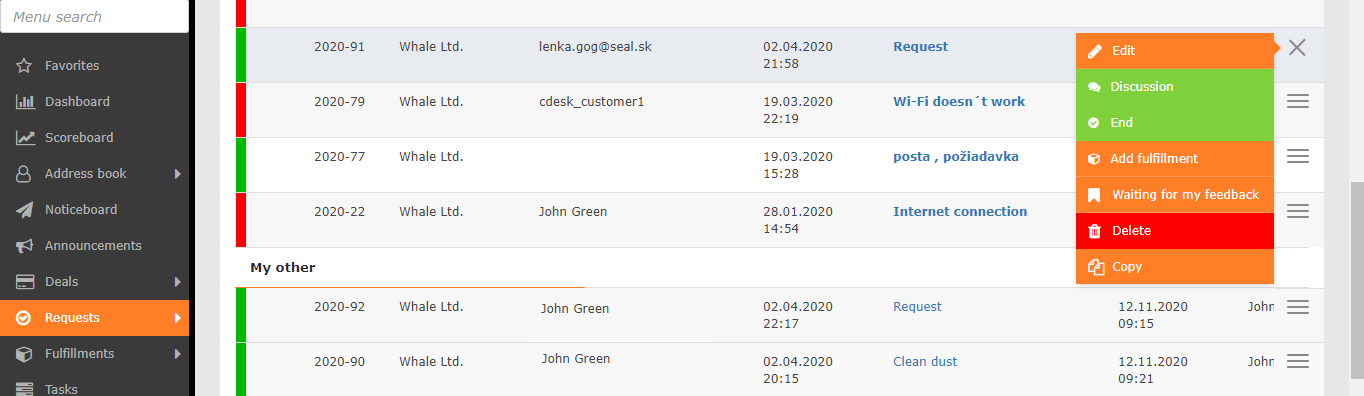
Double-clicking on a request row, or clicking the context menu and selecting Edit, opens a window with a form similar to the one for creating a request, extended by additional options that make the requests module a comprehensive tool not only for the help desk:
- the option to change the request status
- discussion with the customer and internal discussion
- adding tasks to the request
- adding work orders to the request
- adding billing and internal fulfillments of the request
- request history
- adding offers to the request
- adding links to other requests
In the Basic Information section, only the Assignee and Request status fields are of fundamental importance for working with a request, as they affect the meeting of the deadlines defined in the SLA.
Changing the Assignee and the Person Who Requested the Request
If editing the request before assignment is disabled in Global Settings→Requests→Requests, then on a request that has only an assignee group set (i.e. the request is in the received status), only the Assignee field can be changed. This applies only when the Limit assignee selection by assignee group feature is enabled. After the request is assigned to a specific assignee, the option to edit almost all fields of the form becomes available, with the exception of the customer field (the customer field can be edited as long as a work order has not been added to the request) and the SLA. If the Limit assignee selection by assignee group feature is disabled, the request is editable immediately after saving.
The deadlines on the request may be editable depending on the deadline change settings in the SLA applied to the request. In the SLA, you can set who can change the deadlines at which priority.
Changing the Request Status
In Global Settings→Requests→Request statuses you can enable and use a total of up to 27 different request statuses. The meaning of the individual statuses is described in Global Settings→Requests→Request statuses. The highlighted statuses represent the basic statuses that cannot be disabled. They also affect the counting of deadlines.
received
waiting for approval
assigned
verified by responsible person
offer
waiting for customer
accepted by cust. and RP
ordered
start of implementation
working on AS
in progress
waiting for 3rd party
resolved by subcontractor
deployment activities
suspended
for evaluation by responsible person
internal testing
testing by customer
complaint
postponed
AS provided
AS accepted
completed
realized
completion accepted
completed without acceptance
rejected
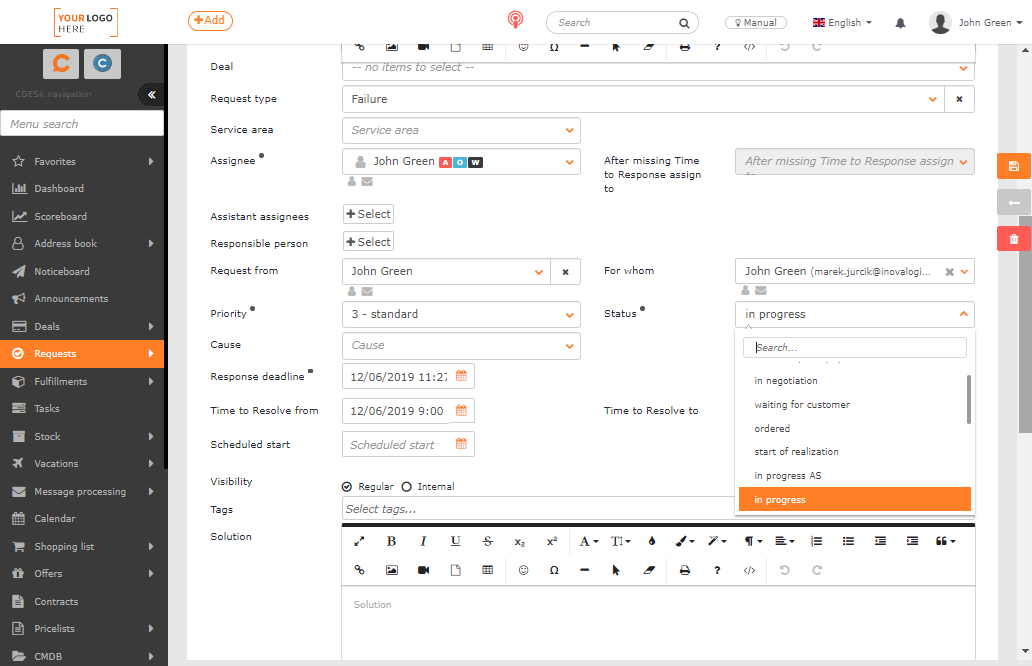
The statuses can be divided into several groups:
Statuses informing the customer about the progress of the request resolution. These statuses affect only the counting of the response time; however, it is possible to set the time to fulfilment of the request deadline not to be counted in selected statuses. These are the following statuses:
Received
waiting for approval
assigned
verified by responsible person
offer
waiting for customer
accepted by cust. and RP
ordered
start of implementation
working on AS
in progress
waiting for 3rd party
resolved by subcontractor
deployment activities
suspended
for evaluation by responsible person
internal testing
testing by customer
complaint
postponed
AS provided
AS accepted
Statuses that affect the request deadline counter and at the same time evaluate its fulfilment:
waiting for approval
assigned
AS provided
AS accepted
realized
Changing the Request Deadlines
For each of the request deadlines, the time to fulfilment of the deadline is counted down. If the deadline is met, the countdown stops and it is evaluated whether it was met on time. For some statuses, it is possible to stop the countdown. We cover this in more detail HERE. If so, a flag is displayed; for an exceeded deadline, a ! is displayed.
Each request has a set response time and time to resolve; depending on the settings, optional deadlines may also be displayed and counted. The countdown of time and the evaluation of the fulfilment of the individual deadlines is governed as follows:
- Time to Own (1) – the countdown of time stops when a specific request assignee is assigned, if the new request was assigned to a group of assignees. For a request assigned to a specific assignee already when it was created, no countdown takes place and the deadline is marked as met
- Time to Alternative Solution (1) – the countdown of time stops when the request status is changed to AS provided
- Response time* – the countdown of time stops with one of the following changes in the request: changing the status, adding a post to the discussion with the customer, or adding a fulfillment
- Time to resolve from (1) – this is a fixed deadline. It marks the date when work on the request began
- Time to resolve* – the countdown of time stops when the request status is changed to completed
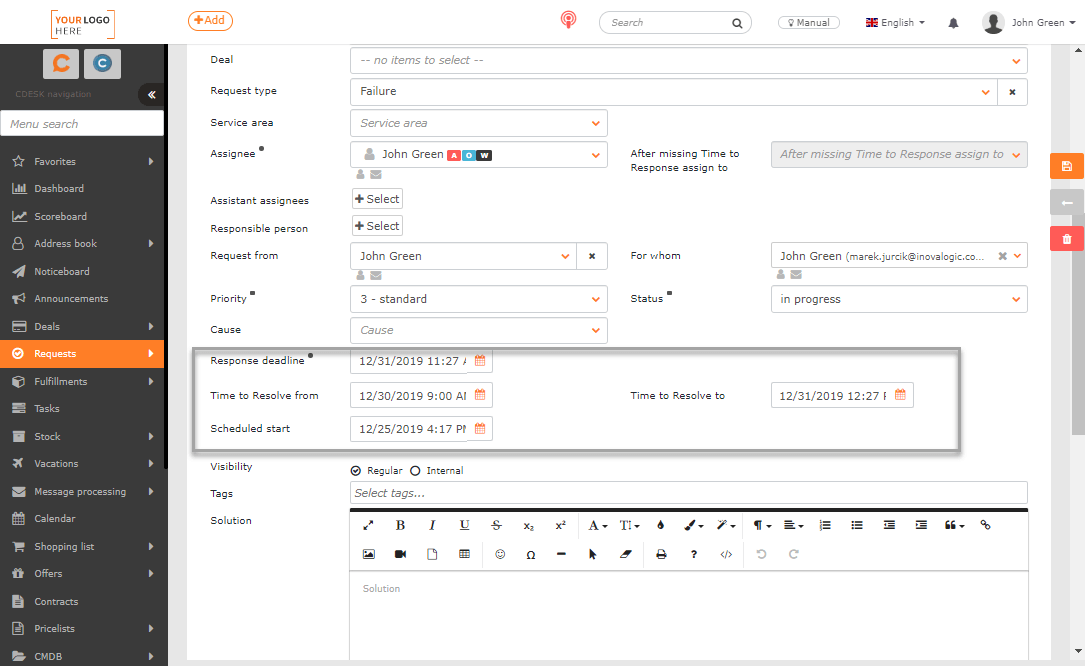
(1) optional deadlines – time to own, time to alternative solution, and time to resolve from are displayed if they are enabled in Global Settings→Requests→Basic Settings and at the same time the Counting of request deadlines option is enabled on the customer card in the SLA section. These deadlines are displayed if they are allowed in the permissions (Requests→Date fields)
Recording the Solution and the Internal Note
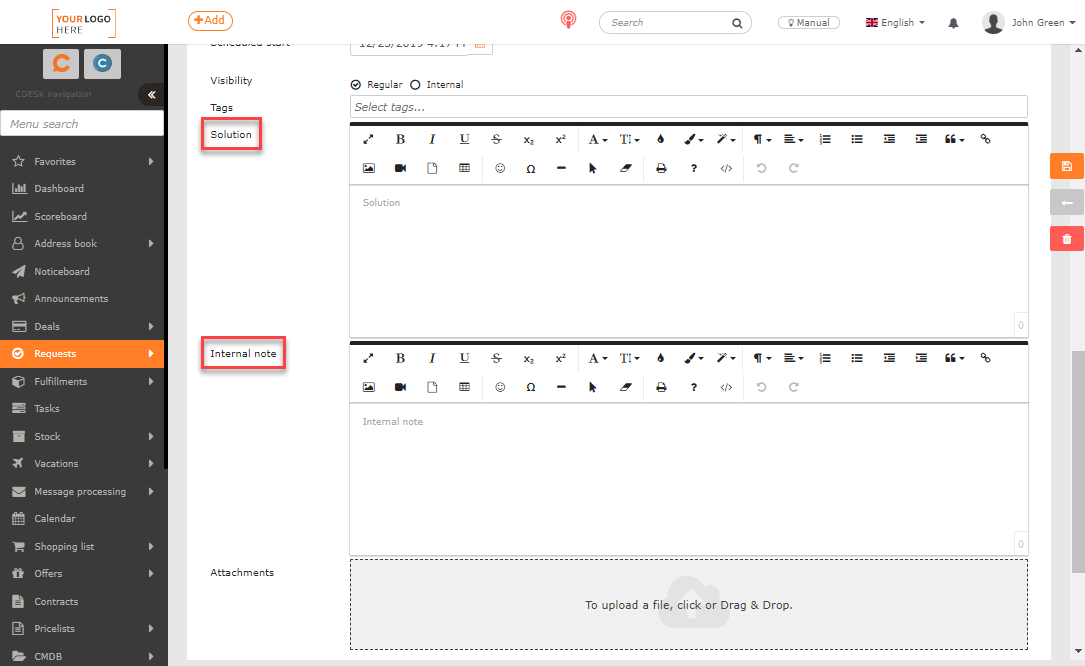
The Solution field is used to record the way the request was resolved, if you do not use Fulfillments. Fulfillments allow you to record the time course of resolving the request, bill the recorded work to the customer, and record internal time worked, and therefore we would recommend that you consider using fulfillments instead of the plain text Solution field.
The internal note is intended for internal records, because it is not accessible to the customer.
On a saved request, you can freely edit the Solution and Internal note text fields.
Completing a Request
After all actions have been completed, switch the request to the Completed status. (If the Realized status is enabled in Global Settings→Requests→Request statuses, you can use that one too. However, the Realized status is intended mainly for superiors who are to check the work realized on the request. After switching the request to this status, the buttons for accepting / not accepting the request, as described in the following text, do not appear.)
Accepting the Completion of a Request While Logged in to CDESK
When the completion accepted status is enabled, after the request is completed, the options for accepting / not accepting the completion become available. With notifications enabled, the customer is also informed about the option to accept the completion via an email notification.
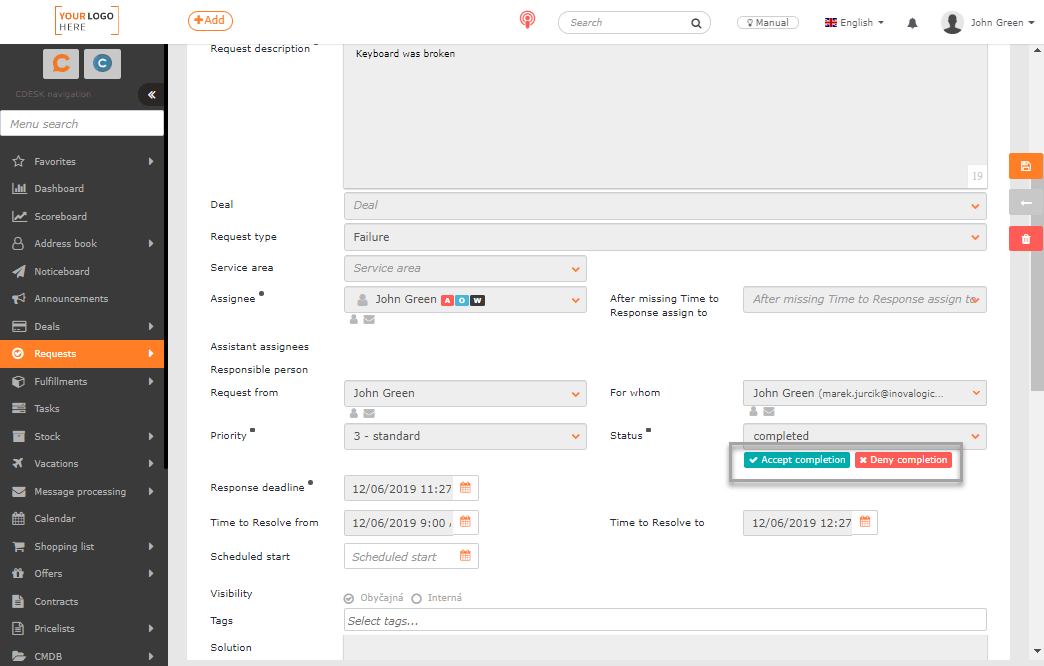
By selecting the Accept completion option, a window opens with the possibility to add a note to the acceptance, as well as the possibility to rate the assignee. After the completion is accepted, the request status changes to completion accepted.
The request can also be completed by setting it to the realized status. However, when this status is selected, the buttons for accepting / rejecting the completion are not offered.
Rejection – Complaint of a Request While Logged in to CDESK
By selecting the Reject completion option, a window opens for stating the reason for the rejection. Stating this reason is mandatory.
If the complaint status is disabled in Global Settings→Requests→Request statuses, the rejection returns the request to the in progress status and the deadline counter is reactivated.
If the complaint status is enabled, rejecting the completion sets the request to the complaint status. The Justified complaint and Unjustified complaint buttons become available on the request.
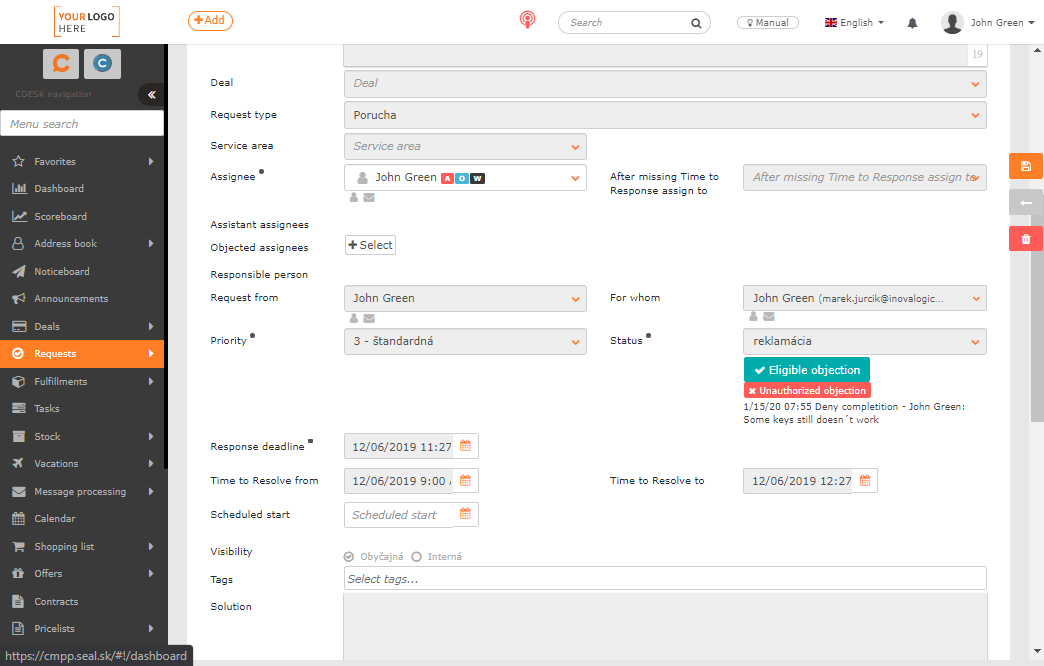
By selecting the Justified complaint option, the request returns to the in progress status and the deadline counter is reactivated. By selecting Unjustified complaint, a new window opens where you need to state a note to the unjustified complaint. This note is mandatory. After saving the note, the request is set to the completed without acceptance status.
Completing a Request via Email Notification
After switching the request to the Completed status, you receive an email notification about the change of the request status. If the Completion accepted status is enabled in Global Settings, the notification will contain buttons for accepting / rejecting the request directly via email. In that case, there is no need to log in to the system. This function is intended primarily for customers who do not have access to CDESK.
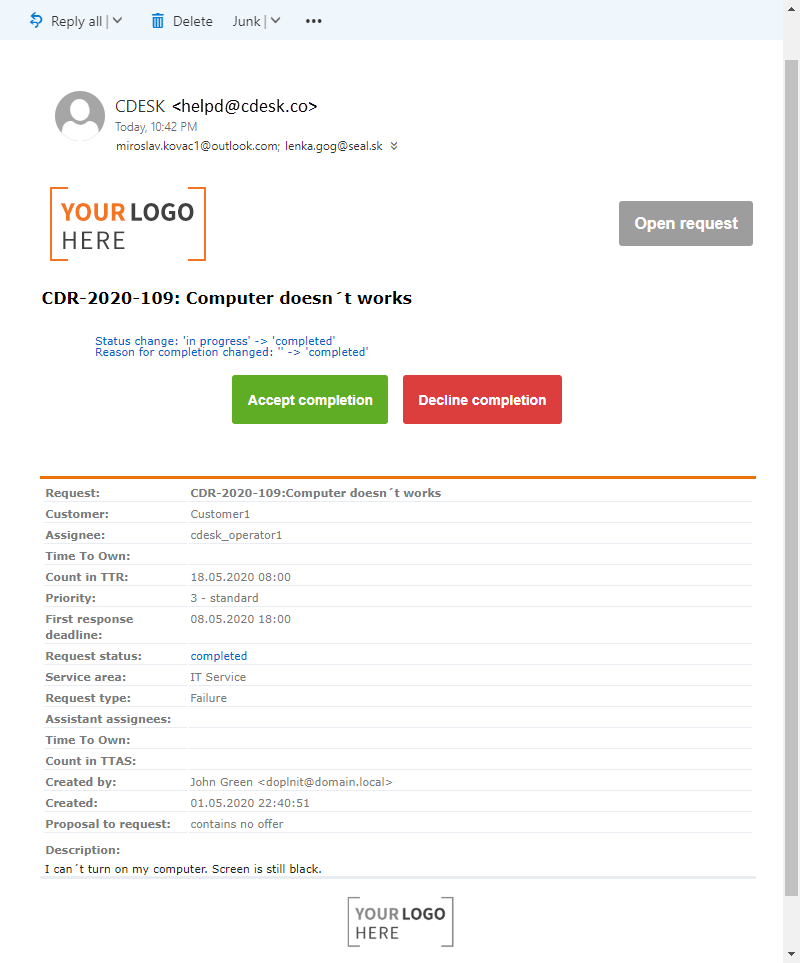
Accepting the Completion of a Request via Email Notification
You accept the completion of the request via the notification by clicking the Accept completion button. A form for accepting the completion then opens in a new window of your default web browser.
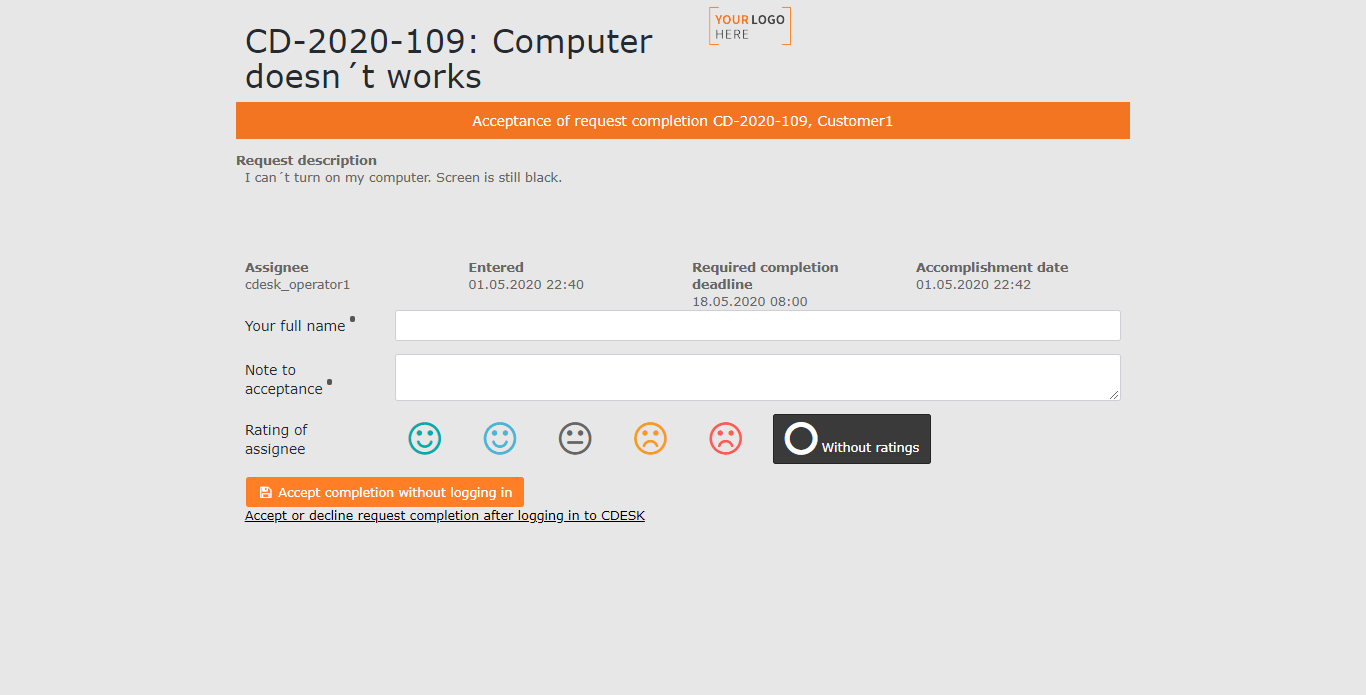
The upper part of the form contains basic information about the request. You cannot change it. Below it are fields that you must fill in for the acceptance of the completion to be valid:
Your full name: Enter your first name and surname
Reason for acceptance: Enter the reason why you decided to reject the completion of the request
Assignee rating: Select a pictogram to rate the assignee’s work on the request. This information is not mandatory. If you do not wish to add a rating, select the No rating option.
After filling in these fields, you reject the request by clicking Accept completion without logging in. Below this button there is a link to enter CDESK, which you can use if you have login credentials. Rejecting the completion of a request via CDESK is described HERE.
Rejecting the Completion of a Request via Email Notification
You reject the completion of the request via the notification by clicking the Do not accept completion button. A form for rejecting the completion then opens in a new window of your default web browser.
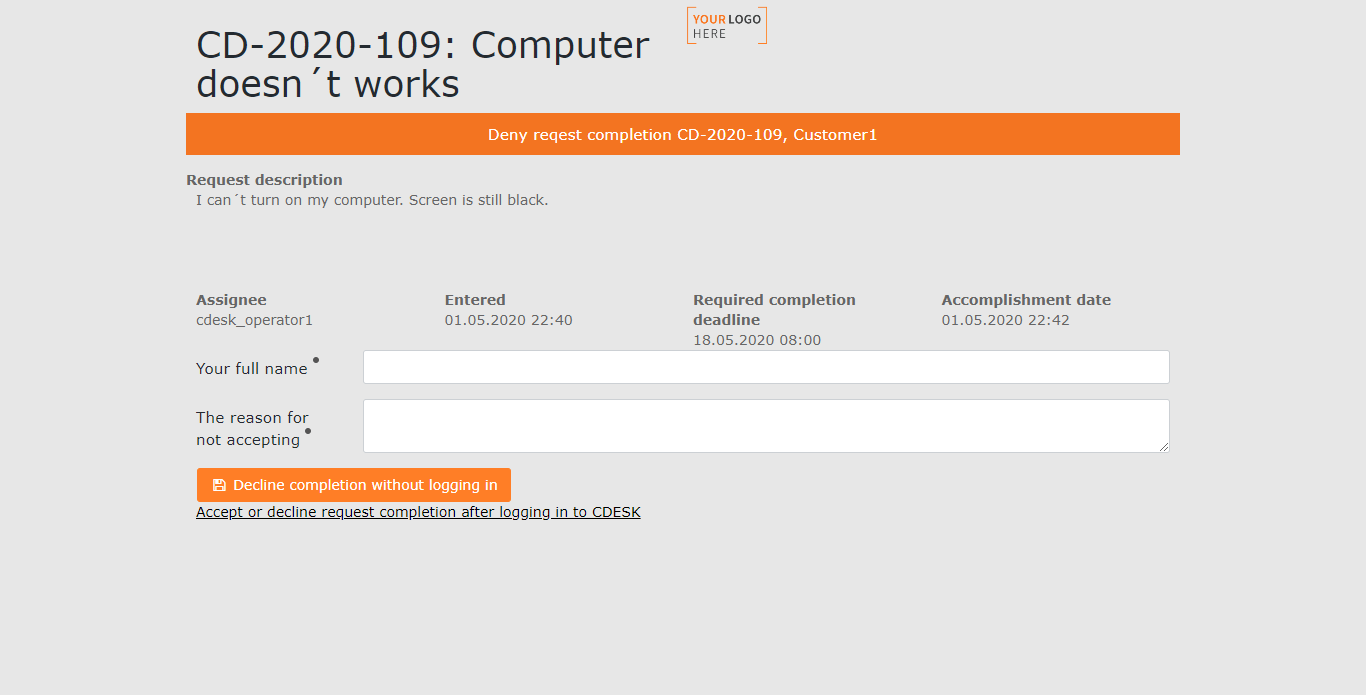
The upper part of the form contains basic information about the request. You cannot change it. Below it are fields that you must fill in for the rejection to be valid:
Your full name: Enter your first name and surname
Reason for non-acceptance: Enter the reason why you decided to reject the completion of the request
After filling in these fields, you reject the request by clicking Reject completion without logging in. Below this button there is a link to enter CDESK, which you can use if you have login credentials. Rejecting the completion of a request via CDESK is described HERE.
Controlling Notifications on a Request
In the upper right part of the window there are icons for setting notifications for the request. Here you can block / allow the sending of notifications for the request. It is also possible to add additional notification recipients.

-
 All notifications allowed – notifications about changes in the request are received by all recipients – affected users or user group and customer contacts that have notifications for requests set to be received. If notification for requests is blocked in Global Settings→Notifications, only customer contacts will be notified, not CDESK users. By clicking repeatedly you can switch between the states:
 All notifications allowed – notifications about changes in the request are received by all recipients – affected users or user group and customer contacts that have notifications for requests set to be received. If notification for requests is blocked in Global Settings→Notifications, only customer contacts will be notified, not CDESK users. By clicking repeatedly you can switch between the states:
 ->  All notifications blocked once – the next saved change will not send any notification
->  All notifications permanently blocked – no notifications about changes to the request will be sent until they are allowed again
- Customer notification allowed – notifications about changes in the request are received by all customer contacts that have notifications for requests set to be received. By clicking repeatedly you can switch between the states:
- ->
 Customer notification blocked once – the next saved change will not send a notification to the customer’s contacts
 - -> Customer notification permanently blocked – notifications about changes to the request will not be sent to customer contacts until they are allowed again
- Edit notification recipients – after clicking, a window is displayed listing the recipients of notifications for the request, discussion, and notes for assignees. For automatically added recipients, the reason is also displayed. Recipients can also be added manually – whether by entering their user name, email address, or phone number in international format (+421 for Slovakia). Notification recipients can also be removed by clicking x. Recipients with the stated reason assignee, previous assignee, requester, or responsible person cannot be removed. Already removed contacts can be added again by clicking +.
 Customer notification allowed – notifications about changes in the request are received by all customer contacts that have notifications for requests set to be received. By clicking repeatedly you can switch between the states:
 Customer notification blocked once – the next saved change will not send a notification to the customer’s contacts
 Customer notification permanently blocked – notifications about changes to the request will not be sent to customer contacts until they are allowed again
 Edit notification recipients – after clicking, a window is displayed listing the recipients of notifications for the request, discussion, and notes for assignees. For automatically added recipients, the reason is also displayed. Recipients can also be added manually – whether by entering their user name, email address, or phone number in international format (+421 for Slovakia). Notification recipients can also be removed by clicking
Discussion
The discussion is used for communication with the customer and assignees. For this purpose, two options are available:
- + Discussion post – adds a post that the customer will also see and can respond to
- + Post for assignees – adds a post to the internal discussion, visible only to assignees
This is followed by a listing of the posts ordered from newest to oldest. The check boxes above the list make it possible to hide the discussion with the customer or the notes for assignees posts.
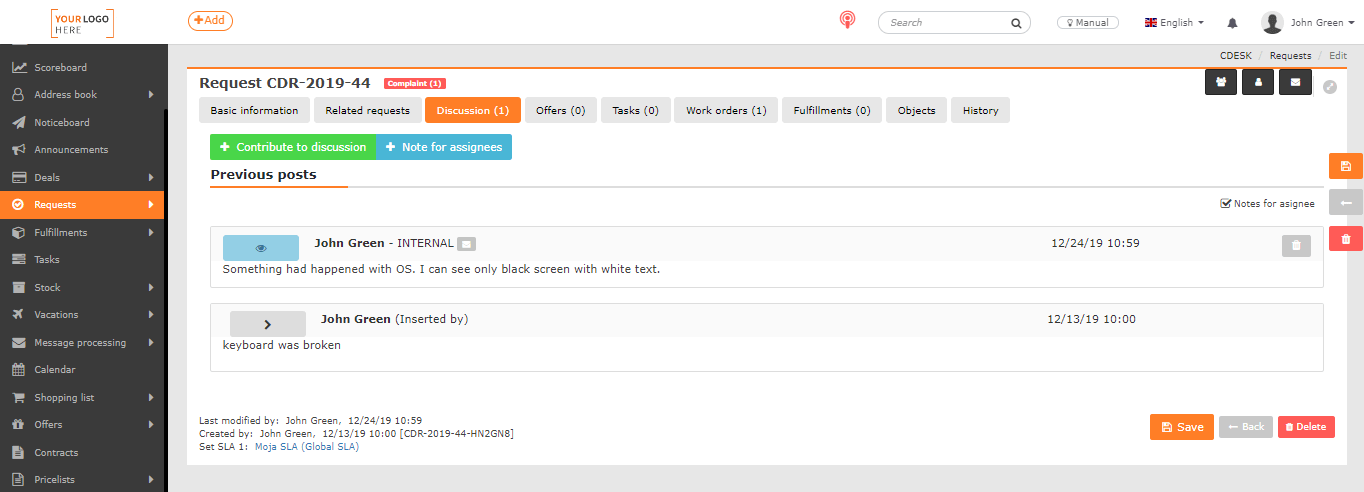
Discussion Post
To* – the option to manually add recipients of the notification about the discussion post on the request – by selecting from the list, or by entering an email address or a phone number in international format (+421…)
This is followed by a list of notification recipients:
- The automatically added recipients are the request requester, the assignee and previous assignees of the request, the responsible person, and the customer contacts that have copies of emails from requests enabled in the contact settings
- A manually added recipient can be a user, a customer contact, an email address, and a phone number (the recipient will be notified via an SMS message – requires an active one). These recipients are color-distinguished from the automatically added recipients
All notification recipient contacts will also be notified for all subsequent posts, until they are removed from the list by clicking x next to the contact.
This is followed by a field for the wording of the post with the possibility of formatting the text, and a field for selecting a signature predefined in the user settings.
In the right part of the window there is a field for adding a file, for example a screenshot or a photograph. Clicking on it opens a dialog box for selecting a file, or find the file on the PC and drag it onto the given field using drag&drop.
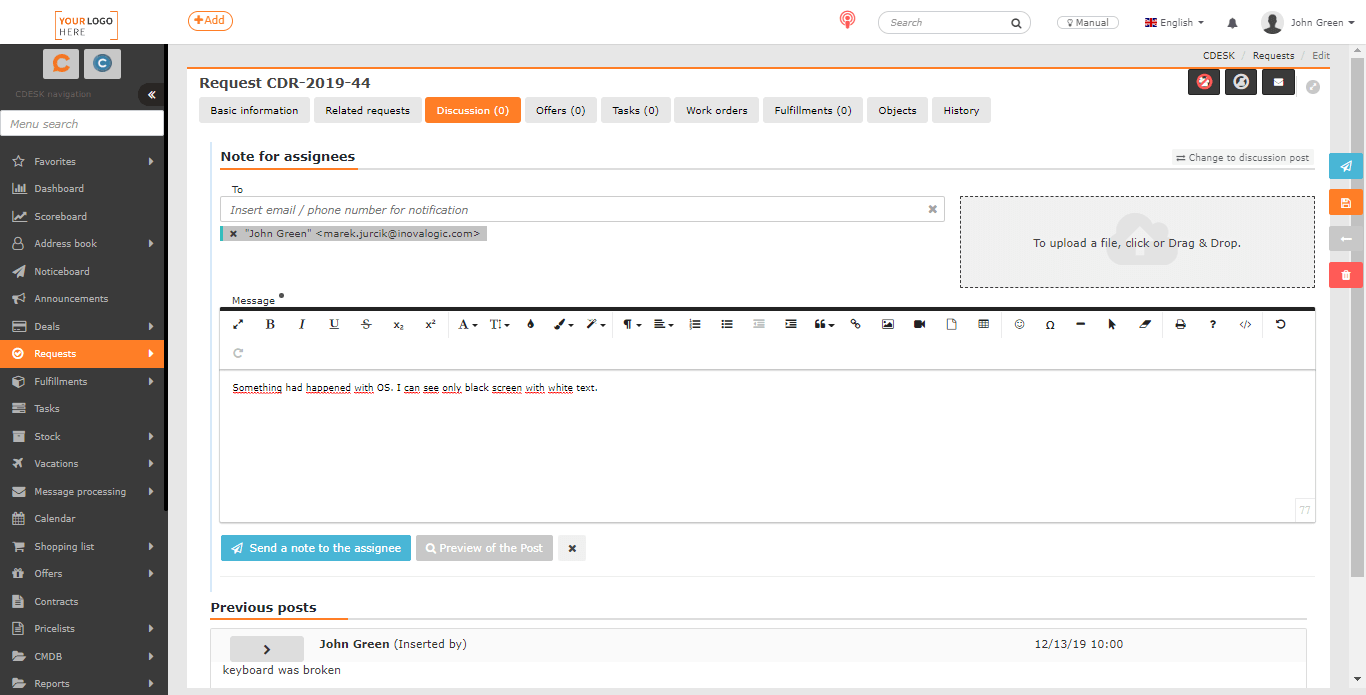
You send the post by clicking Send post to discussion. If you wish to change a post already being written in the discussion with the customer into an internal note for assignees, it is still possible to switch the type of the discussion post by clicking Change to a note for assignees in the right part of the window. The type of the post is changed without loss of content, only the notification recipients remain just the assignees.
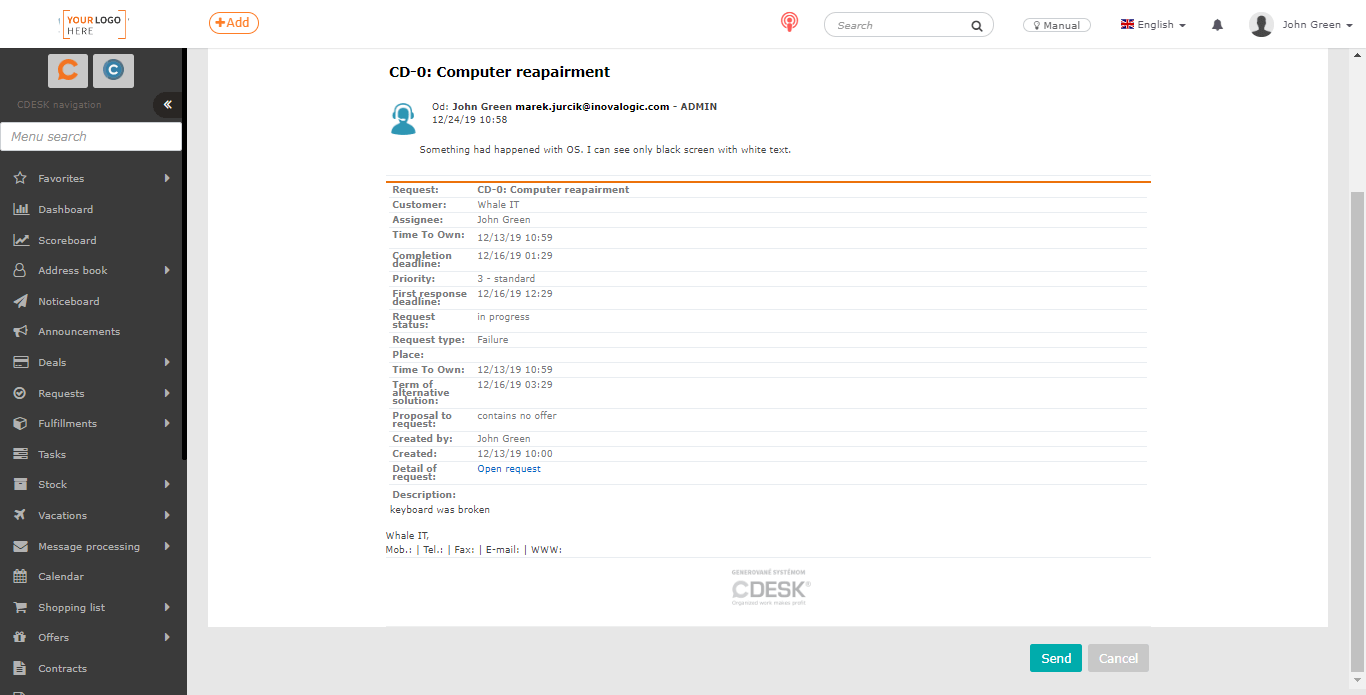
The Discussion preview button gives you access to a preview of the email notification before it is sent. After clicking, buttons become available for displaying the customer notification and the notification for operators. You send the post by clicking the Send button. By selecting the Cancel option, you return to the Discussion tab.
Post for Assignees
The same form as in the case of a post to the discussion with the customer, with the difference that the automatically added notification recipients are only the assignees. Likewise, a note being written can be switched to a discussion post with the customer by clicking Change to a post in the discussion with the customer in the right part of the window. The type of the post is changed without loss of content.
Notification of Recipients About a New Post
The sent post is displayed in the discussion on the request, plus the notification recipients receive a message by email. Notifications of discussion posts are sent even if the notification on the request is permanently blocked.
Offers
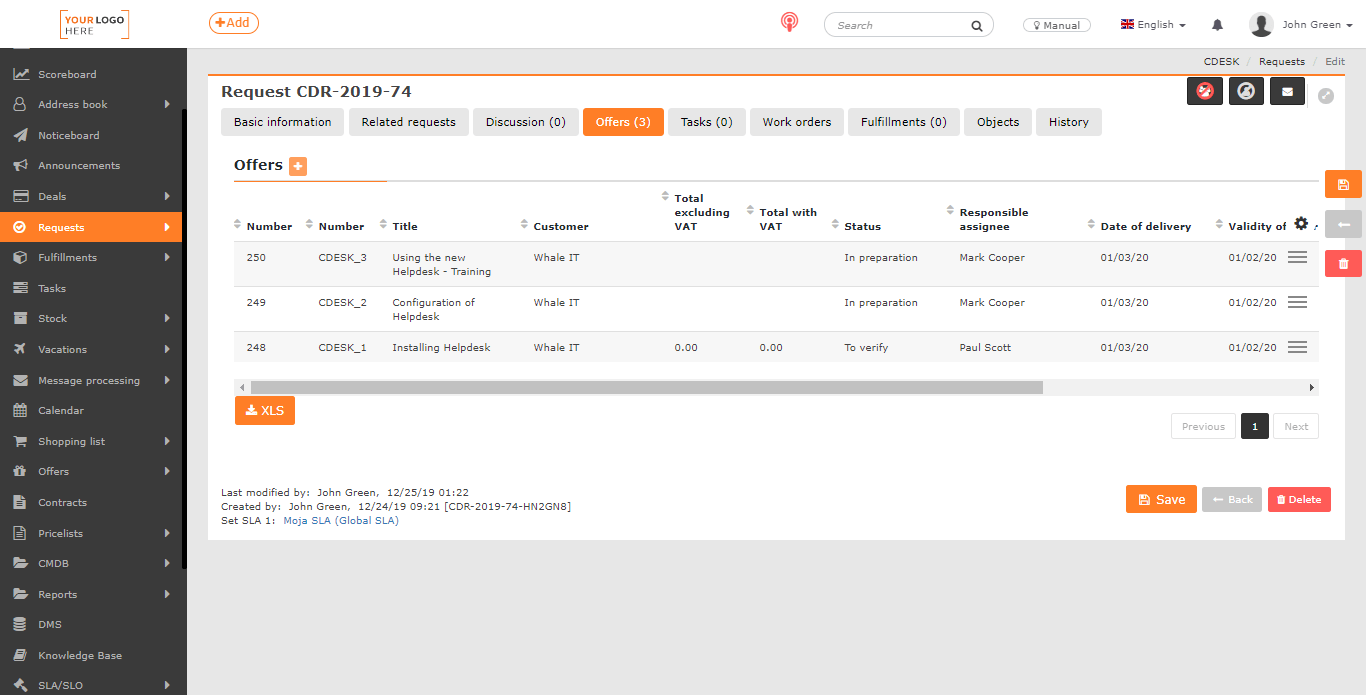
The tab is displayed if the Offers module is enabled in Global Settings→Offers. You can also make it available/unavailable to users in Permissions→Requests→Access to tabs→Offers. On this tab it is possible to assign offers to the request, and there is also a listing of the added offers here.
You add an offer by clicking the + icon. A new window then opens like the one for creating a new offer.
Tasks
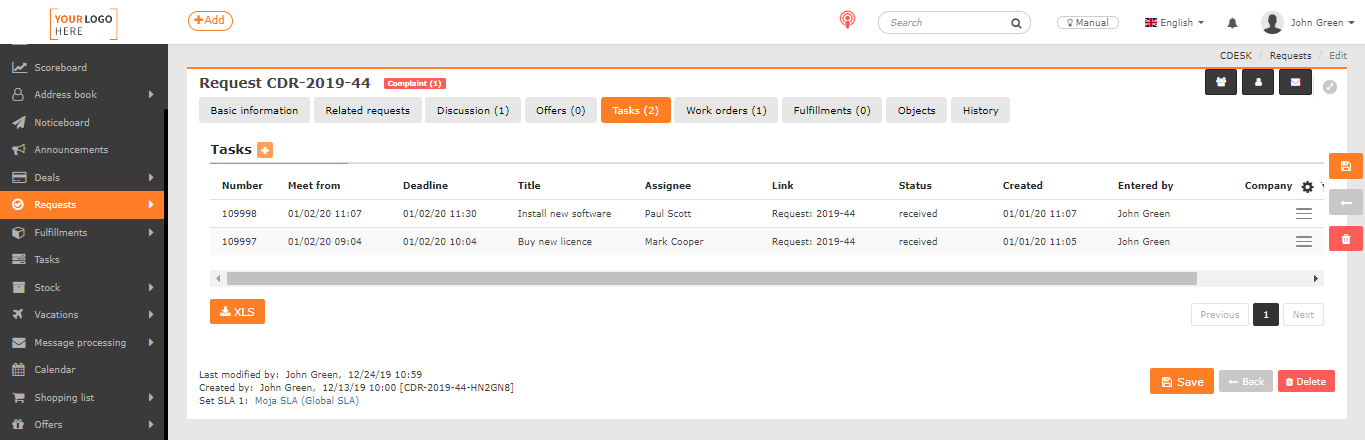
Tasks allow a larger request to be divided into smaller units that can be assigned to other assignees, while being simpler than work orders. The simplicity of tasks lies mainly in the minimization of the form. They offer only the essential fields. The Tasks tab is available only if this module is enabled in Global Settings→Tasks.
A new task for the request can be created directly from the request by clicking +. A window opens for filling in basic information such as the name or type of the task, the assignee, the deadline from-to, and other fields. Their meaning, as well as working with tasks, are described in more detail in the article Tasks.
Work Orders
Work orders offer a way to divide work on requests. They are used to carry out the planned steps under a request. They are usually created automatically according to the request template (see Catalog of Requests). A work order can also be created manually. This option is allowed by permissions.
Unlike Tasks, work orders affect the counting of the SLA and can be conditionally arranged in a serial-parallel manner. They can also affect the request status. For example, the request is automatically switched to the Completed status after all assigned work orders are completed.
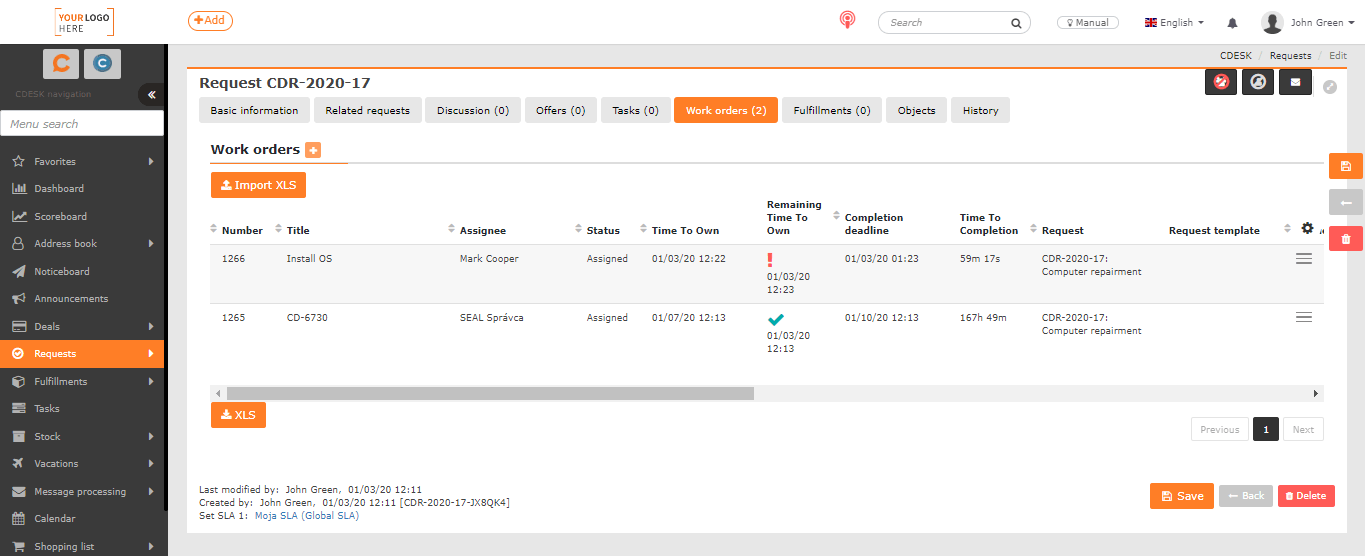
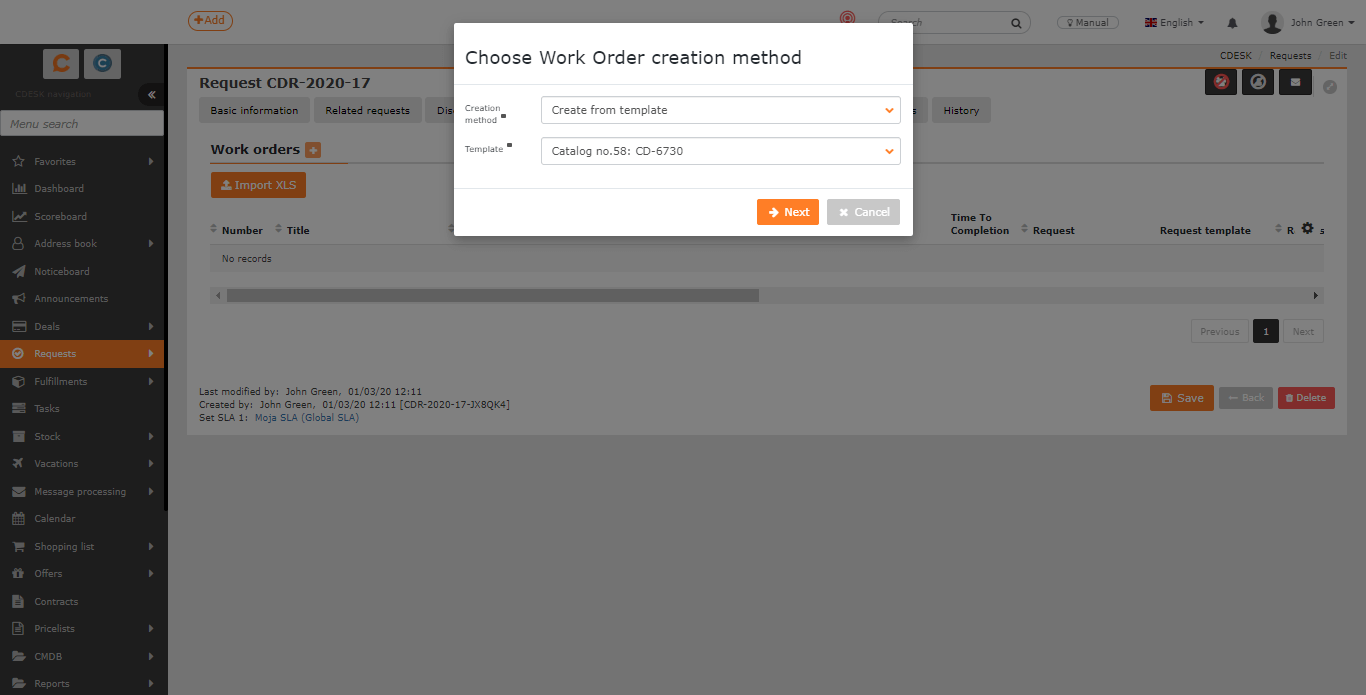
You add a new work order to the request using the + icon. A window then opens where you select the method of creation – Create from template / Create new.
- Create from template – selecting this option makes available a field for selecting a template. (You can read more about work order templates HERE). Clicking the Next button opens the same form as when entering a new work order. Since this is a work order created from a template, some fields will not be editable. You save the work order by clicking the Save button in the bottom right corner.
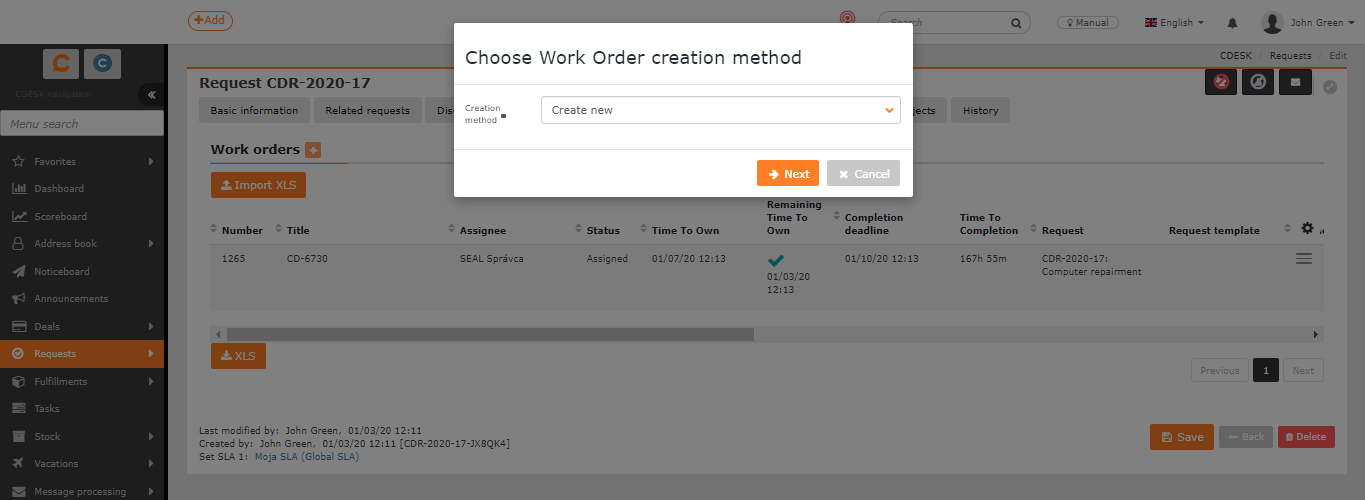
- Create new – Clicking the Next button opens the same form as when entering a new work order. You save the work order by clicking the Save button in the bottom right corner.
You can import work orders into the request using the Import XLS button. Only lists of work orders that are in XLS format can be imported.
Work orders can be added to the request automatically if you create the request from a template that has work orders linked to it. Such orders can be arranged in a serial-parallel manner – selected work orders are displayed only after the previous ones are completed. You can read about creating such orders in this text.
You export the current list of work orders on the request using the XLS button located below the list. Clicking this button opens a new window where you select the columns you wish the export to contain. You export the record by clicking the Export button.
Fulfillments
Fulfillments allow the transparent recording of the work performed in resolving a request. The Fulfillments tab is available only if the module is enabled in Global Settings→Fulfillments.
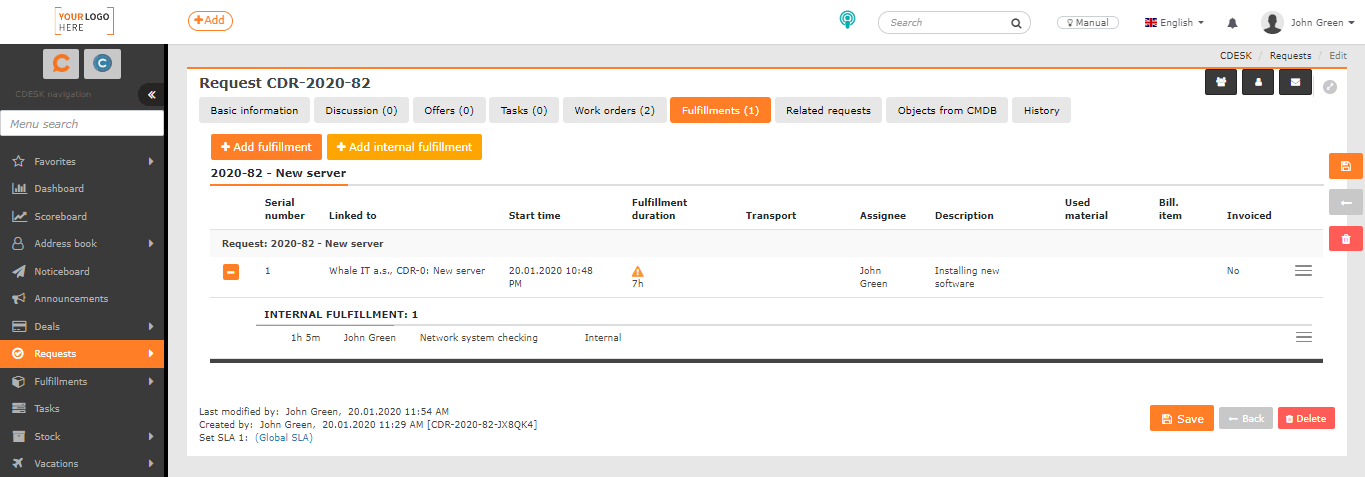
A new fulfillment for the request can be added directly from the request by clicking +Add fulfillment. A window opens for filling in the fulfillment fields. The meaning of each field, as well as working with fulfillments, are described in more detail in the article Fulfillments.
Using the +Add internal fulfillment button, you add a fulfillment to the request that will not be visible to your customers. If necessary, you can make the internal fulfillment available to customers in Permissions→Fulfillments→Internal fulfillments. You can read more about internal fulfillments HERE.
Related Requests
On the Related requests tab it is possible to link the request with existing requests, or to create a new one that is related to the given request.
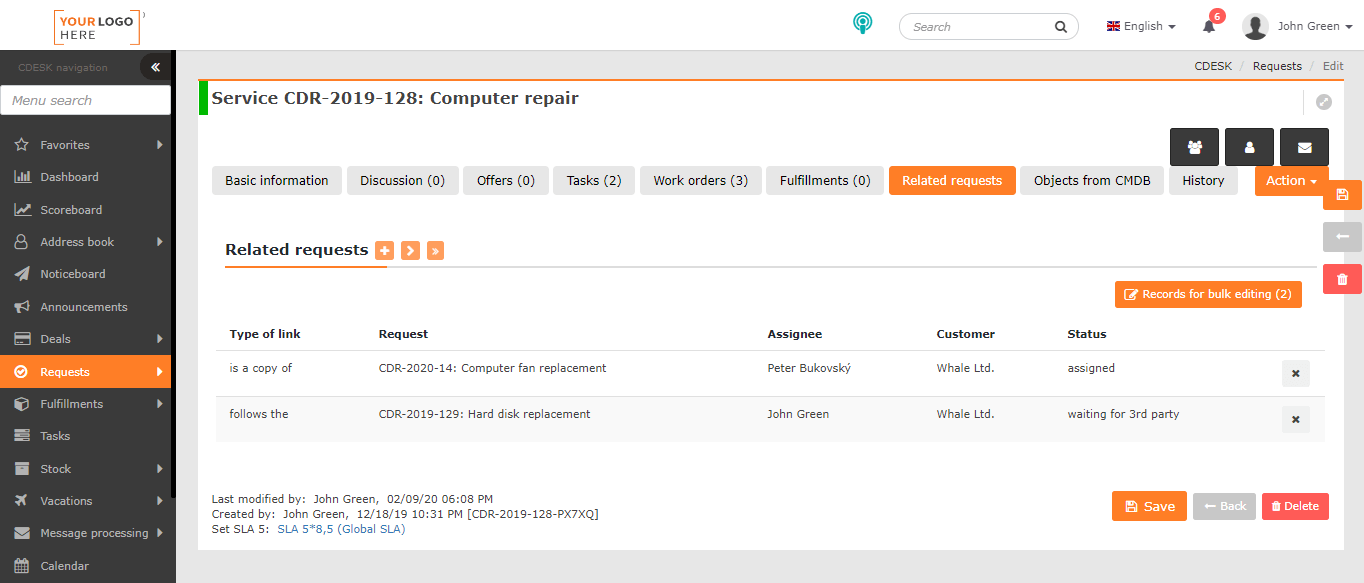
You create a new request on this tab by clicking the + icon. The same form as when entering a new request then opens. The meaning of each field is described HERE. In the upper part of the form there is a Link code list with the following options
- Follows up on
- Copies
- Is a copy of

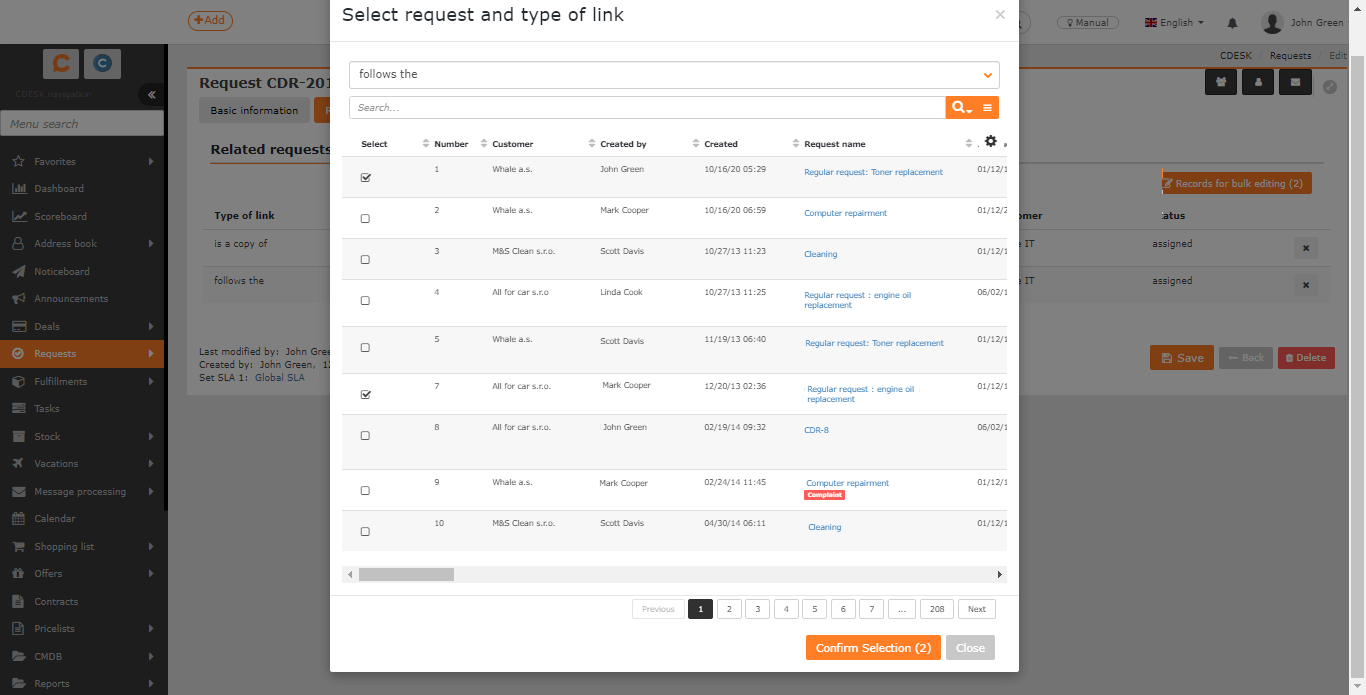
Using the > icon, you can add a link to an existing request. After clicking, a list of all created requests opens. Next to each there is a check box that you use to mark the desired item. You add the selected items using the Confirm selection button. By clicking the Close button, you return to the Related requests tab without adding the selected items.
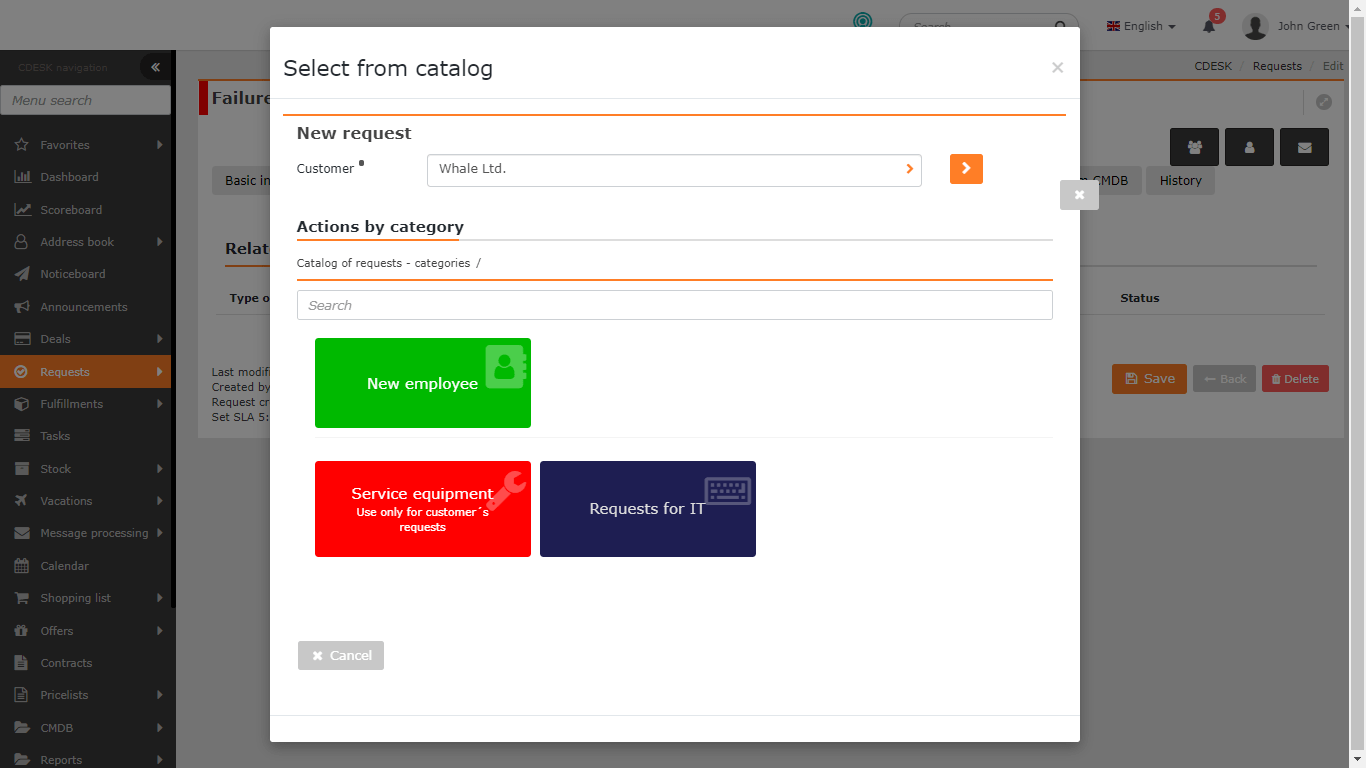
The >> icon allows the linking of a new request from the catalog of requests. After clicking, a window opens with a selection of customers. After selecting, the tiles accessible to the given customer are displayed.
A form then opens like the one for entering a request, with the individual fields pre-populated according to the template settings.
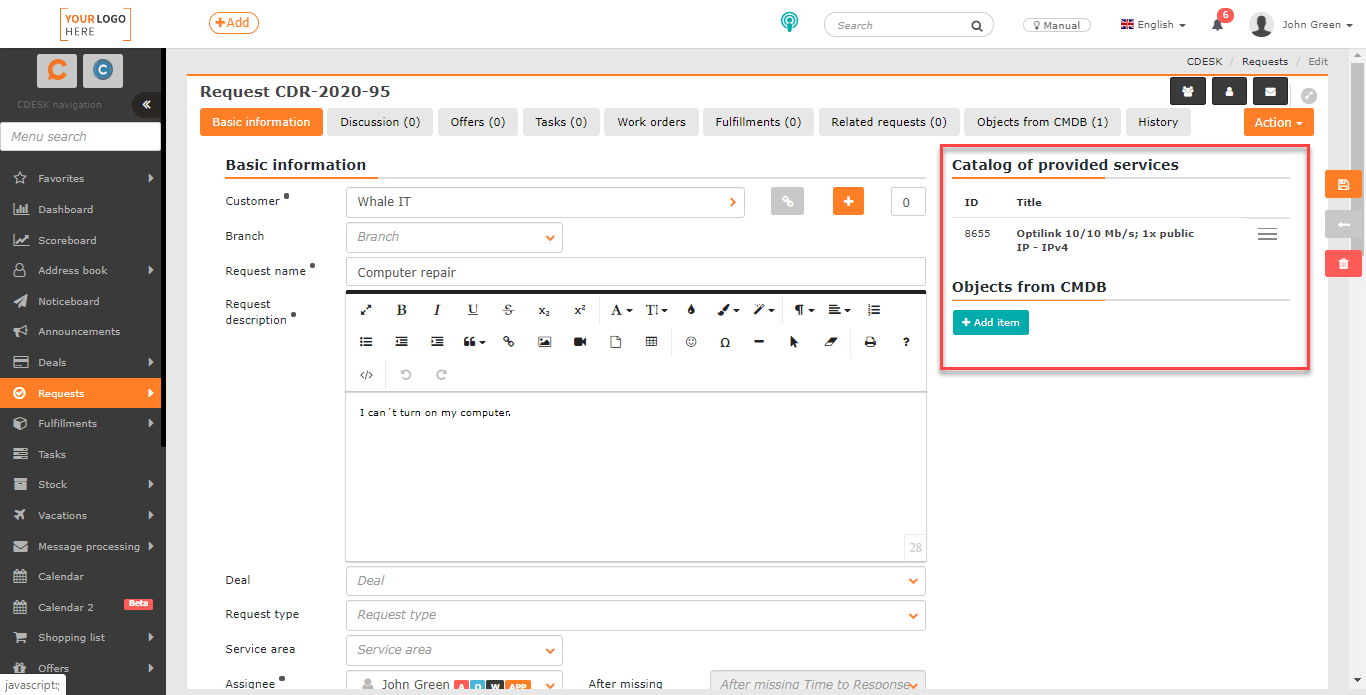
Objects from CMDB
The tab is displayed if the Object selection option is enabled in Global Settings→Requests→Requests. Here there is a listing of objects, if any have been assigned to the request.
Objects are superior to requests. Adding an object to a request makes the following options available:
- In the case of recording objects in the CMDB, it is possible to record a request history for them by selecting the object in the request.
- If the object uses an SLA, the request will be governed by the object’s SLA. As a result, the deadlines on the request will change.
- If you record services in the CMDB, the calculation of their availability is carried out on the basis of the requests to which they were added.
In order to be able to select from objects, it is first necessary to define for the customer at least one group from the categories Devices, Catalog of operated services or General category in the CMDB. If the customer has defined objects*, they are added to the request by clicking +Add item. When adding an object, only the objects defined for the given customer are offered, according to the selected site and location (if stated). After clicking +Add item, a window opens for selecting objects according to the main group and CI type. The objects that are in the given category are listed. By checking the selected objects and clicking Add, you assign them to the request. By clicking the Close button, you close the window without adding the selected items.
*) In case the customer has defined objects but they do not appear in the selection, check whether the objects are assigned to the same site / location as is stated in the request.

Multiple objects assigned to a request may contain different SLAs with different deadline and priority settings, which gives rise to an SLA conflict that CDESK informs you about. In that case, before saving the request, you need to select in the basic information the SLA according to which the request deadlines will be counted.
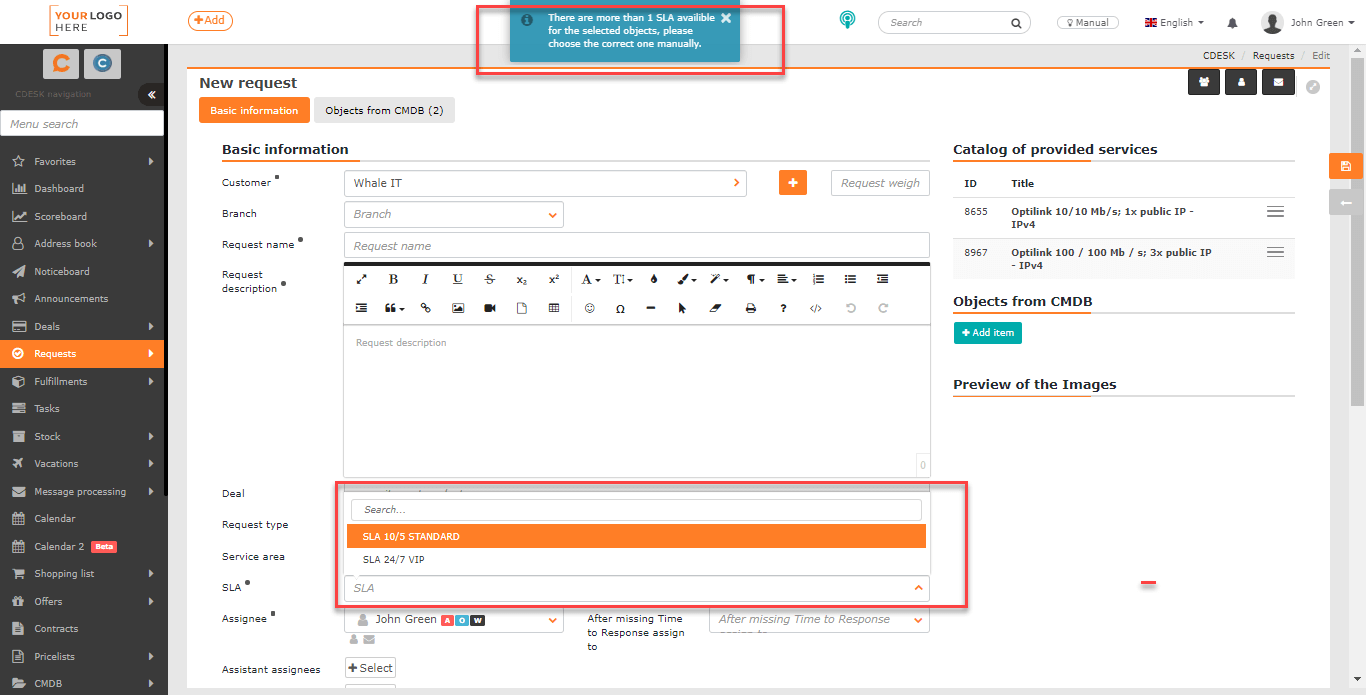
Changing the objects on an already entered request does not affect the SLA. Not even in the case where the SLA was set according to an object that was subsequently removed or replaced by an object with a different SLA.
In case it is necessary to change the parameters of an object, this can be done by clicking →Edit. The Delete button, which is also located in the context menu, is used to remove an object from the request.

History
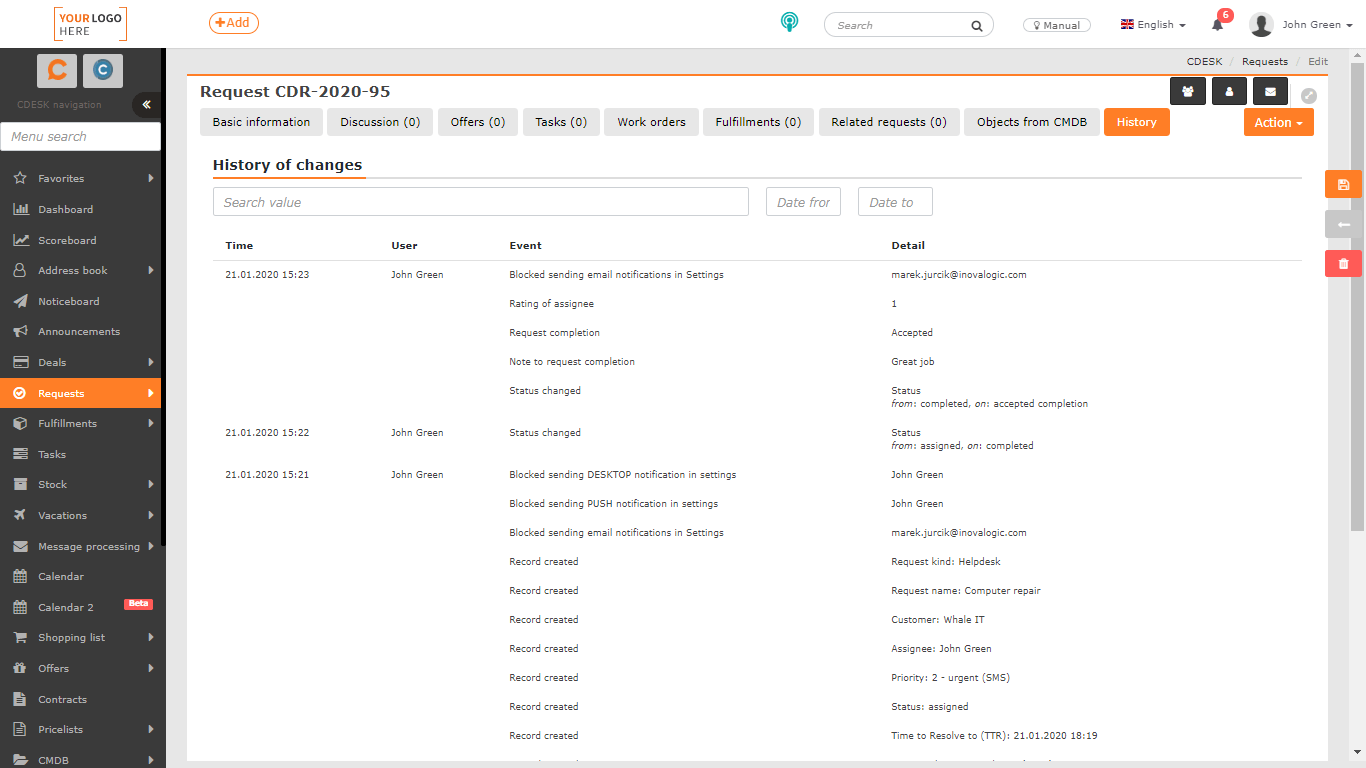
In this section, all the changes made and saved in the request are recorded, for example:
- changes – of priority, type, service area, status, assignee, deadline…
- info about notifications – recipients of the discussion post notification, blocking or allowing the sending of notifications
Create a New Request Using the Mobile App
Log in to the CDESK application before making a new request. Use the same login as for the website.
Once logged in to CDESK, you can add a new request using the quick select button on the bottom bar.
Click and choose Requests, then select Add a Request. If only the Add a Request from Catalog button is displayed, move to the Requests from the Catalog of Requests Using Mobile App paragraph.
After selecting Add a Request, the form for entering the request will open. The meaning of individual fields is described in the paragraph Meaning of Fields When Making a Request
Request from the Catalog of Requests Using the Mobile App
To add a request from the catalog of requests, click the quick select button and select Add request from catalog.
The first step is to select the customer and then tiles with associated templates.
When you click on a tile, a form will open to create a request. According to the template settings, some fields are pre-populated. The meaning of each field is described above, in the section Meaning of Fields When Making a Request.
Create a New Request Using Outlook Plugin
Outlook Plugin is an extension of CDESK to Outlook. It allows you to quickly enter requests and archive discussions directly from this email client.
After installing the Outlook Plugin, a new toolbar CDESK will be added to the Outlook tools panel. Click on it to make several options available. To create a new request, click the Create a New Request button located at the beginning of the toolbar.
Click to display the form as when making a request. The meaning of each field is described HERE.
Create a Request from the Catalog of Requests Using Outlook Plugin
Outlook Plugin provides the possibility of entering the request from the catalog of requests.
The button to create requests from the catalog is only displayed if it is enabled in CDESK. To enable the catalog of requests, go to Global Settings–>Requests–>Catalog of Requests. If the button still does not appear, check if you have permission to create requests from the catalog. Permissions can be set in CDESK in Users and Groups–>Users–>choose a user–>Permissions tab–>Requests–>New Records via the Catalog of Requests.
After clicking on the Create New Request by Catalog button, a new modal window will open where you can select the customer.
After selecting a customer, the tiles accessible to that customer are displayed. After selecting a tile, the form is displayed as when making a request. The meaning of each field is described HERE.
The Most Common Actions on the Request
Requests created by any method are displayed in Requests–>Requests, from where they can be further manipulated.
Double–click in the request line or click on the context menu and select Edit to open a window with a form similar to the one used to create a request, extended with additional options that make the Requests module a comprehensive tool not only for the helpdesk:
- change the request status
- discussion with the customer and internal discussion
- add tasks to the request
- add work orders to the request
- add invoice and internal fulfillments to the request
- request history
- add offers to the request
- add links to other requests
Only Assignee and Request Status in the Basic Information section are essential fields for working with the request, as they have an impact on meeting the deadlines defined in the SLA.
Change the Assignee and the Request Creator
If the feature of editing requests before assignment is disabled in Global Settings–>Requests–>Basic Settings, only Assignee can be changed in requests where only the assignee group is set (i.e. the request is in the Received status). This applies when Limit assignee selection by assignee group is enabled. After assigning the request to a specific assignee, it becomes possible to edit almost all fields of the form, except for the fields Customer (can be edited unless a work order has been added to the request) and SLA. If Limit assignee selection by assignee group feature is disabled, the request is editable immediately after saving.
Dates on the request may be editable depending on the settings of changing dates in the SLA that are applied to the request. In the SLA, it is possible to set who and at what priority can change dates.
Change the Request Status
In Global Settings–>Requests–>Status Setup for Requests, you can enable and use up to 27 different request states in total. The meaning of individual statuses is described in the text Global Settings–>Requests–>Status Setup for Requests . The highlighted statuses represent basic states that cannot be turned off. At the same time, they influence counting of deadlines.
received
waiting for approval
assigned
verified by comp. person
in negotiation
waiting for customer
accepted by the cust. and CP
ordered
start of realization
AS in progress
in progress
waiting for 3rd party
subcontractor in charge
deployment activities
pending
to be evaluated by comp person
internal testing
tested by customer
Complaint
Deferred
AS provided
AS accepted
completed
Implemented
accepted completion
completion without acceptance
refused
Statuses can be divided into several groups:
Statuses informing customers about the progress. These statuses affect counting of the First Response Deadline, but it is possible to set selected statuses not to count the time to meeting a deadline. This group includes following statuses:
received
waiting for approval
assigned
verified by resp. person
in negotiation
waiting for customer
accepted by cust. and RP
ordered
start of realization
AS in progress
in progress
waiting for 3rd party
subcontractor in charge
deployment activities
pending
to be evaluated by resp. person
internal testing
tested by customer
Complaint
Deferred
AS provided
AS accepted
Statuses that affect the request deadline counter and evaluate its meeting:
waiting for approval
Assigned
AS provided
AS accepted
Implemented
Change of Request Dates
For each of the request deadlines, the time to meet the deadline is counted down. If the deadline is met, the countdown is stopped and evaluates whether it was met on time. For some statuses, it is possible to stop the countdown. More details HERE. If met on time, is displayed, if not, you will see .
Each request has a set first response deadline and time to resolve, and depending on the settings, optional times can be displayed and calculated. The time countdown and evaluation of meeting deadlines is managed as follows:
- Time to own (TTO) (1) – the countdown stops by assigning a specific assignee if the new request has been assigned to an assignee group. For a request assigned to a specific assignee at its creation, the countdown is cancelled and the deadline is marked as met
- Time to alternative solution (TTAS) (1) – the time countdown is stopped by a status change for AS provided
- First response deadline• – the countdown is stopped by one of the following changes in the request: status change, new post to the discussion with the customer, new fulfillment
- Time to resolve from (1) – this is a fixed time. It marks the date when work on the request started
- Time to resolve to •– the time countdown stops when the request status changes to completed
(1) Optional dates – first response deadline, time to alternative solution and time to resolve from are displayed if they are enabled in Global Settings–>Requests–>Basic Settings and at the same time the option Show TTO/TTAS dates is enabled on the customer tab in the SLA section. These dates are displayed if they are enabled in permissions (Requests–>Date Fields)
Record of the Solution and the Internal Note
The Solution field is used to record how the request was resolved unless you are using Fulfillments. Fulfillments allow you to record the time taken to resolve the request, bill the customer for the work entered and record internal time worked. We recommend you to consider using Fulfillments instead of the plain text field Solution.
The internal note is for internal record keeping and is not accessible to the customer.
On a saved request, you can edit the Solution and Internal Note text fields at will.
Request Completion
When all actions are completed, switch the request status to Completed. (If the Implemented status is enabled in Global Settings–>Requests–>Status Setup for Requests, you can use that one as well. However, Implemented is mainly for supervisors to check the executed work on the request. When the request is switched to this status, the buttons for accepting/denying the request will not appear as written in the following).
Accept the Request Completion When Logged in to CDESK
With the Accepted Completion status enabled, the options for accepting/not accepting completion become available when the request is completed. When notifications are enabled, the customer is also informed of the option to accept the completion via email notification.
Select the Accept Completion option to open a window with the option to add a note to the acceptance, as well as the option to rate the assignee. After accepting the completion, the request status changes to accepted completion.
The request can also be terminated by switching to Implemented. However, no accept/deny termination buttons are offered when this status is selected.
Denial – Claim a Request When Logged in to CDESK
Selecting Deny Completion opens a window to indicate the reason for the rejection. Providing this reason is mandatory.
If in Global Settings–>Requests–>Status Setup for Requests the Complaint status is disabled, rejecting the request returns the request to the in progress status and the deadline counter is reactivated.
If the Complaint status is enabled, the request is put into the Complaint status when its completion is denied. On the request, the Legitimate complaint and Unauthorized complaint buttons become available.
Selecting the legitimate complaint option returns the request to the In Progress status and the deadline counter is reactivated. Selecting the unauthorized complaint option opens a new window where a comment on the unauthorized complaint must be specified. This note is mandatory. After the note is saved, the claim is put in completion without acceptance.
Complete the Request Using Email Notification
After the request is switched to the Completed status, you will receive an email notification of the request status change. If the Accepted Completion status is enabled in Global Settings, the notification will include buttons to accept/deny the request directly via email. In this case, there is no need to log into the system. This feature is primarily intended for customers who do not have access to CDESK.
Accept the Request Completion Using Email Notification
To accept the completion of a request via notification, click the Accept Completion button. This will then open a form to accept the termination in a new window of your default web browser.
The top part of the form contains basic information about the request that you cannot change. Below these are the fields you must fill in for the completion acceptance to be valid:
Your full name: Enter your first and last name
Note to acceptance: Specify the reason why you have decided to deny the request completion
Rating of assignee: Select the pictogram to rate the assignee’s work on the request. This field is optional. If you do not wish to rate, select Without ratings.
After completing these fields, click Accept completition without logging in. to accept the request. Below this button is a link to enter CDESK, which you can use if you have the login credentials. How to deny the request completion using CDESK is described HERE.
Deny the Request Completion Using Email Notification
To deny the request completion via notification, click the Deny completion. button. A form opens in a new window of your default web browser to finish denial.
The top part of the form contains basic information about the request that cannot be changed. Below these are the fields you must fill in for the rejection to be valid:
Your full name: Enter your first and last name
Reason for not accepting: Write the reason of your denial
Once you have completed these fields, you can reject the request by clicking Decline completion without logging in. Below this button is a link to enter CDESK, which you can use if you have login credentials. How to decline the request completion using CDESK is described HERE.
Manage the Request Notifications
In the upper right part of the window there are icons for setting notifications for the request. Here you can block/enable sending request notifications as well as add additional recipients.
- All Notifications Allowed -all recipients: affected users, user groups and customer contacts that are set to receive notifications for requests will receive notifications about changes to the request. If the request notification is blocked in Global Settings–>Notifications, only customer contacts will be notified, not the CDESK users. Click to toggle between these statuses:
-> One-time blocking of all notifications – no notification of the next saved change
-> All notifications blocked permanently – no notifications of request changes until they are re-enabled
- Customer Notification Allowed – all customer contacts that are set to receive notifications for request changes will receive the notifications. Click to switch between these statuses:
- -> One–time blocking of customer notification – no notification of the next saved change to customer contacts
- -> All customer notifications blocked permanently – no notifications to customer contacts until they are re-enabled
- Edit Receivers of Notification – click to open a window listing the recipients of notifications for requests, discussions and notes for assignees. For automatically added receivers, the reason is also displayed. Recipients can also be added manually – either by specifying their username, email address, or phone number in international(+421 for Slovakia). Notification receivers can also be removed by clicking x.Recipients with the reason, such as assignee, previous assignee, reporter or responsible person cannot be removed. Removed contacts can be re-added by clicking +.
Discussion
The discussion is used to communicate with customers and assignees. Two options are available for this purpose:
- + Contribute to discussion – add a post that the customer will see and can respond to
- + Note for assignees – add a post to the internal discussion visible only to assignees
Then you can see a listing of posts sorted from newest to oldest. The checkboxes above the list allow you to turn off contributions to the discussion with the customer or notes for assignees.
Contribution to the Discussion
To • – possibility to manually add recipients of notification about the request discussion post by selecting from the list, or by typing e–mail address or phone number in international format (+421, etc)
Then follows the list of notification recipients:
- The automatically added recipient is the requestor, the assignee and previous assignees of the request, the responsible person and the customer contacts that have copies of the request emails enabled in the contact settings
- A manually added recipient can be a user, customer contact, email address and phone number (recipient will be notified via SMS message). These recipients are color coded to differentiate them from automatically added recipients
All contacts to receive the notification will also be notified on all subsequent posts until they are removed from the list by clicking the x next to the contact.
This is followed by a field for the body of the post with option to format the text and a field for selecting the signature predefined in user settings.
On the right side of the window there is a field for adding a file, for example a screenshot or a photo. Click on it to open the dialog box for file selection, or search for the file on your PC and drag & drop it to the field.
To send a post, click on Send the discussion post. If you wish to change a draft post meant for a discussion with the customer to an internal note, you can still switch the type of discussion post by clicking on Change to a note for assignees in the right part of the window. The post type will be changed without loss of content and only assignees will receive it.
The Discussion Preview button gives you a preview of the mail notification before it is sent. Click to enable buttons to view customer and operator notifications. To send a post, click the Send button. Select Cancel to go back to the Discussion tab.
Note for Assignees
Same form as for posting to a discussion with a customer, except that the automatically added notification recipients are only assignees. It is also possible to switch the draft note to a customer discussion post by clicking Change to discussion post on the right side of the window. The post type will be changed without loss of content.
Notify Recipients of a New Post
The submitted post appears in the request discussion and notification recipients receive an email. Notifications of discussion posts are sent even if notifications of the request are permanently blocked in the request.
Offers
This tab is displayed if the Offers module is enabled in Global Settings–>Offers. You can also enable/disable it to users in Permissions–>Requests–>Access to Tabs–>Offers. On this tab you can assign offers to the request and find a listing of added offers.
To add an offer, click on +. A new window opens as if you were creating a new offer.
Tasks
Tasks allow a larger request to be divided into smaller units that can be assigned to other assignees and are simpler than work orders. The simplicity of tasks lies mainly in the minimization of the form. There are only the inevitable fields. The Tasks tab is only available if this module is enabled in Global Settings–>Tasks.
You can create a new task for the request directly in the request by clicking +. This will open a window for filling in basic data such as task name or type, assignee, deadline from-to and other fields. Meaning of the fields, as well as how to work with tasks, is described in more detail in Tasks.
Work Orders
Work orders offer a way to divide the work on requests. They are used to execute scheduled steps under the request. They are usually created automatically according to the request template (see Catalog of Requests). A work order can also be created manually, but it has to be enabled in permissions.
Work Orders, unlike Tasks, affect the SLA count and can be conditionally serial-parallel ordered. They can also affect the request status, for example: the request automatically switches to the Completed status, when all associated work orders have been completed.
Use + to add a new work order to the request. Then a window opens where you can select the creation method – Create from template / Create new.
- Create from template – select this option and the field for template selection will open. (more on work order templates HERE). Click Next to open the same form as when entering a new work order. Since this is a work order created from a template, some fields will not be editable. To save the work order, click theSave button in the bottom right corner.
- Create New – Click Next to open the same form as when entering a new work order. To save the work order, click Save in the bottom right corner.
You can import work orders into the request using the Import XLS button. Only the lists of work orders in XLS format can be imported.
Work orders can be added to a request automatically, if the request is created from a template with work orders bound to it. Such work orders can be sorted in a serial-parallel way – selected work orders are displayed only after the previous ones have been completed. You can read about creating such work orders in this text.
To export the current list of work orders on the request, use the XLS button below the list. Clicking this button opens a new window where you can select columns you wish the export to contain. Click the Export button to export the record.
Fulfillments
Fulfillments allow for a transparent record keeping of the work done to resolve the request. The Fulfillments tab is only available if the module is enabled in Global Settings–>Fulfillments.
You can add a new fulfillment to the request directly from the request by clicking +Add a fulfillment<. A window for filling in the fields of the fulfillment opens. The meaning of fields, as well as how to work with fulfillments, is described in more detail in Fulfillments.
Use the +Add an internal fulfillment button to add a fulfillment to the request that is not visible to your customers. If needed, you can make the internal fulfillment available to your customers in Permissions–>Fulfillments–>Internal Fulfillments. Read more on internal fulfillments HERE.
Related Requests
In the Related Requests tab, you can link a request to existing requests or create a new one related to it.
To create a new request on this tab, click +.
This will open the same form as when entering a new request. The meaning of each field is described HERE. At the top of the form you can see the code list called Link with the following options:
- follows
- copies
- is a copy of
Create a new request using the Related Requests tab
Use > to add a link to an existing request. The list of all created requests opens. Next to each request, there is a checkbox to select the desired item. Use the Confirm Selection button to add selected items. Click the Close button to return to the Related Requests tab without selecting.
The >> icon allows you to bind a new request from the catalog of requests. Click to open a window with a selection of customers. Once selected, the tiles accessible to this customer are displayed.
Then the form opens as when the request is made, with fields pre-populated according to the template settings.
CMDB objects
This tab is displayed if Selection of Objects is enabled in Global Settings–>Requests–>Basic Settings. There is a listing of objects, if there are any assigned to the request.
Objects are superior to requests. An object added to the request makes the following options available:
- In the case of object registration in the CMDB, it is possible to add records of the history of requests by selecting an object in the request.
- If the object uses an SLA, the request will be governed by the object’s SLA. Therefore, deadlines on the request change.
- If you register services in the CMDB, their availability is calculated based on the requests to which they have been added.
To select from objects, it is necessary first to define at least one group for the customer from the categories, such as Devices, Catalog of Services Provided or General category in the CMDB. If there are objects defined for the customer*, they can be added to the request by clicking +Add an item When adding an object, only objects defined for the customer will be offered, according to the selected branch and place (if specified). Click +Add an item to open a window for selecting objects according to the main group and CI type. The objects that are in that category are listed. Check the selected objects and click Add to associate them with the request. Click Close to close the window without adding selected items.
*) If there are objects defined for the customer but they are not in the selection, check if the objects are assigned to the same branch/place as specified in the request.
Multiple objects assigned to the request may contain different SLAs with different deadline and priority settings, what creates an SLA conflict and CDESK will inform you about it. In this case, you need to select the SLA in the basic information according to which the request dates will be calculated before saving.
Changing objects on an already entered request does not affect the SLA. Even if the SLA was set according to an object that was subsequently removed or replaced by an object with a different SLA.
If it is necessary to change parameters of the object, it can be done by clicking →Edit. To remove an object from the request, the Delete button located in the context menu can be used.
History
This section records all changes made and saved on the request, such as:
- changes of – priority, type, service area, status, assignee, deadline, etc.
- information on notifications – recipients of notifications of discussion posts, blocking or allowing notifications to be sent