Catalog of Requests
Page content
Reasons for Using the Catalog of Requests
The catalog of requests allows you to speed up and simplify the entry of new requests. You can do this by defining templates. These templates extend the use of the Requests module for specific scenarios. Find below the list of parameters you can set for templates:
- Predefined assignee, priority, type or service area, as well as description which will speed up the process of filling a new request.
- Assign a customer or customer category. Each customer can thus use a service catalog tailored to their needs.
- Set visibility by job position, so that logged-in users can view only the relevant templates for their job position.
- Define a custom set of optional properties to create a customized request form for each usage scenario.
- Default tasks created automatically with the request and assigned to designated assignees.
- The template can be assigned an approval process.
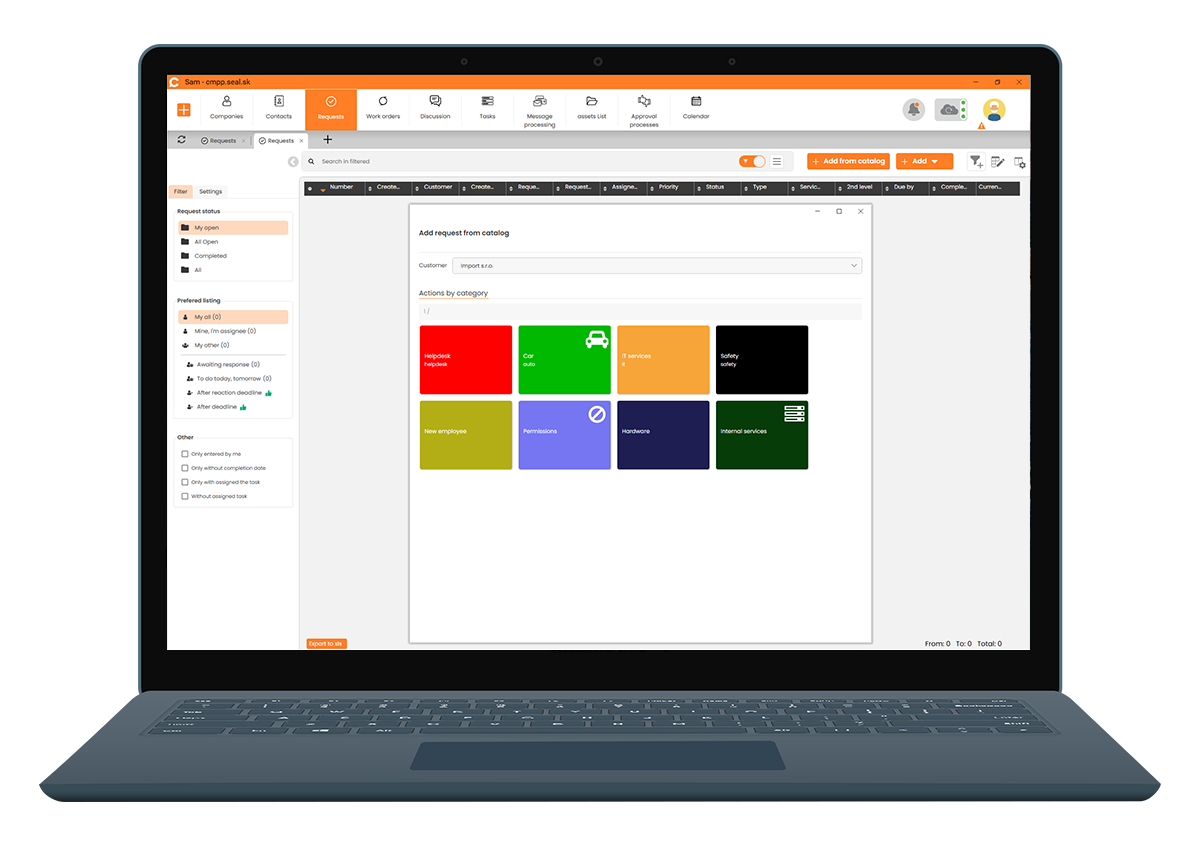
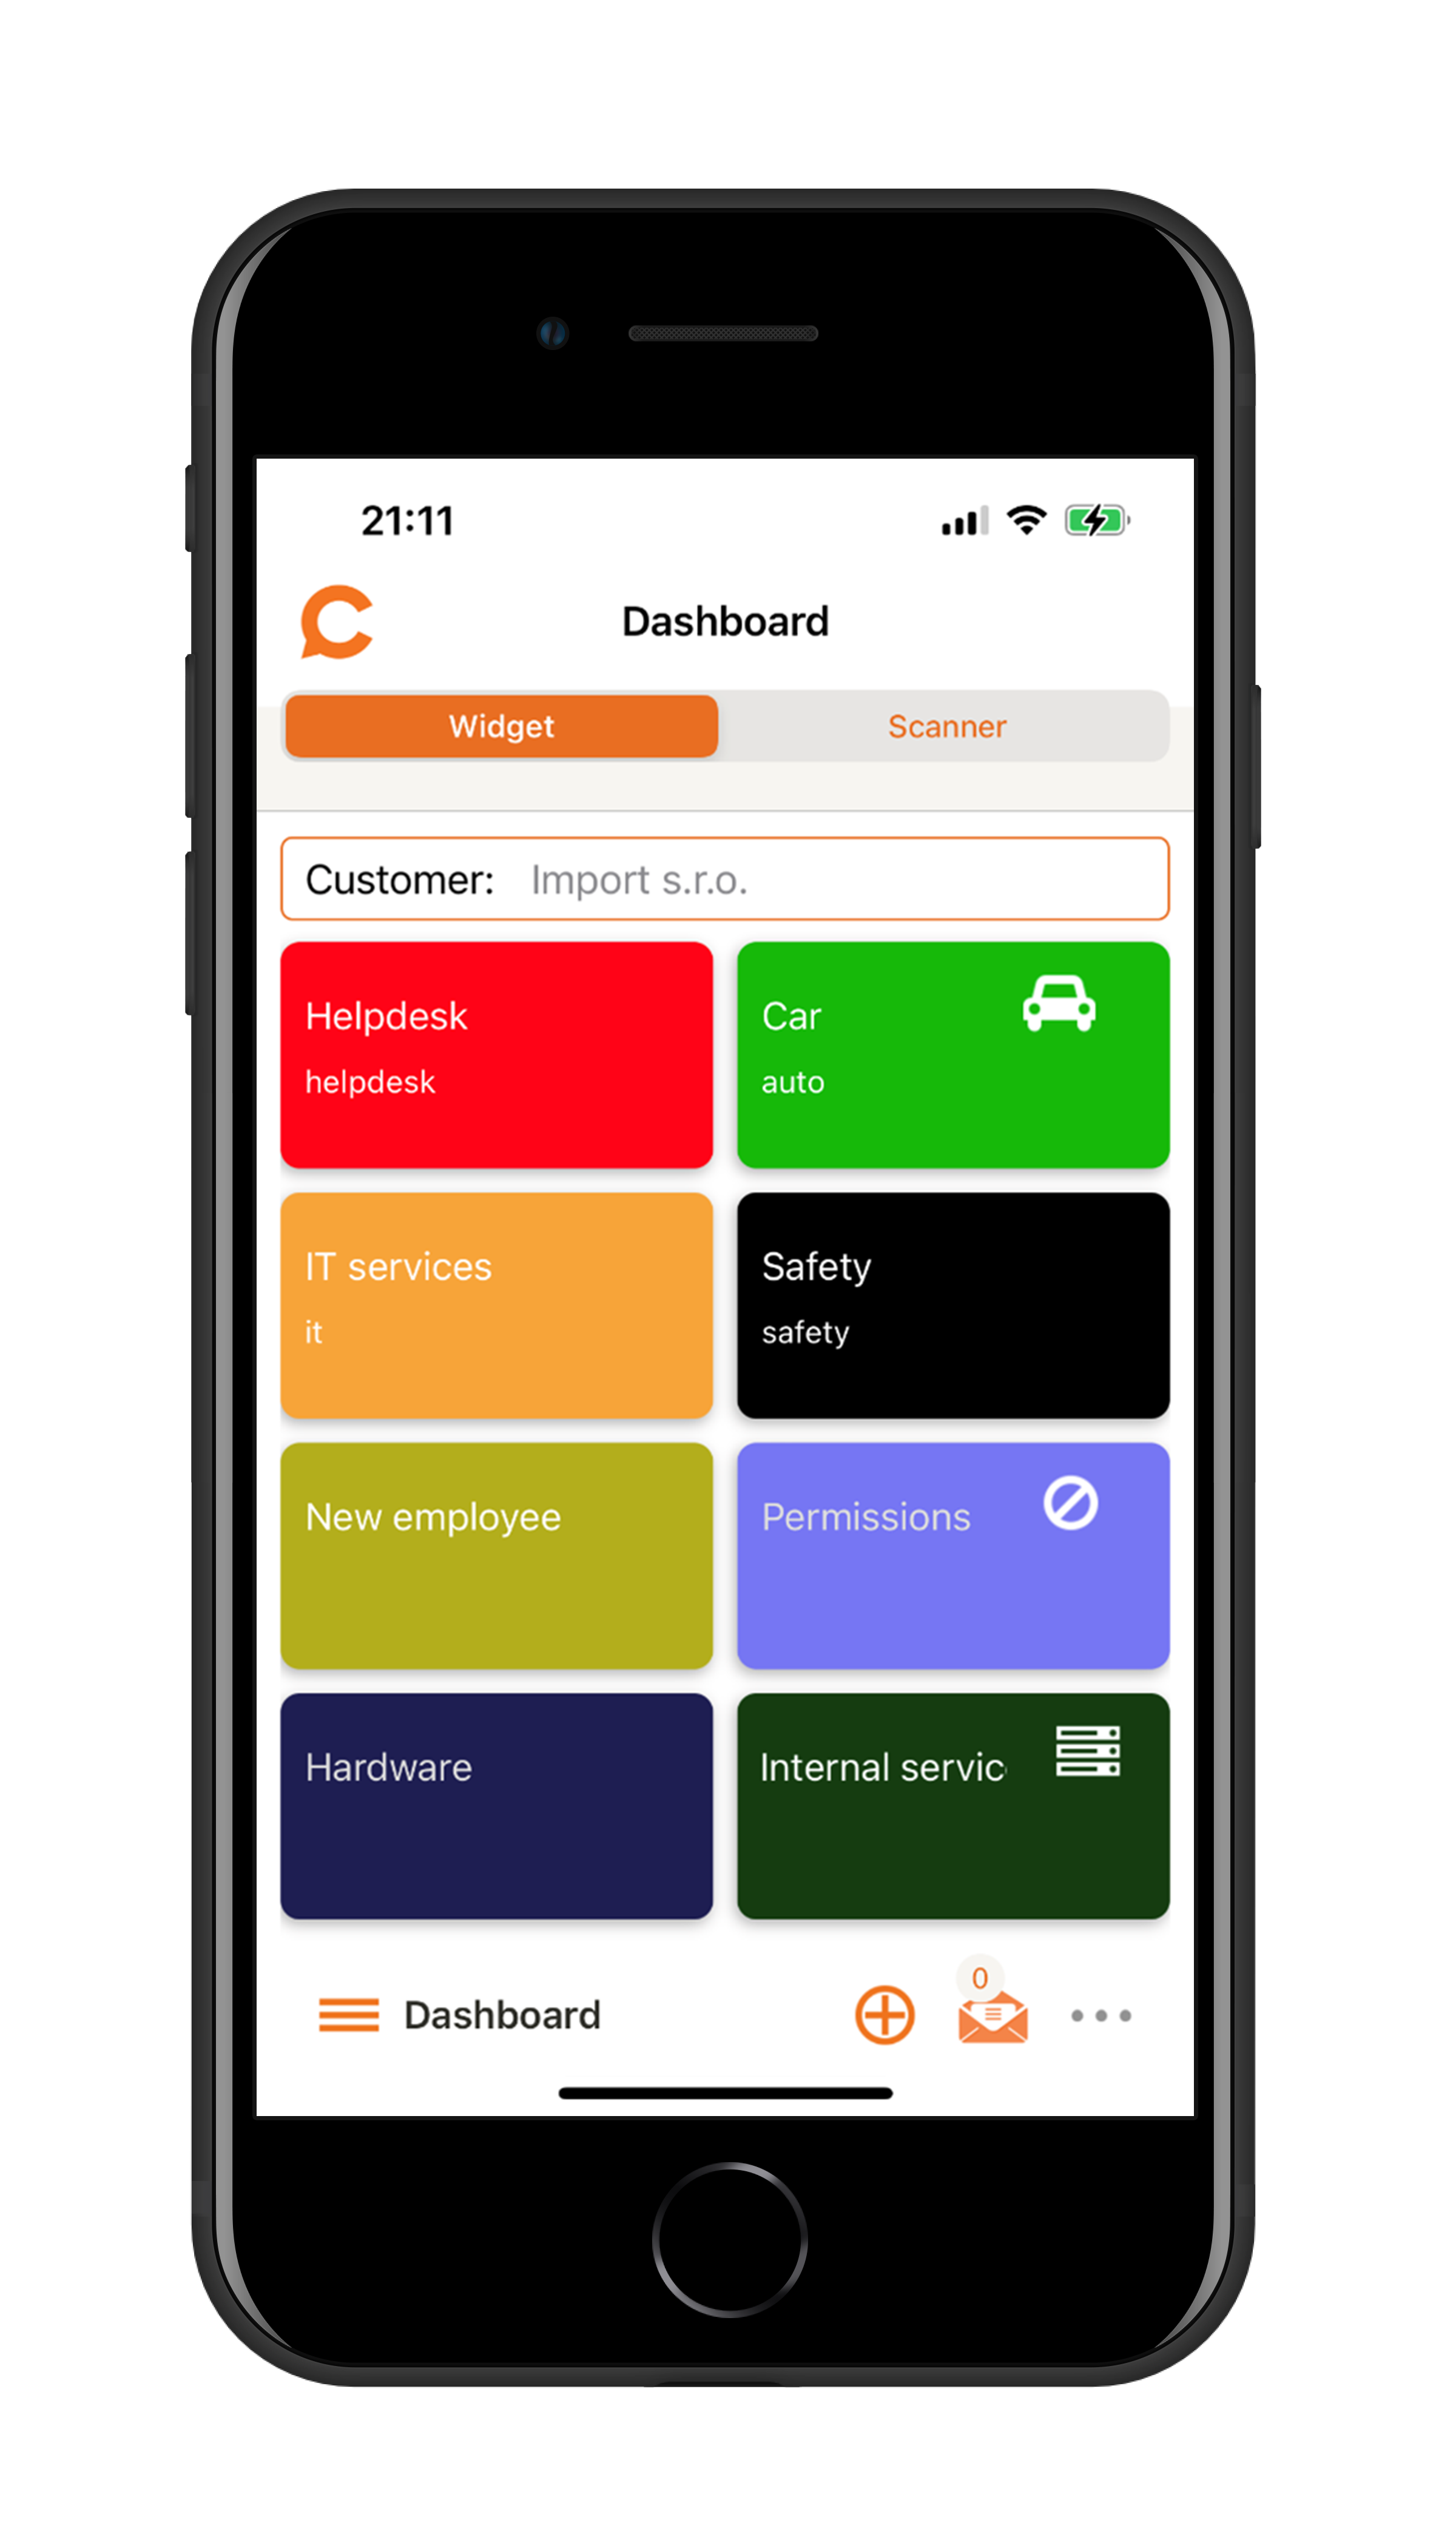
Sample Catalog of Requests on Different Platforms
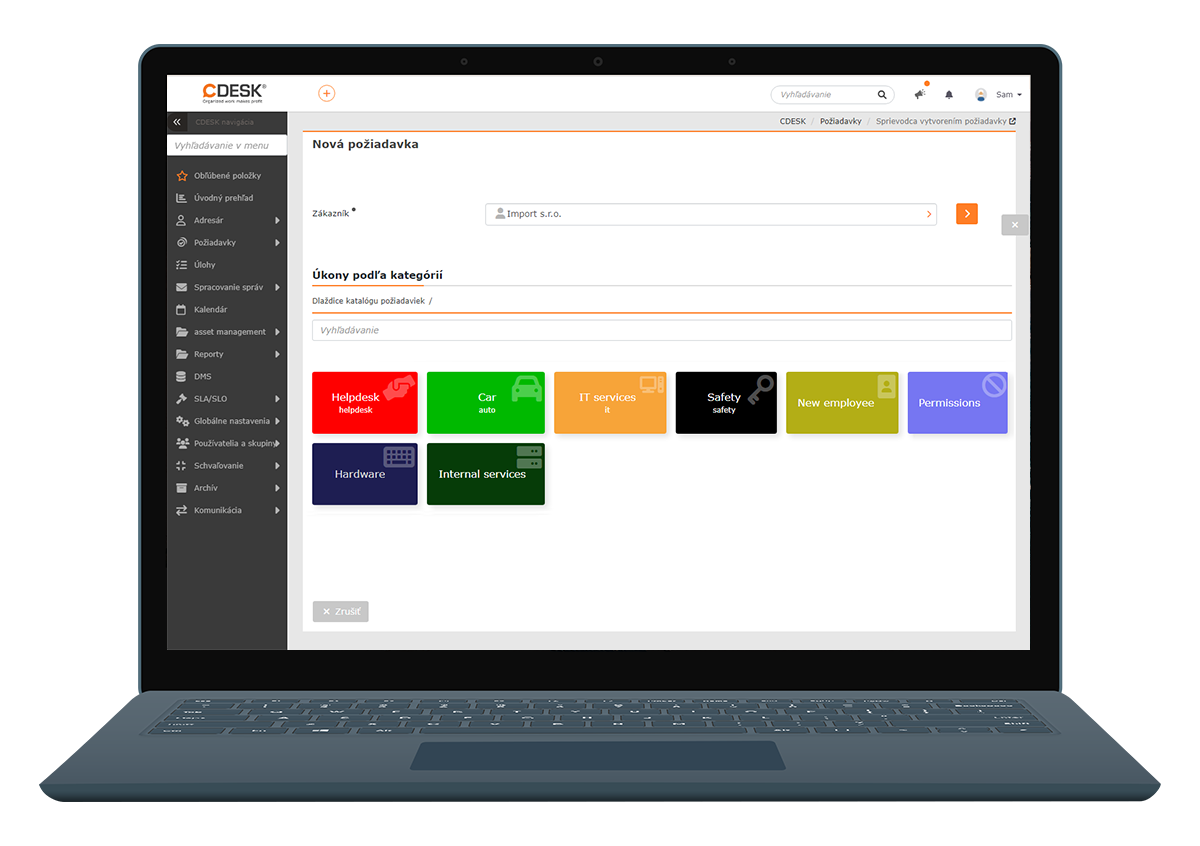

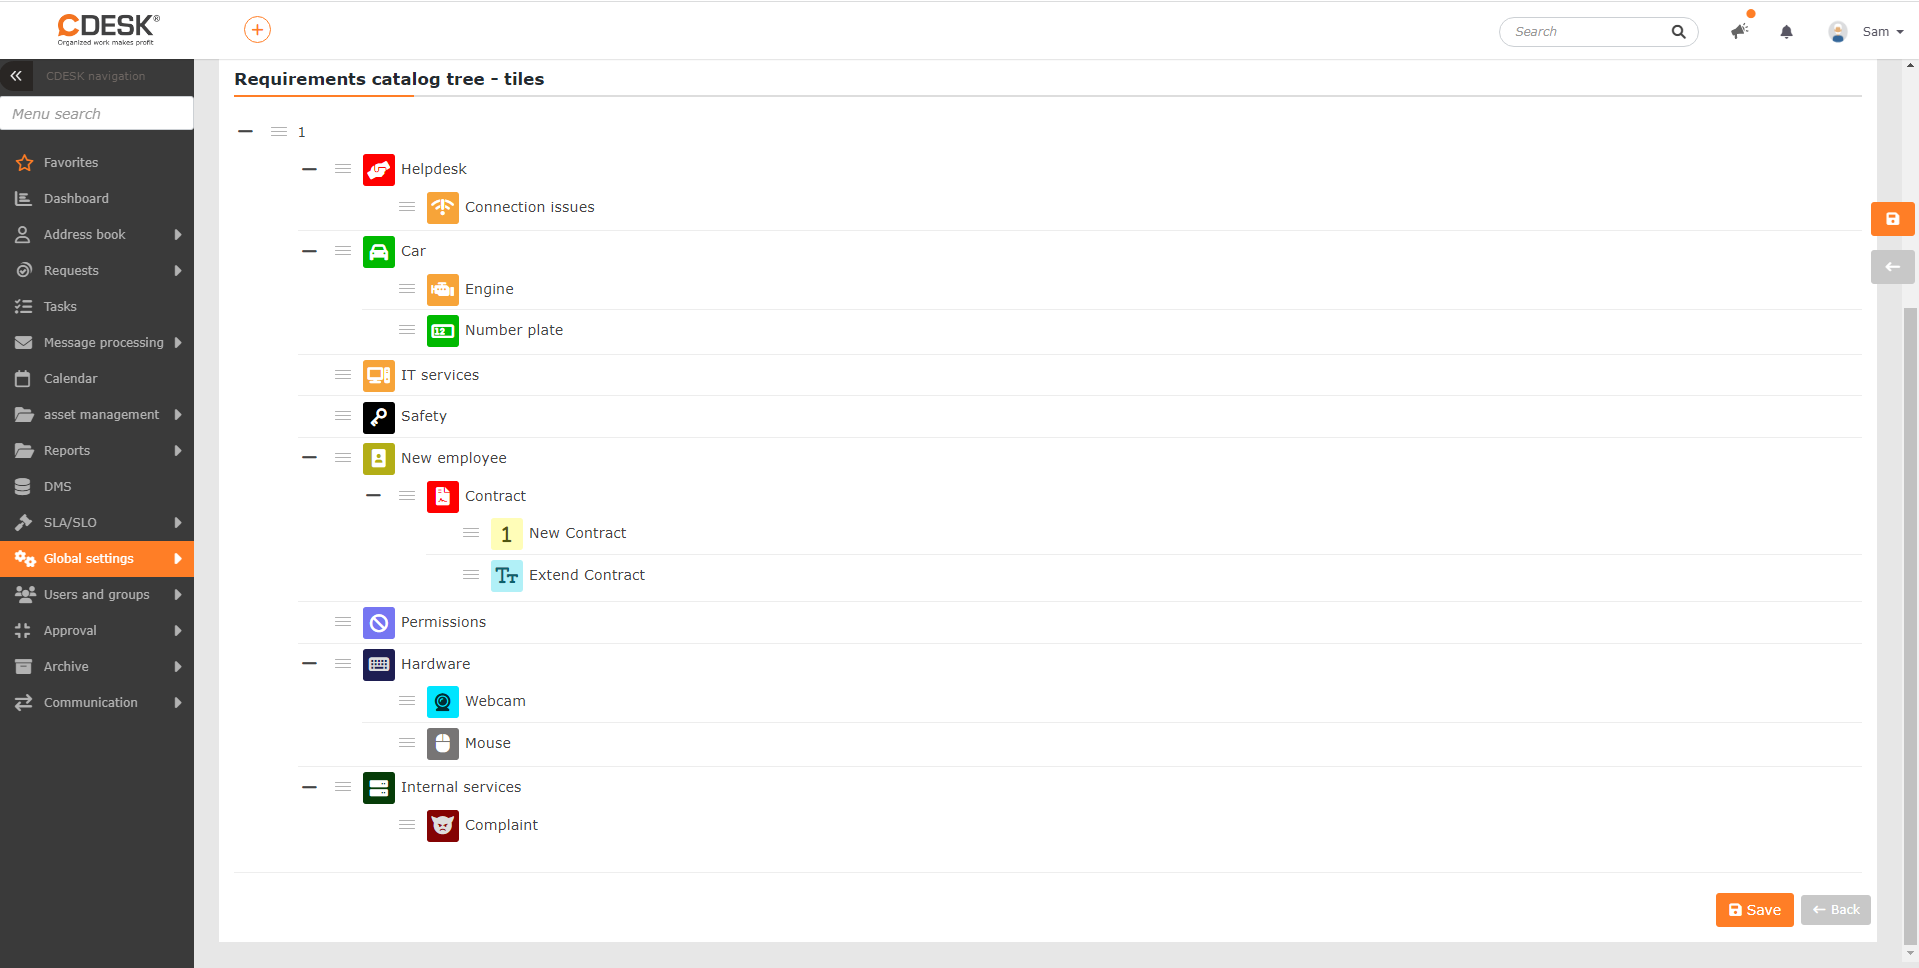
Establishing a Tile Tree for Catalog of Requests
To create requests via the catalog of requests, you first need to create tiles in Global Settings -> Requests -> Catalog of Requests. The procedure for this can be found HERE.
Creating a Template for Tiles
You can create a new template via Request Templates. These can be found in Requests->Request Templates if the catalog of requests is enabled in Global settings -> Requests -> Catalog of requests.
To create a new template, use the +Add record button. This will open the form for creating a new record. This is followed by a list of fields, with the hashtag # indicating those that can be optionally enabled. Required fields are marked with •.

Basic Information
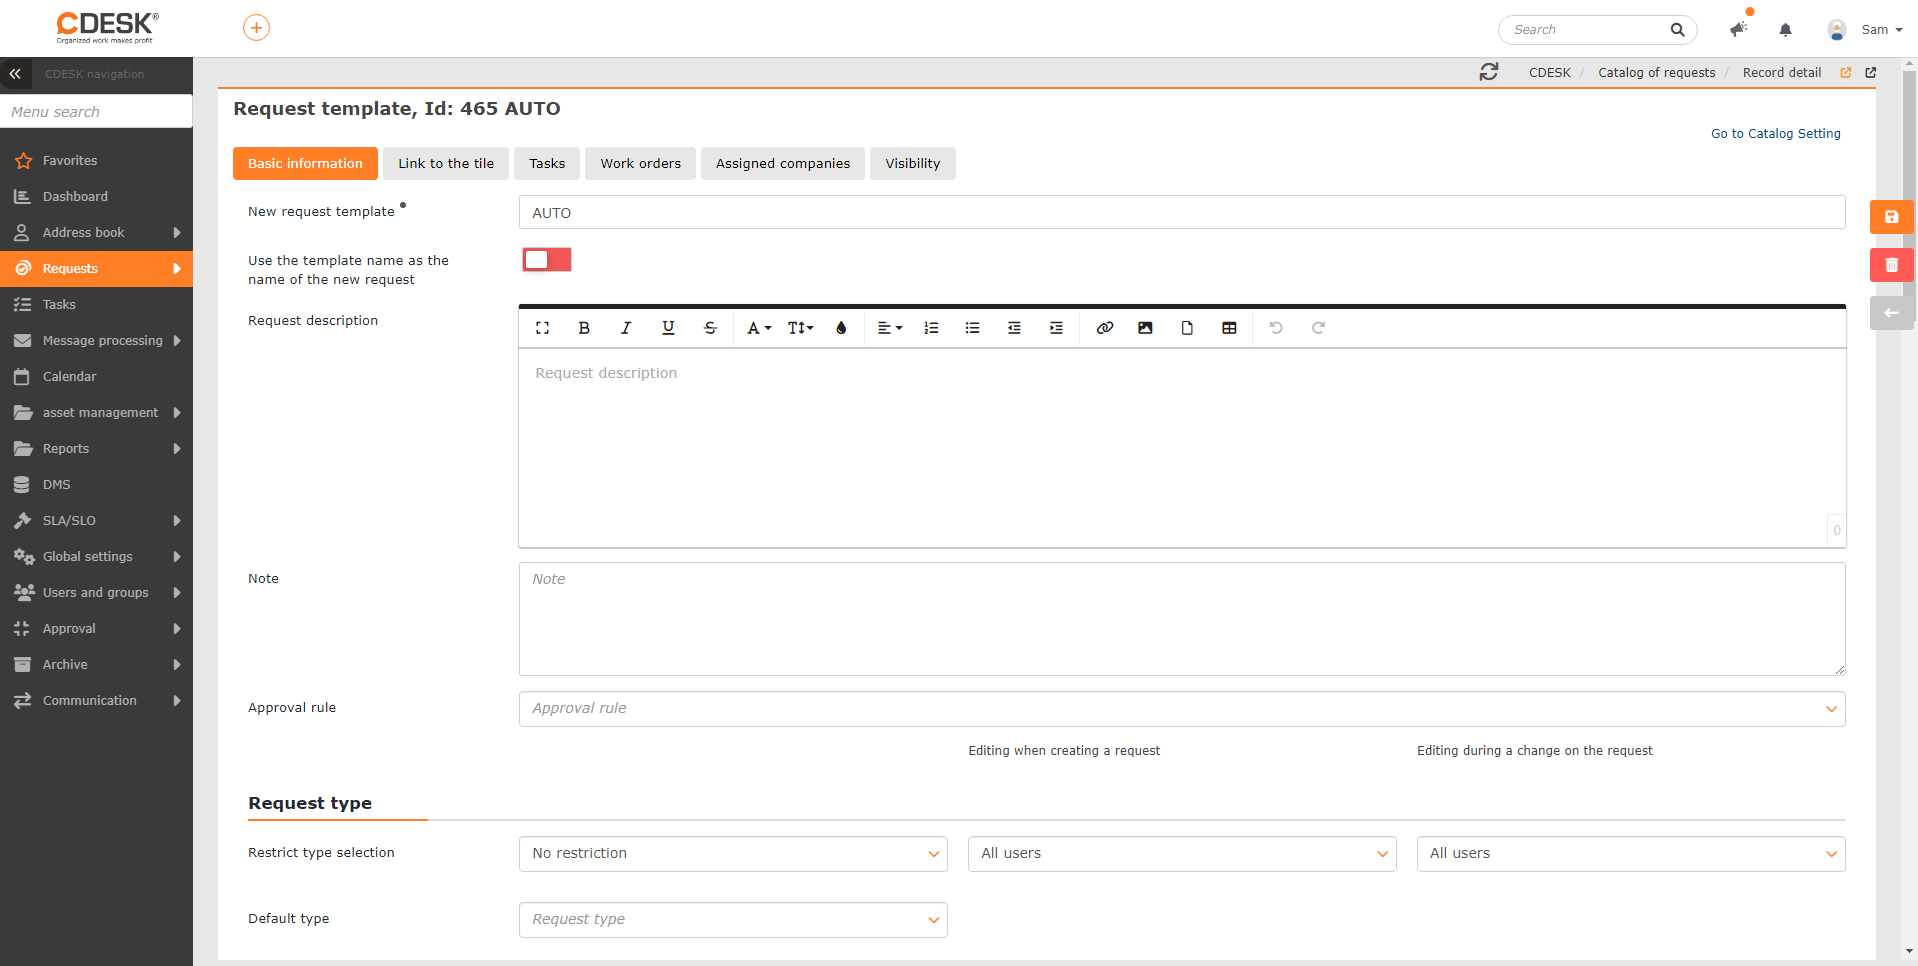
Name of the request template – the name under which the template will be displayed in the catalog of requests.
Use the template name as the name of the new request – if the switch is on, the template name will be used when creating a new request.
Request description – to be used as description of the request created from the catalog (with the possibility of modification)
Note – text field for inserting a note to the request template. This field can only be displayed in the list of request templates. It is not displayed directly on the created request.
Approval rule – if you need the requests created from this template to be subject to approval, select the offered approval rules from the list. Only rules that belong to the Approval Process and Dynamic Request Approval groups based on additional properties are offered. If no rules are offered, you must first enable Approval of Requests from catalog in Global Settings->Requests->Catalog of Requests and then create the rule in Approval->Approval Processes.
#Request type
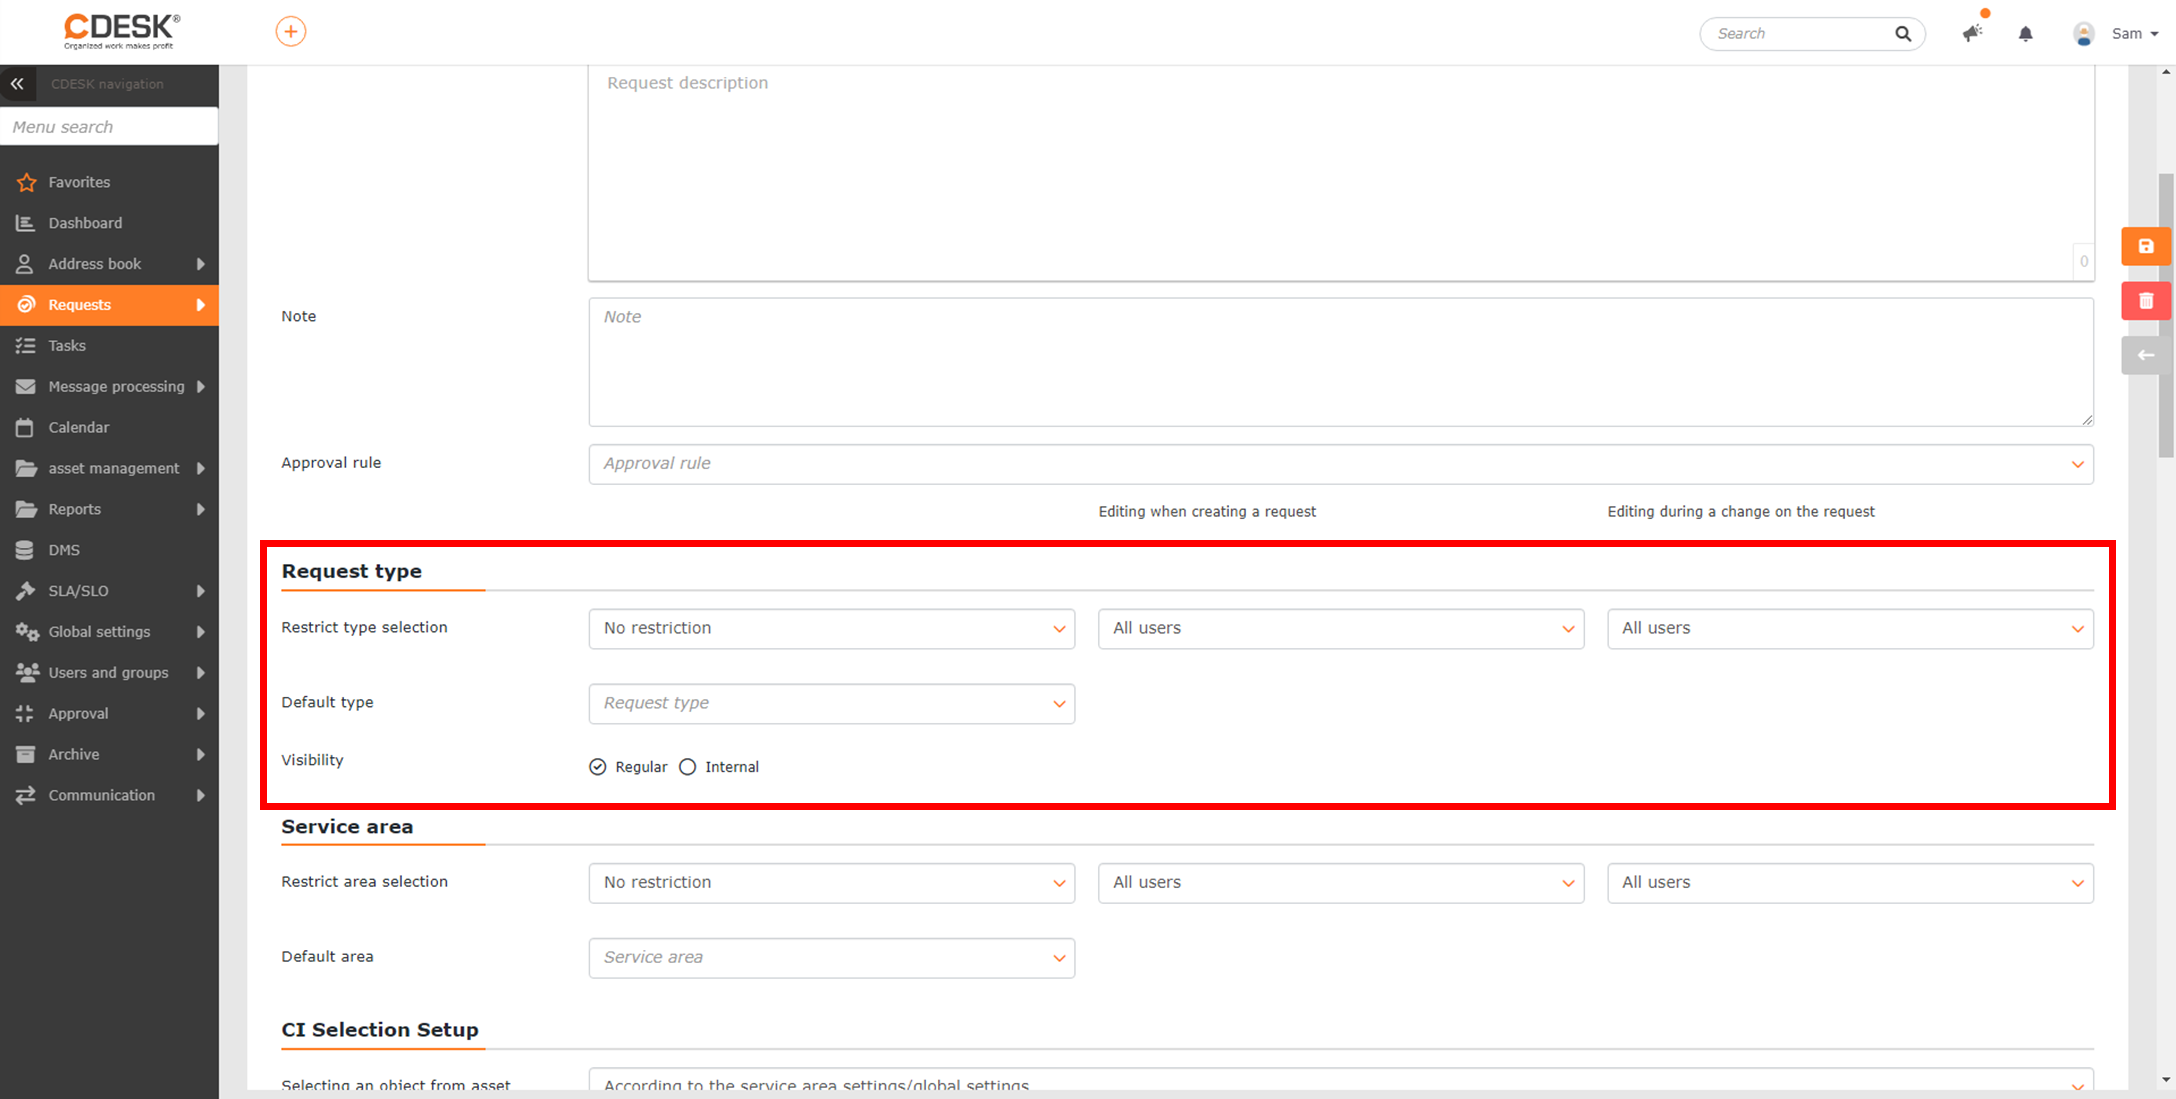
The following settings are only displayed if the option to select request service areas is enabled in Global Settings -> Requests -> Types and Areas of Service.
Restrict Type Selection
No restriction – a request created from this template will not have restricted selection of request types. All service areas defined in Global Settings -> Requests -> Types and Areas of Service will be available on the request.
- Limit to selected types – when selecting this option, a field is made available for selecting types of requests that will be available for the request created from the template.
In the Editing when creating a request column, you can set whether you can change the values pre-populated from the template when entering a request from the template. The following options are available:
- All Users – pre-populated values that are filled in when creating a request based on the template settings can be changed by every user.
- Operator, Administrator – pre-filled values that will be filled in when creating a request based on the template settings can only be changed by users belonging to the Operator or Administrator
- Assignee, Operator, Administrator – pre-filled values that are filled in when creating the request based on the template settings can only be changed by users belonging to the Operator or Administrator groups, or by the request assignee.
- Administrator – only users belonging to the Administrator group can change the pre-filled values that are filled in when creating the request based on the template settings.
In the Editing when modifying request column, you can set which fields pre-populated based on the template will be editable after saving the request if the request was created from a template.
The following options are available:
- All Users – pre-populated values that are filled in based on the template settings can be changed by each user.
- Operator, Administrator – pre-filled values that are filled in based on the template settings can only be changed by users belonging to the Operator or Administrator
- Assignee, Operator, Administrator – pre-filled values that are filled in based on the template settings can only be changed by users belonging to the Operator or Administrator groups, or by the request assignee.
- Administrator – only users belonging to the Administrator group can change the pre-filled values that are filled in based on the template settings.
Default type – allows you to select the type that will be filled in by default when creating the request. The default value on the request can be changed based on the template settings. This setting is available whether or not the request type selection is restricted. If the selection of types is not restricted, you can set any request type that is defined in CDESK as the default type. If type selection is restricted, you can set only listed types as default.
Visibility
- Regular – the default selected value. The request created from the given template has regular visibility by default, i.e. it is also visible to customers.
- Internal – the request created from the given template will have internal visibility by default. Request with internal visibility is not visible to customers.
#Service area
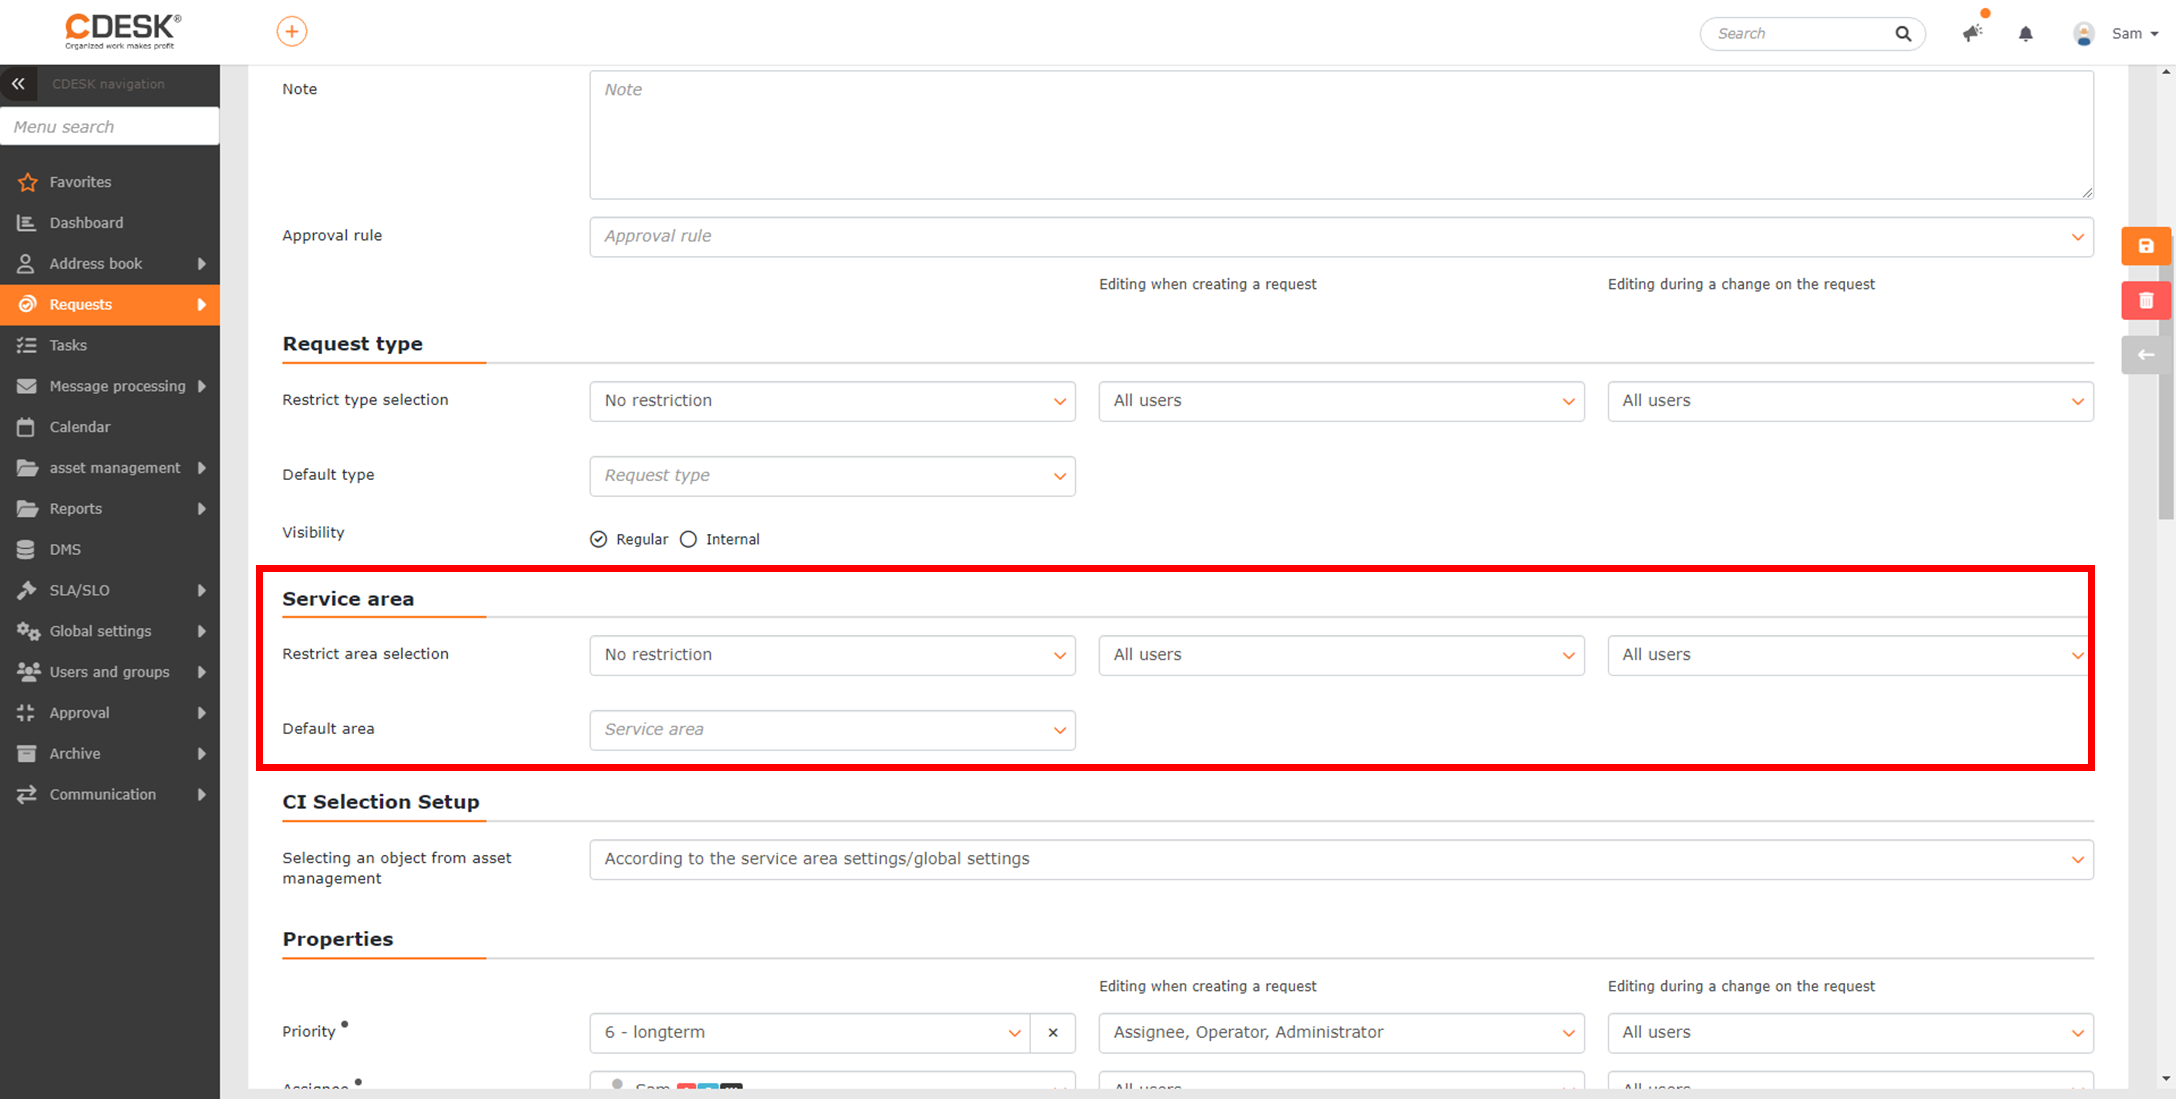
The following settings are only displayed if the option to select request service areas is enabled in Global Settings -> Requests -> Types and Areas of Service.
Restriction on the selection of areas
No restriction – request created from this template does not have a restricted selection of service areas. All service areas that are defined in Global Settings->Types and Areas of Service
- Limit to selected areas – only selected areas are available on the request created from this template. You can also select a level 2 area to the selected area. You can remove a selected area by clicking the x icon next to the service area name.
In the Editing when creating a request column, you can set whether you can change the values pre-populated from the template when entering a request from the template. The following options are available:
- All Users – the pre-populated values that are filled in when creating a request based on the template settings can be changed by each user.
- Operator, Administrator – pre-filled values that are filled in when creating a request based on the template settings can only be changed by users belonging to the Operator or Administrator
- Assignee, Operator, Administrator – pre-filled values that are filled in when creating the request based on the template settings can only be changed by users belonging to the Operator or Administrator groups, or by the request assignee.
- Administrator – only users belonging to the Administrator group can change the pre-filled values that are filled in when creating the request based on the template settings.
In the Editing when modifying request column, you can set which fields pre-populated based on the template will be editable after saving the request if the request was created from a template.
The following options are available:
- All Users – pre-populated values that are filled in based on the template settings can be changed by each user.
- Operator, Administrator – pre-filled values that are filled in based on the template settings can only be changed by users belonging to the Operator or Administrator
- Assignee, Operator, Administrator – pre-filled values that are filled in based on the template settings can only be changed by users belonging to the Operator or Administrator groups, or by the request assignee.
- Administrator – only users belonging to the Administrator group can change the pre-filled values that are filled in based on the template settings.
Default area – the selected area / 2nd level will be pre-populated on the request. This setting is available regardless of whether or not the request service area selection is restricted. If the selection of service areas is not restricted, you can set any service area that is defined in CDESK as the default area. If the selection of service areas is restricted, you can set only selected areas as the default area.
# CI selection settings
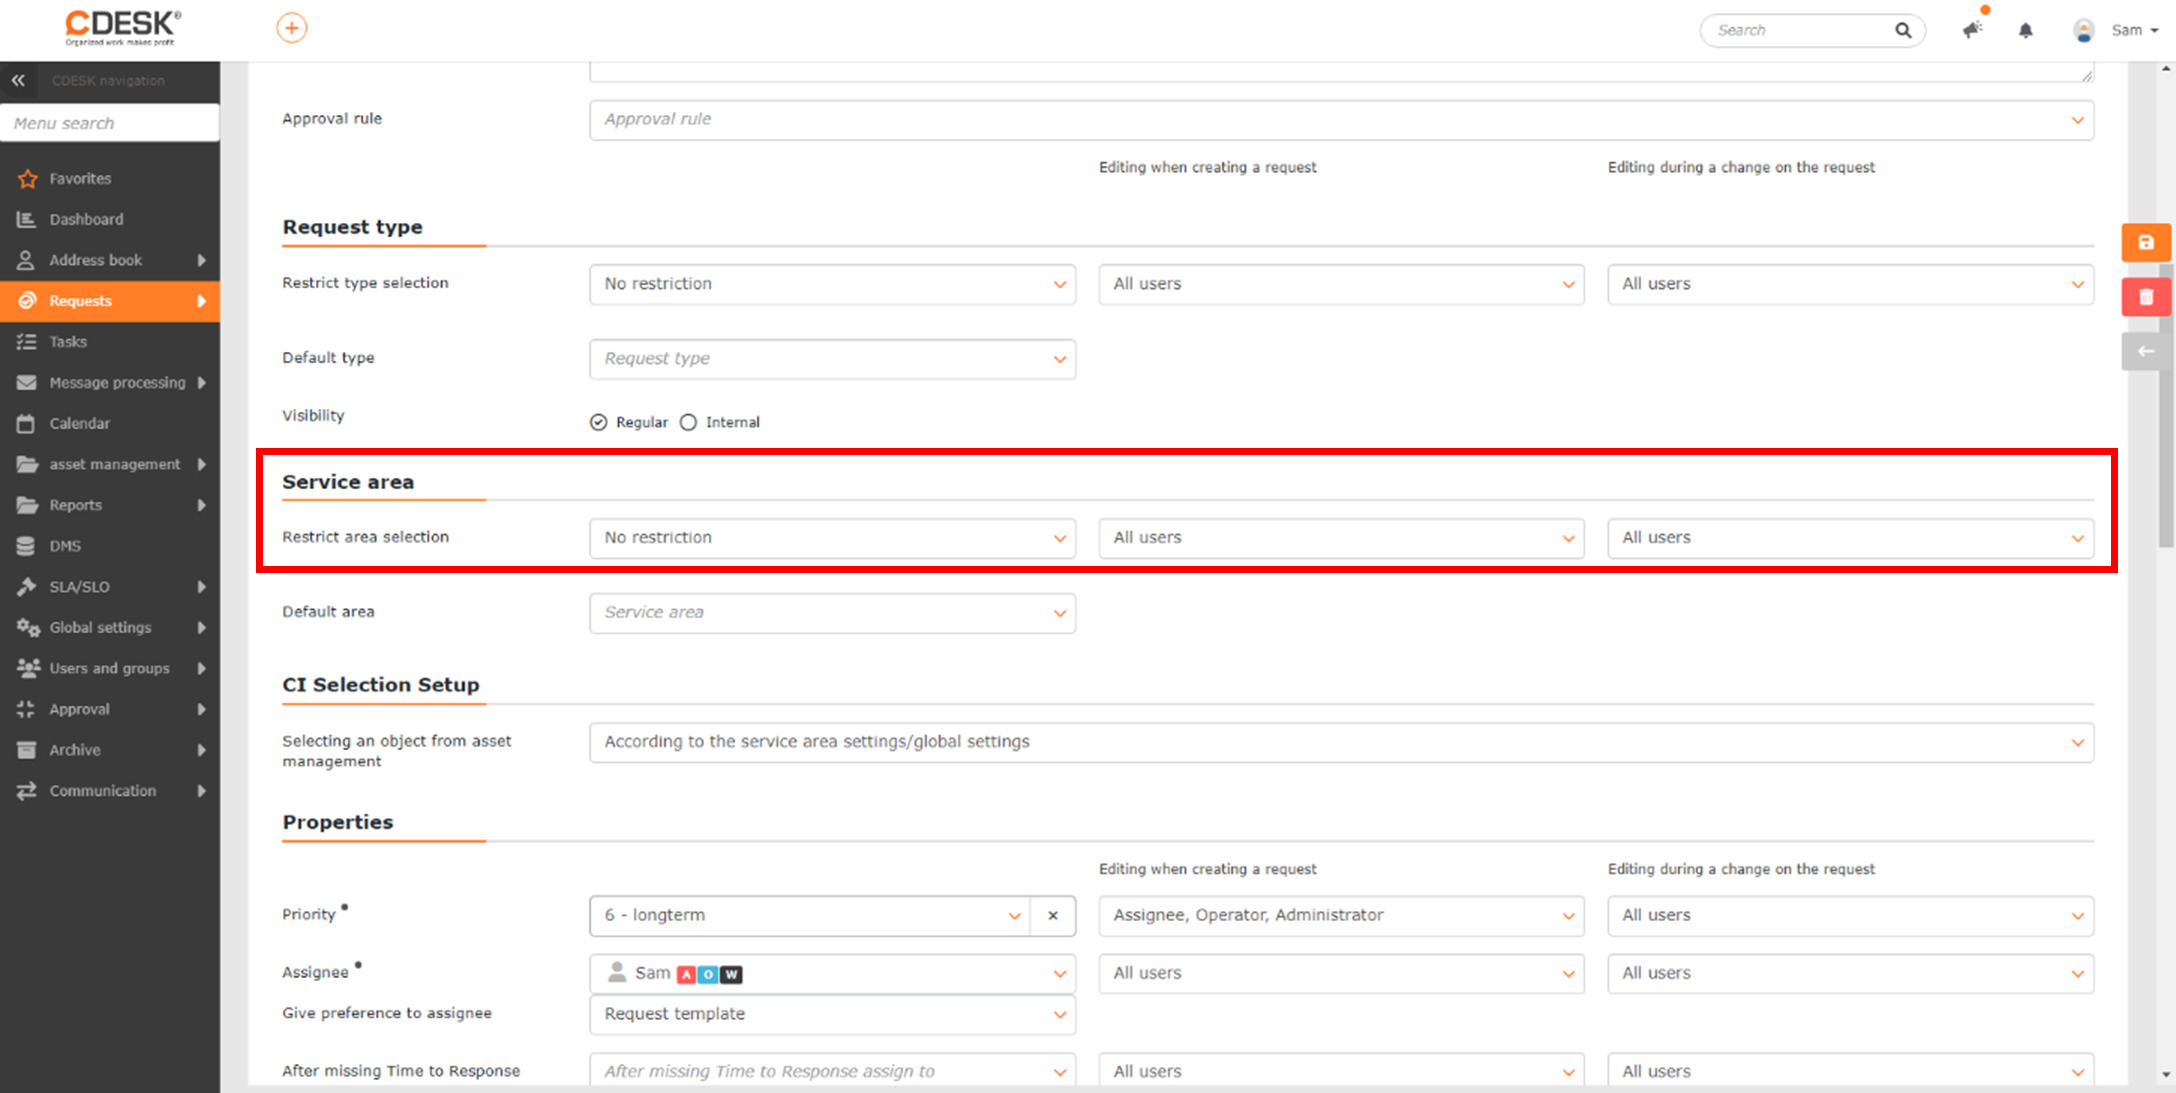
Selecting an object from the CMDB
- By service area/global settings – the selection of CI configuration objects on the request is controlled by the selected service area or global settings.
- Disabled – selection of CI configuration objects on the request is not possible
- Optional – selection of CI configuration objects on the request is possible, but it is possible to save the request without selecting the object.
- Required – selection of CI configuration objects on the request is mandatory. The request is not saved unless the user selects a CI configuration object.
Properties
Priority• – request priority enabled in Global Settings -> Requests -> Basic Settings. The priority selection will affect the request terms if an SLA is defined. It is also possible to set whether this parameter will be editable in the template and in the request, editable only by the operator, or not editable by anyone.
# Assignee Group – this option is only displayed if the Limit assignee selection by assignee group feature is enabled. The selected assignee group will be pre-populated on the request created from this template. When enabled, the assignee selection is split into two fields: mandatory assignee group and optional assignee. In the assignee field, only assignees belonging to the selected assignee group are offered. Through the assignee group the visibility of requests is controlled and notification can also be provided. This setup is advantageous for companies where requests are solved in teams. This feature is disabled by default. Turning it on in the system will cause permanent changes and turning it off is only possible via a PAID service.
Assignee• – selection of request assignees. If you have activated the Limit assignee selection by assignee group feature, only assignees from the selected assignee group will be offered. In this case, assignee selection is not mandatory. It is also possible to set whether this parameter will be editable in the template and in the request, editable only by the operator, or not editable by anyone.
Give preference to assignee
- Request Template – when creating a request, the assignee that is set on the template is pre-populated on the request.
Service Area / Request Template – when creating a request, the assignee set for the service area that is filled in on the template is pre-populated on the request. The linking of the assignee to the service area can be done in Global Settings -> Requests -> Types and Areas of Service. If no service area is set on the template or the selected service area does not have a selected assignee, the assignee that is set for the template will be selected for the request.
- Logged in Assignee / Request Template – when creating a request, the currently logged in user is pre-populated on the request. However, they must be a member of the Worker group. If the currently logged in user does not belong to the Worker group, the assignee set on the template is pre-populated on the request.
- Logged in Assignee / Service Area / Request Template – when creating a request, the currently logged in user is pre-populated on the request. However, they must be a member of the Worker group. If the currently logged in user is not a member of the Worker group, the assignee set for the service area that is selected on that template is pre-populated on the request. If no service area is set on the template, or if the selected service area does not have an assignee selected, the assignee set for that template will be selected for the request.
- Administrative Assignee from CI / Request Template – If a CI configuration object is selected on the template that has an administrative assignee set up, that assignee is also pre-populated as the request assignee. If the selected configuration object does not have an administrative assignee set, the assignee predefined for the template is pre-populated on the request.
- Administrative Assignee from CI / Service Area / Request Template – If a CI configuration object is selected on the template that has an administrative assignee set up, that assignee is also pre-populated as the request assignee. If the selected configuration object does not have an administrative assignee set, then the assignee predefined for the service area on the template is pre-populated on the request. If the service area does not have an assignee set either, the assignee predefined for the template is pre-populated on the request.
- Technical Assignee from CI / Request Template – if a CI configuration object is selected on the template that has a technical assignee set, that assignee is also pre-populated as the request assignee. If the selected configuration object does not have a technical assignee set, the assignee predefined for the template is pre-populated on the request.
Technical Assignee from CI / Service Area / Request Template – if a CI configuration object is selected on the template that has a technical assignee set up, that assignee is also pre-populated as the request assignee. If the selected configuration object does not have a technical assignee set, then the assignee predefined for the service area on the template is pre-populated on the request. If the service area does not have an assignee set either, the assignee predefined for the template is pre-populated on the request.
After missed Time to Response assign to – if the selected assignee or any assignee in the selected assignee group misses the time to respond to the request, the request will be assigned to another assignee or group. If the request is not to be assigned to another assignee after the response deadline is missed, leave this field blank. This field can be enabled in Global Settings -> Requests -> Basic Settings. It is also possible to set whether this parameter will be editable in the template and in the request, editable only by the operator, assignee or administrator, or not editable by anyone.
Assistant assignees – it is possible to add additional assistant assignees or groups of assistant assignees to the request assignee, who will have access to edit the request and will be notified of changes to it at the same time. The field Assistant assignees can be enabled in Global Settings -> Requests -> Basic Settings. It is also possible to set whether this parameter will be editable in the template and in the request, editable by the operator, assignee or administrator, or not editable by anyone.
Responsible person – it is possible to set a responsible person to the request, who can, for example, decide on the implementation of the request. The Responsible person field can be enabled in Global Settings -> Requests -> Basic Settings. It is also possible to set whether this parameter will be editable in the template and in the request, editable only by the operator, assignee or administrator, or not editable by anyone.
Additional Properties on the Request Template
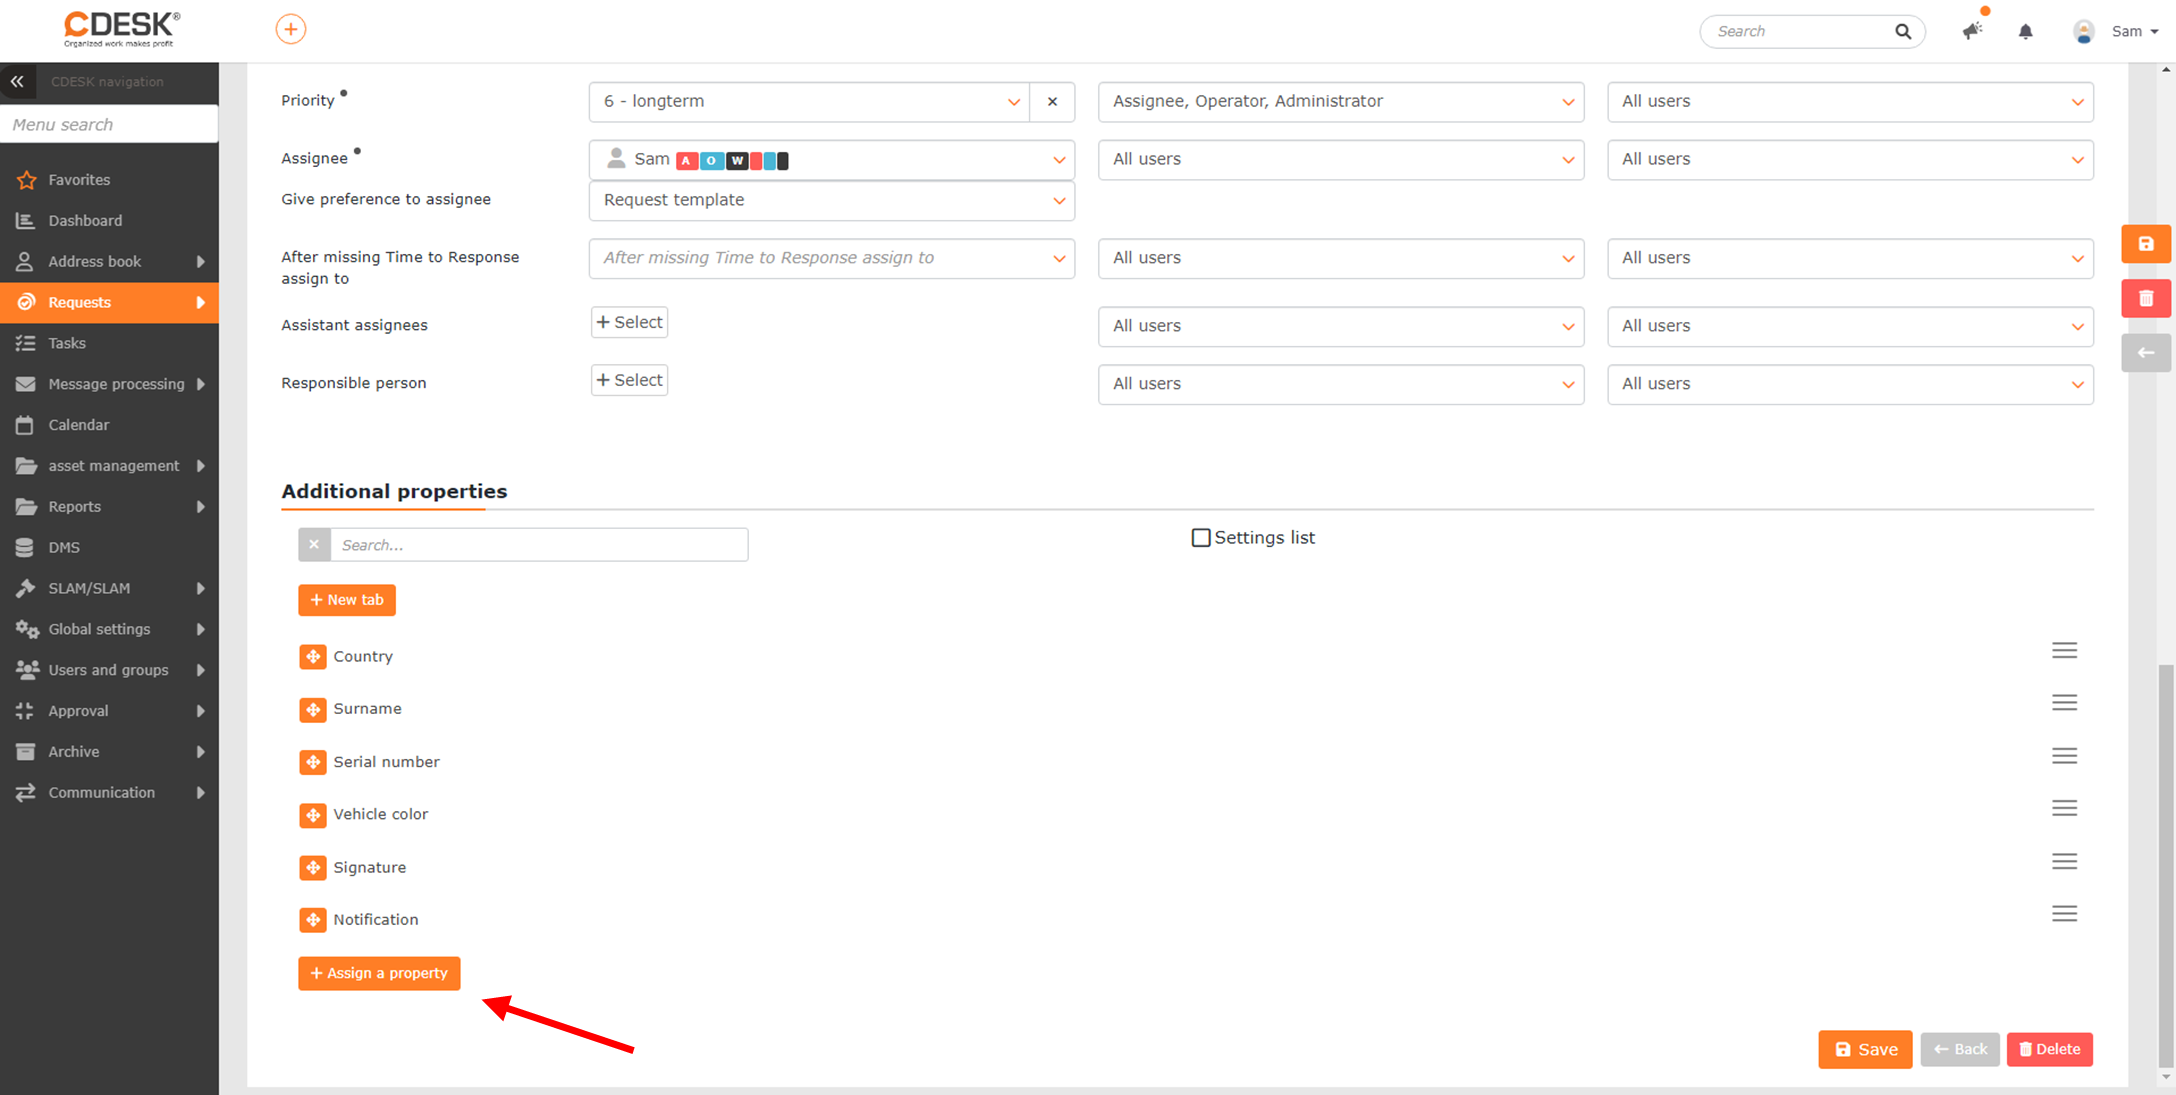
For each template it is possible to define its own set of additional properties, which allows you to adapt creation of requests to different scenarios and also significantly speed up the request creation by filling only those fields that are relevant to the scenario. To add additional properties, use the +Assign Property button. Working with additional properties is described in the article titled Additional Properties.
Adding Additional Properties to Template
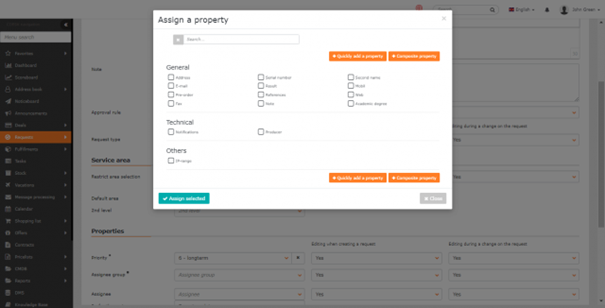
To add an additional property, click the +Assign Property button.
When clicked, a new window opens with a list of additional properties that you can define under the CMDB module. For each property, there is a check box to select the desired property. Use the Assign Selected button to add the selected properties.
If the list does not contain the property you want, you can also define it directly in the property selection window using the +Quickly add a property and +Composite property buttons. Selecting +Quickly add a property will create a basic property. Use the Composite property button to add a composite property that contains more than one basic property.
Setting Additional Properties on Request Template
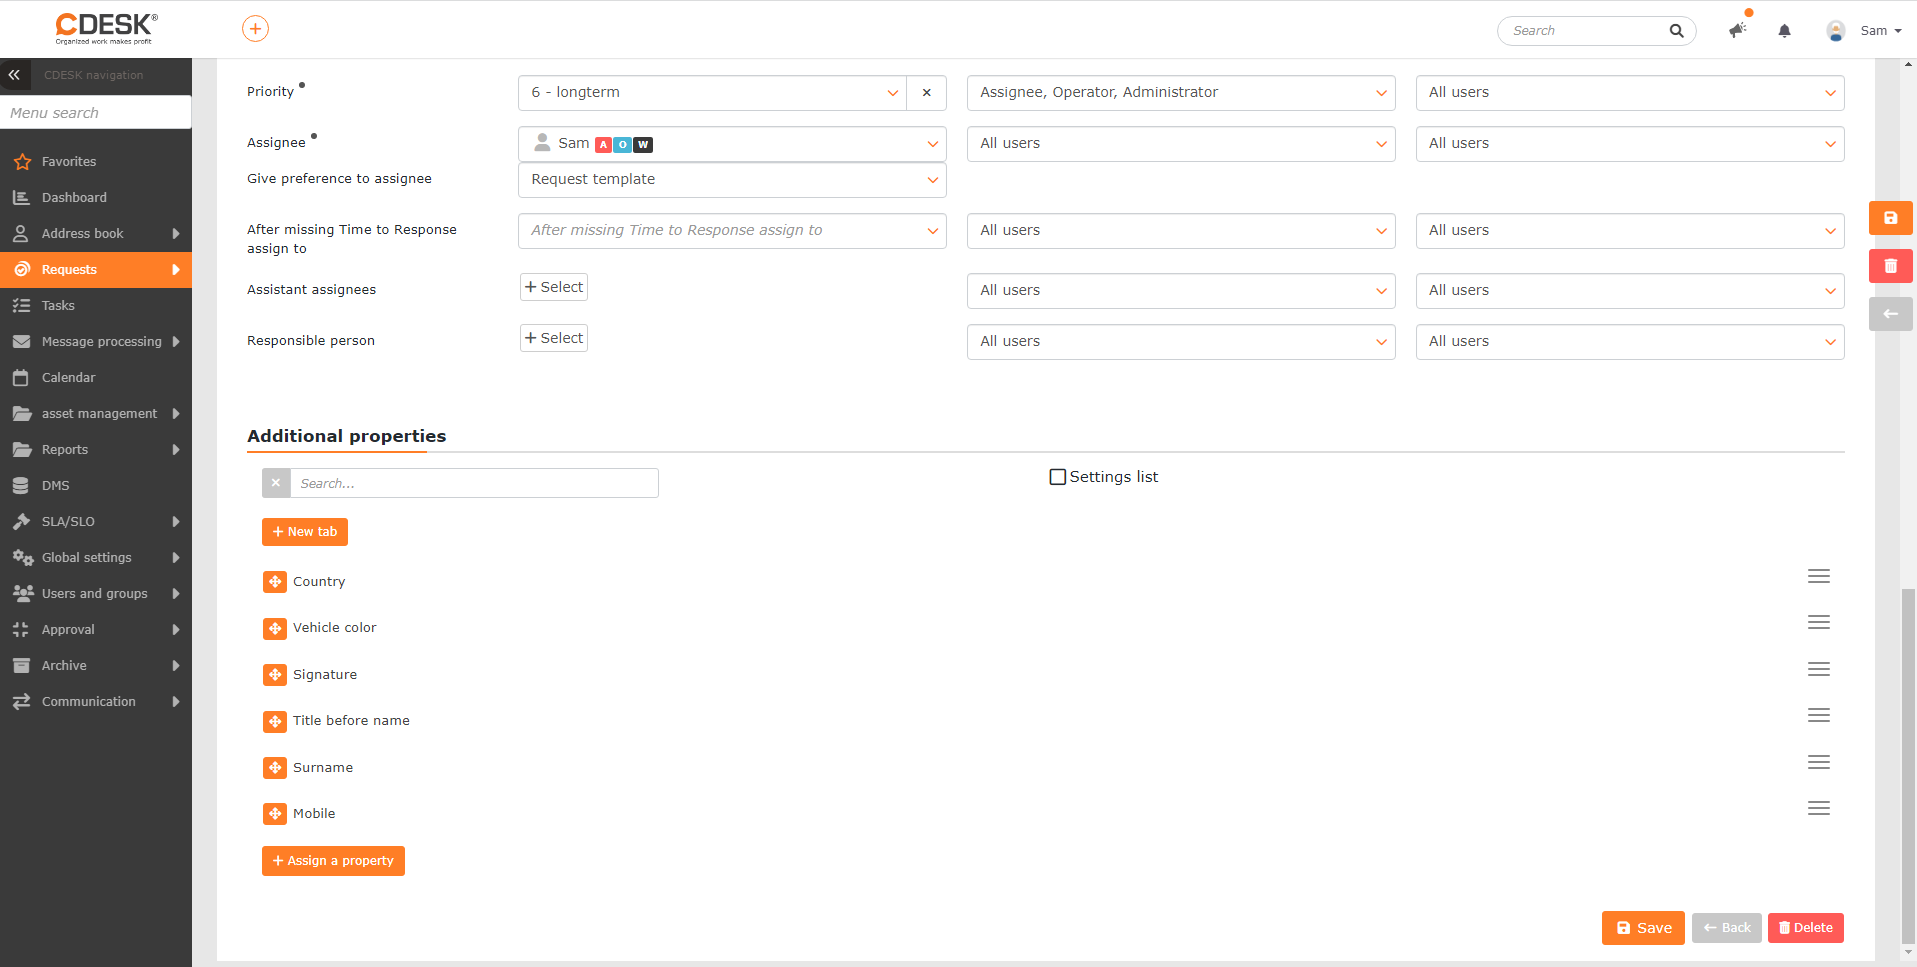
The selected additional properties are added to the list of Additional Properties. The properties will appear in the request form in the order they are ordered in this list. You can change the order of the items by dragging ![]() . There is a search bar above the list. To delete additional properties that you have already added and do not wish to use, click Delete, which can be found in the context menu
. There is a search bar above the list. To delete additional properties that you have already added and do not wish to use, click Delete, which can be found in the context menu ![]() in the upper right corner of the additional property. If the list of additional properties on the request is too long and no further property configurations are needed, you can use the List of Settings option. If this box is unchecked, the list of additional properties will only show their names and reorder icons.
in the upper right corner of the additional property. If the list of additional properties on the request is too long and no further property configurations are needed, you can use the List of Settings option. If this box is unchecked, the list of additional properties will only show their names and reorder icons.
We recommend using tabs to easily navigate through the additional properties. To create a new tab, click the +New tab button. In the modal window you need to name the tab, add a translation if necessary, and save it with the Save button.
You can also set how properties are displayed and filled in.
Show Collapsed – when the Show Collapsed option is checked, the entire property is not displayed in the request form, only the checkbox. The property will be expanded when this checkbox is checked.
Required field – when Required field is checked, the property will be marked as mandatory in the request form. You will not be able to save the request unless you fill in the property.
More values – when you check More values, you will be able to fill in the property multiple times. When you select this option, the Limit field becomes available in which you can limit the quantity.
Show in the list of requests – additional property can be displayed as a separate column in the list of requests.
Subject to approval – allows you to set approval on the selected additional property. Approval via additional properties is described in the text below in the paragraph Setting up Approval of Request via Additional Property on Template.
After filling in the basic information, go to the Link to Tile tab to attach the template to the tile. On the Assigned Companies tab, set which customer the template will be available for. Alternatively, you do not need to select a specific customer, but can assign the template to multiple customers of the same type at once. Details on creating templates are described in the following text.
Linking Template to Tile
Template can be assigned to the tile in the Link to the Tile tab. The tab contains a list of tiles of the catalog of requests. Tiles can be defined in Global Settings -> Requests -> Catalog of Requests. Check to select for which tiles the template will be available.
If you need to edit tiles, you can use the Go to Catalog Settings button, which will take you directly to Global Settings -> Requests -> Catalog of Requests

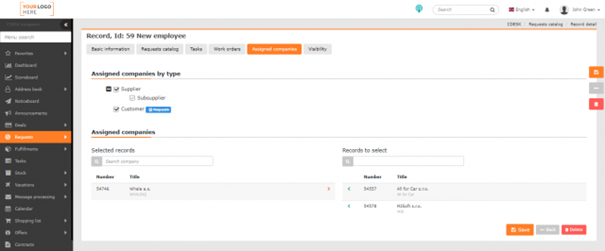
Assigning Template to Company
In order to save the template, you must first assign customers to it – either by selecting customer categories or individually, by selecting specific customers from the list in the right half of the window. To narrow down the selection of offered customers or to search for a specific customer, use the search box above the list. Thus, the template will only be available to the assigned customers in the service catalog.
Visibility by Job Position
The service catalog can be differentiated by template offer for job positions, which can be defined in Global Settings -> Job Positions -> Defining of Job Positions. Visibility is adjusted by clicking on the icons in the ![]() column:
column:
![]() – users see the template in the catalog of requests
– users see the template in the catalog of requests
![]() – users are not able to see the template in the catalog of requests.
– users are not able to see the template in the catalog of requests.
The job position is assigned to users in Permissions and Access -> Users. The option to specify the visibility of a request is useful when creating requests that are to be accessible only to senior managers, for example. You can also assign the request to an assignee group.
Click Save to add the template you are creating to the catalog.

Setting Up Automatic Generation of Tasks
The automatic generation of tasks is performed after the request is created via the template in which the tasks are defined. Tasks can be conditionally created based on certain properties, but only at the moment of creating the request. Starting one task does not depend on the completion of other tasks. Such extended options are provided by the work orders described HERE.
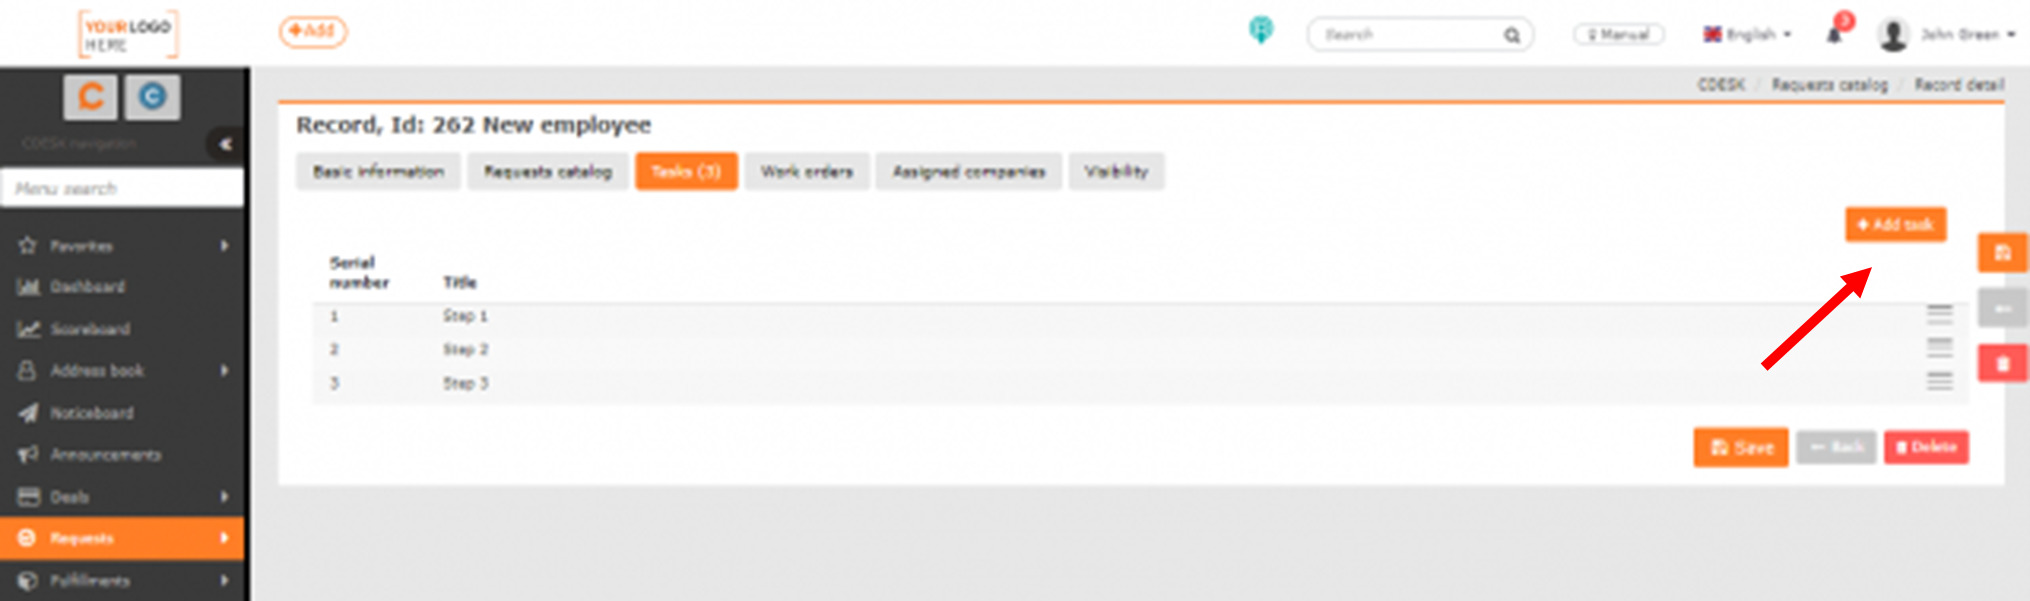
The Tasks tab is available after saving the template if the Tasks module is enabled in Global Settings -> Tasks.
To add a new task, click the +Add task button in the top right corner. Once clicked, a new window will open.
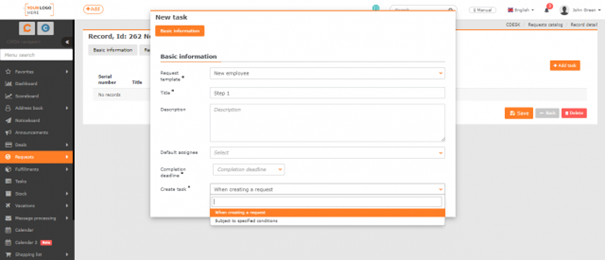
Title – the name of the task under which it will appear in the list of tasks. At the same time, it is the name of the task generated for the assignee
Description – task description
Default assignee – specify who will be the assignee of the generated task. It can also be an assignee group
Time to resolve (TTR) – can be the same as the request completion date, or you can specify the due date in hours or days
Create a task – select under what circumstances the task will be generated
- When a request is created – when a new request is created through the service catalog, this task is generated and assigned to the designated assignee
- Subject to specified conditions – the task is generated when specified conditions are met. If you specify more than one condition, the task will be generated only when all conditions are met. To generate a task when at least one of the conditions is met, a separate task must be created for each of them. Conditions can be created from optional properties listed in the template’s basic information, and only of the following types:
-> checkbox – possibility to select condition according to the on or off status
-> custom enum – possibility to select condition according to the values defined in the custom enum used in the given optional property
To assign a task to a template, click Save. Click Cancel to close the window without adding the task.
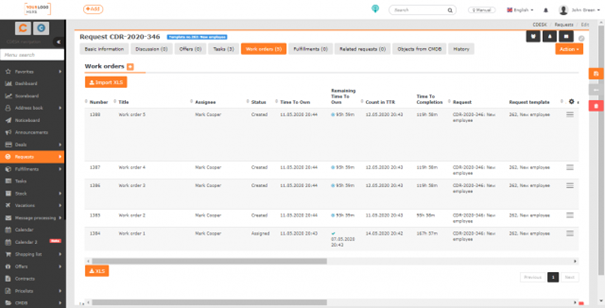
Setting Up Automatic Generation of Work Orders
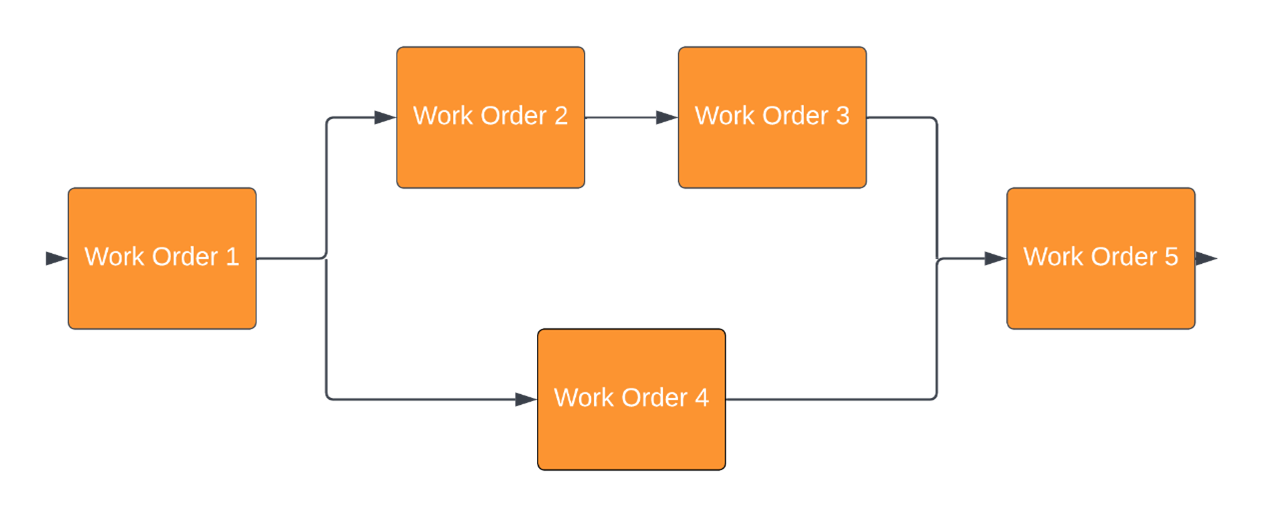
Automatic generation of work orders is performed after the request is created via the template in which the work orders are defined. The generated work orders can interact with each other in a serial-parallel manner. The start of a particular work order may depend on the completion of previous orders.
The Work Orders tab appears after the template is saved if enabled in Global Settings -> Requests -> Work Orders. On the Work Orders tab, you can define work orders to be automatically generated and assigned to assignees when a request is created.
If you wish to terminate the request automatically after the last work order is completed, you must enable the Automatically terminate the request when the last work order is completed switch.
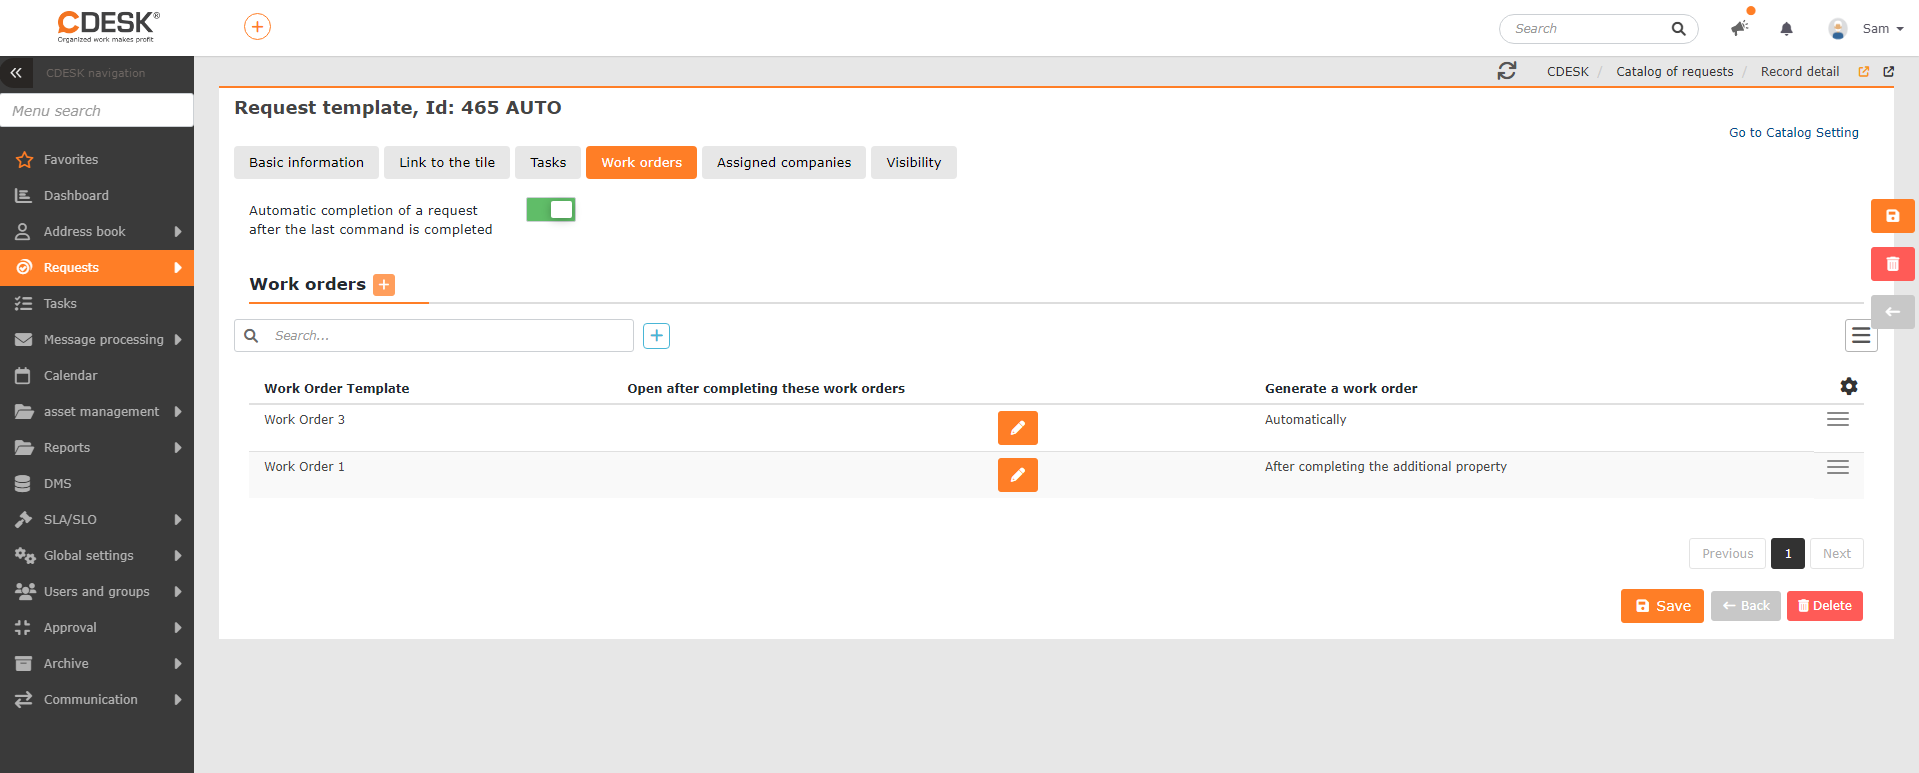
Use ![]() to add a new work order. When clicked, a new window opens.
to add a new work order. When clicked, a new window opens.
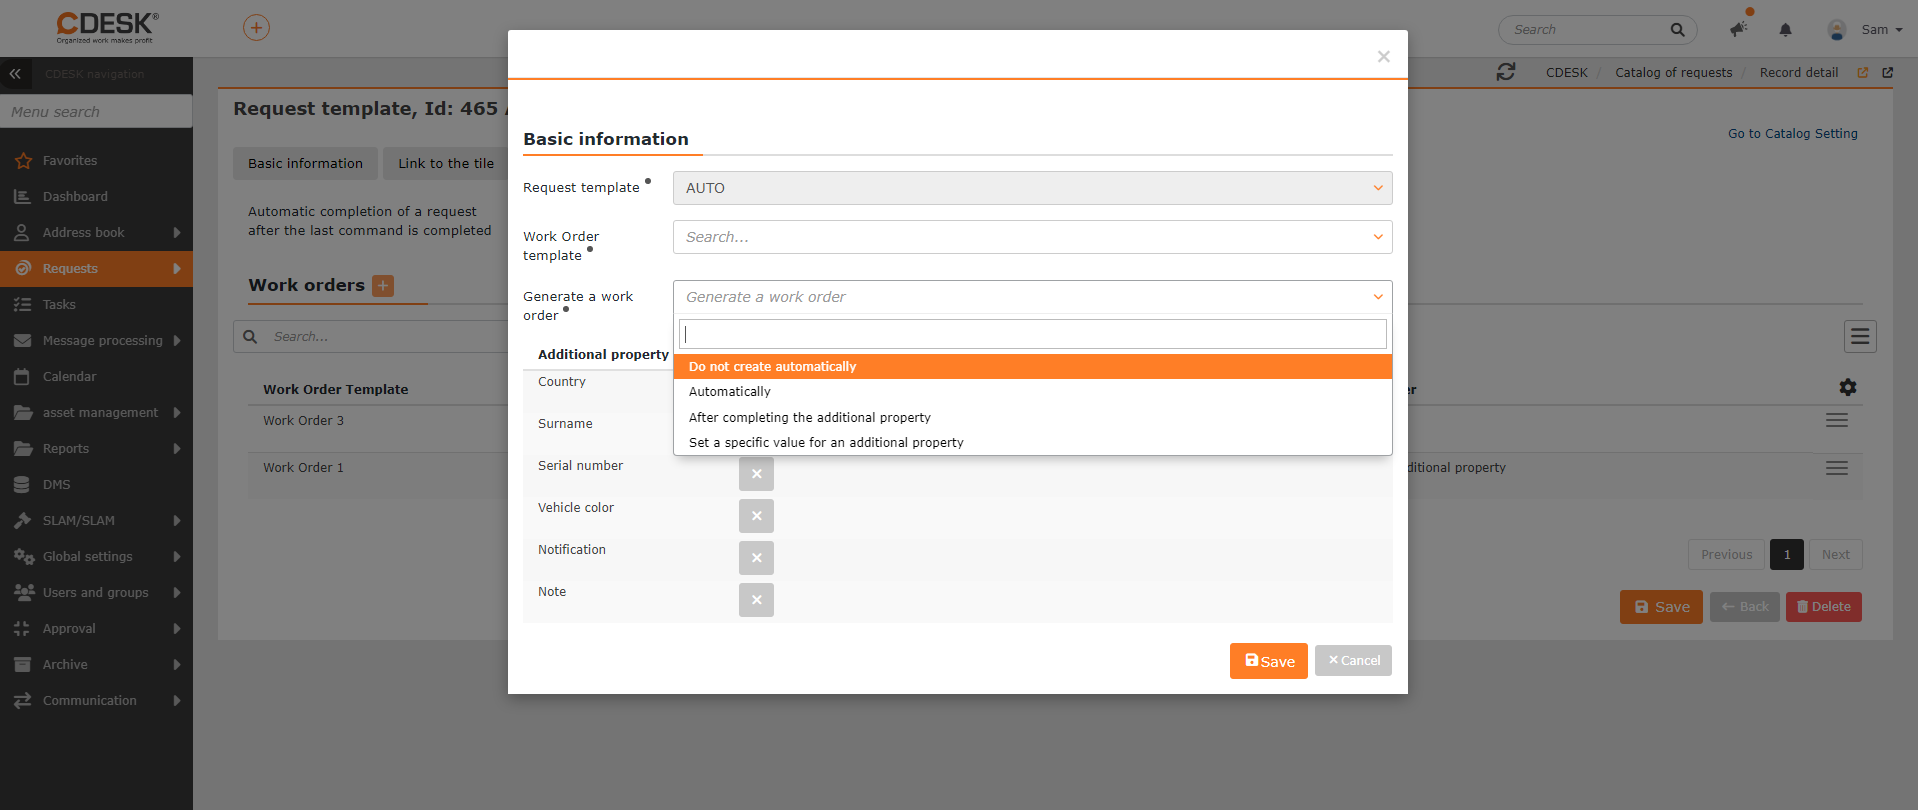
Request template – this field is pre-populated with the name of the template to which you are adding the work order. You cannot change the name in this field.
Work order template – select a work order template from the list. The selected template will serve as a template for the automatic creation of work orders for the request that will be created from this request template (this includes generating a work order based on an additional property or a certain value of additional property). If the list does not contain any work order templates, you must create them in Requests->Work Order Templates. ||
Generate work order – select the condition according to which the work order will be generated. The list contains following options:
- Do not create automatically – the work order is not created automatically. In this case you have to enter it manually.
- Automatically – the work order is created automatically when a request is created from this template. The work order will be created based on the set work order template.
- After completing the additional property – the work order is created automatically after completing the selected additional properties. Selecting this option opens the field for setting the generation conditions. CDESK offers the following options:
-> At least one condition – to generate a work order, it is sufficient to fill in one additional property placed on the request.
-> All conditions – to generate a work order, you need to fill in all additional properties.
Additional properties that condition the generation of work order are listed below. These are additional properties that are added to the request template. If it is a composite property, each property that the composite property contains will be included in the list. If you do not want any of the additional properties to affect the generation of the work order, click on ![]() that can be found next to the name of the additional property. However, the additional property marked in this way remains on the request template. Click
that can be found next to the name of the additional property. However, the additional property marked in this way remains on the request template. Click ![]() to return the additional property to the list of properties that affect work order generation.
to return the additional property to the list of properties that affect work order generation.

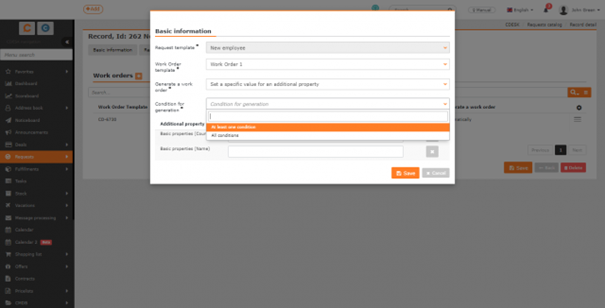
- Set specific value for additional property – the work order is created automatically after filling in specific values of selected additional properties. Selecting this option opens the field for setting the generation conditions. CDESK offers the following options:
-> At least one condition – to generate a work order, it is sufficient to fill in one additional property placed on the request.
-> All conditions – to generate a work order, you need to fill in all additional properties.
Additional properties that condition the generation of a work order are listed below. These are additional properties that are added to a given request template. If it is a composite property, each property that the composite property contains will be included in the list. If you do not want any of the additional properties to affect the generation of the work order, click on ![]() next to the name of the additional property. However, the additional property marked in this way remains on the request template. Click
next to the name of the additional property. However, the additional property marked in this way remains on the request template. Click ![]() to return the additional property to the list of properties that affect work order generation.
to return the additional property to the list of properties that affect work order generation.
Next to each additional property there is a field for entering the specific value at which the work order will be generated. Depending on the type of basic property, the following values can be set:
- Time – click to open the window where you can set the time
- Time and date – click to open the window where you can set the date and time
- Checkbox – offers options: on status / off status
- Number – you can only enter an integer without a decimal point in the field
- Date – click to open the window for setting the date
- Decimal number – enter here a decimal number
- Hyperlink – it is not possible to set the Hyperlink type property to affect the generation of the work order. Therefore, it is not in the list
- IP address – you can enter an IP address in the field in the format xxx.xxx.xxx.xxx
- IP range – you can enter an IP range in the field in the format xxx.xxx.xxx.xxx – xxx.xxx.xxx.xxx
- Counter – you can set a specific value on the selected date. You can only enter an integer without a decimal point
- File upload – no specific parameters are set for this property. The work order will be automatically generated after attaching the file to the request
- Long text – you can enter any characters into the field. The maximum number of characters is 65 535.
- Long text with formatting – you can enter any characters into the field. The maximum number of characters is 65 526 characters
- String – you can enter any characters in the field. The maximum number of characters is 255 characters
- Three-state checkbox – offers the following options: on status / off status
- DB relation – you can select one value from the select. The content of the list varies depending on the type of relation. For example, if the binding is to companies, the list contains companies registered in CDESK.
- Custom enum – you can select one value from the chosen custom select.
Save the work order settings using the Save button in the bottom right corner of the window. Click Cancel to close the window without saving the changes you have made.
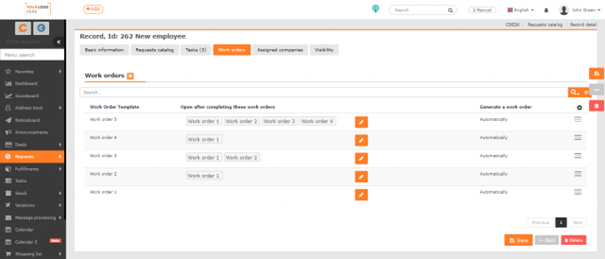
Setting Up Serial-Parallel Sorting of Work Orders
Use ![]() to set the order to be activated only after the selected work orders have been completed. Clicking on
to set the order to be activated only after the selected work orders have been completed. Clicking on ![]() in the Open after completing these work orders column will make available a button to select the work orders that are located on this template. Click
in the Open after completing these work orders column will make available a button to select the work orders that are located on this template. Click ![]() to confirm the selection.
to confirm the selection.

Setting Up Approval of Request via Additional Property on Template
You can only approve the request using additional properties if you set an approval rule on the template that belongs to the Dynamic approval of the request based on additional properties group. If you have not created such a rule yet, you can create it in Approval->Approval Rules.
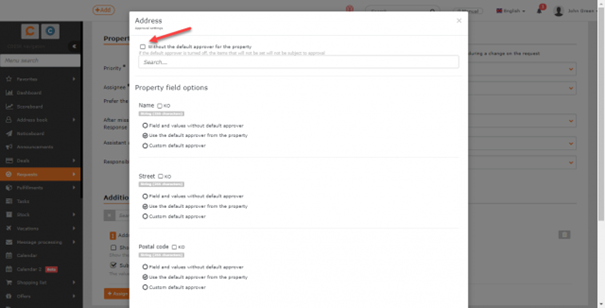
Approval by the selected property is available by checking the Subject to approval option. Clicking ![]() opens a window to set up the approval process.
opens a window to set up the approval process.
Without default approver for the property – when you check this box ![]() , you disable the ability to select a default approver. If the default approver is disabled, items that are not set will not be subject to approval. If it is on, there is a field below where you can select a user group or user with approval permission. If you set a default approver and set other approvers below for individual select items, the items will be approved by the user who is set as the default approver and also by the approvers set for the individual items. This setting applies only to custom selects. For other properties, it is not possible to set approvers for individual items separately.
, you disable the ability to select a default approver. If the default approver is disabled, items that are not set will not be subject to approval. If it is on, there is a field below where you can select a user group or user with approval permission. If you set a default approver and set other approvers below for individual select items, the items will be approved by the user who is set as the default approver and also by the approvers set for the individual items. This setting applies only to custom selects. For other properties, it is not possible to set approvers for individual items separately.
If it is a composite property, you can set the default approver for the entire property and also for each property individually.
Property Fields
KO – A property that has the KO option checked in the approval process will be placed first in the first stage of the approval process. The approval process will be generated on all approvers set on the property, but the notification will only go out to approvers set on the property marked as KO for now. Other approvers on properties will only be notified of the approval process when the KO property is approved. A KO property is only approved when all approvers on the KO item have commented positively. If one or more users do not approve the property, the property will not be approved regardless of the comments of the remaining approvers.
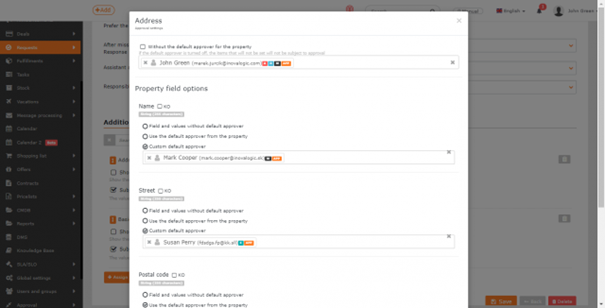
Field and values without default approver – when this option is checked, the property will not have a default approver.
Use default approver from property – when this option is checked, the property will have the same default approver as the entire property.
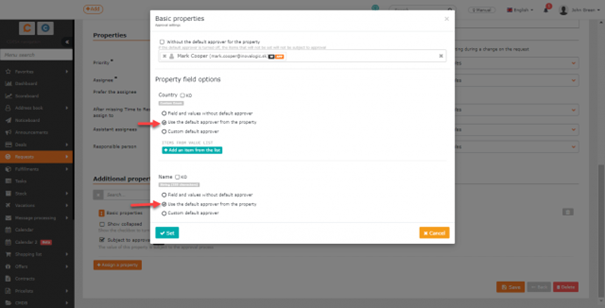
Custom Default Approver – when this option is checked, the property will have its own default approver to select.
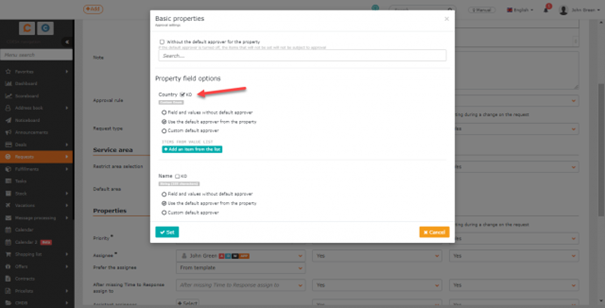
Setting Approval for Each Item from the List Separately
You can use the +Add item from list button to select an item from the list that will be subject to approver other than the default approver. For example, if the default approver does not approve a property, but the approver on a specific item in the list approves the item, only that item will be approved. The request will be partially approved.
Clicking on +Add item from list opens a list of selectable items in the window, where you can set the approval for each item separately. When clicked, the following options become available:
Value is not subject to approval – the selected value will not be subject to approval.
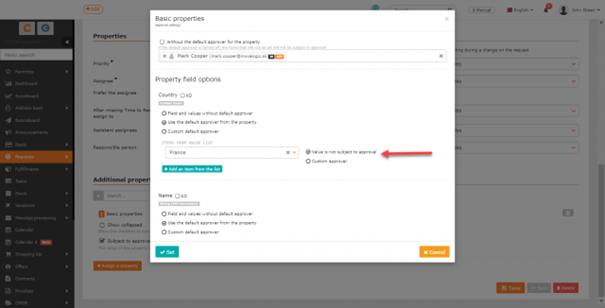
Custom approver – select the approver/approval group for the item.
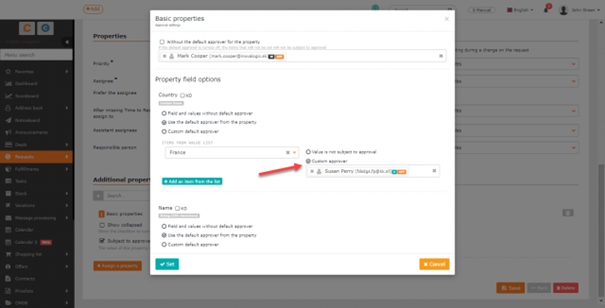
Use the Set button to apply the setting. Select Cancel to close the window without applying the settings.
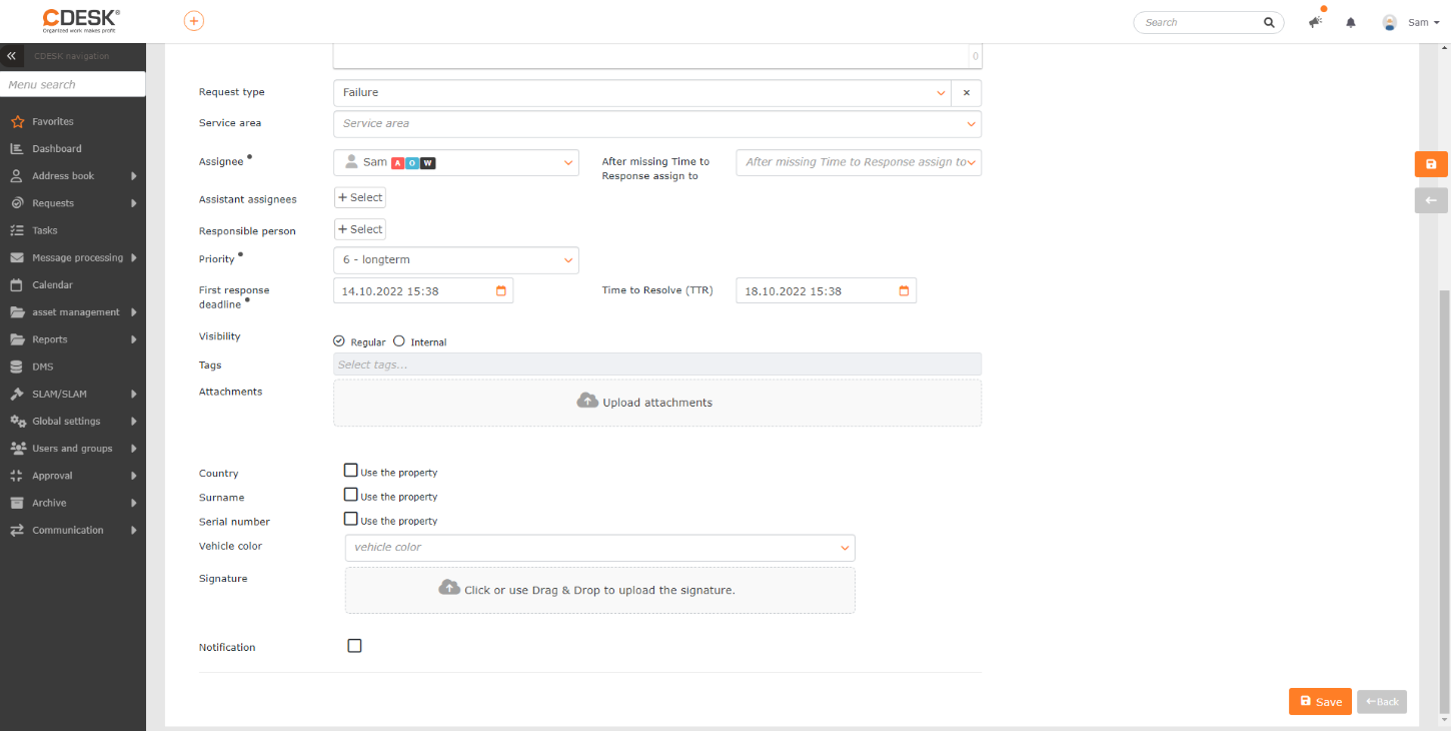
Entering Request via Catalog of Requests
You can create a new request from the catalog in Requests -> List of Requests, by clicking on the +Add from catalog button or by clicking on the top + button. For more information about creating requests from the catalog, see Working with Requests – Operator.
