WhatsApp - Short Documentation
Page contents
We are introducing the integration of the WhatsApp Business API into CDESK, aiming to improve the quality and accessibility of your customer and technical support. After setting up and configuring your WhatsApp Business account, your operators can communicate with clients in CDESK and create requests directly based on specific messages and prompts.
If your license includes the WhatsApp module (labelled as “Chats” in CDESK, part of the Omnichannel package), you need to activate the module in Global Settings.
Basic Settings
Global Settings > Omnichannel > Chats. Toggle the switch to “on” position (green). The module should then become accessible.
After activation, you need to fill in the basic data for linking WhatsApp Business and CDESK.
- WhatsApp Business Account ID – A 15-digit numerical code that can be found in the Meta Business Suite interface.
- API (Access) Token – An API token generated in your business account.
- Webhook Token – A random string of characters that you enter in the WhatsApp application settings.
- Business Phone Number ID – An identifier assigned to the phone number, listed in the WhatsApp application settings. The identifier consists of 15 digits.
- Business Phone Number – The customer-facing phone number in international format (for Slovak numbers, the prefix is +421).

CDESK offers the option to add a second phone number and its ID, but filling in the second number is not mandatory.
Module Interface
When opening the Chats module, a table with a list of conversations will appear. Like other modules, clicking the gear icon allows you to add or remove columns from the table.
On the right side, there is a notification/summary panel for completed and pending conversations. The user can see how many conversations they have handled today and how many are waiting for a response. The visual design of the panel is set up to motivate operators and provide basic information about existing conversations.
If all columns are selected, the table becomes wider, and to view all columns, you need to either scroll horizontally using the scrollbar at the bottom or close the right panel.
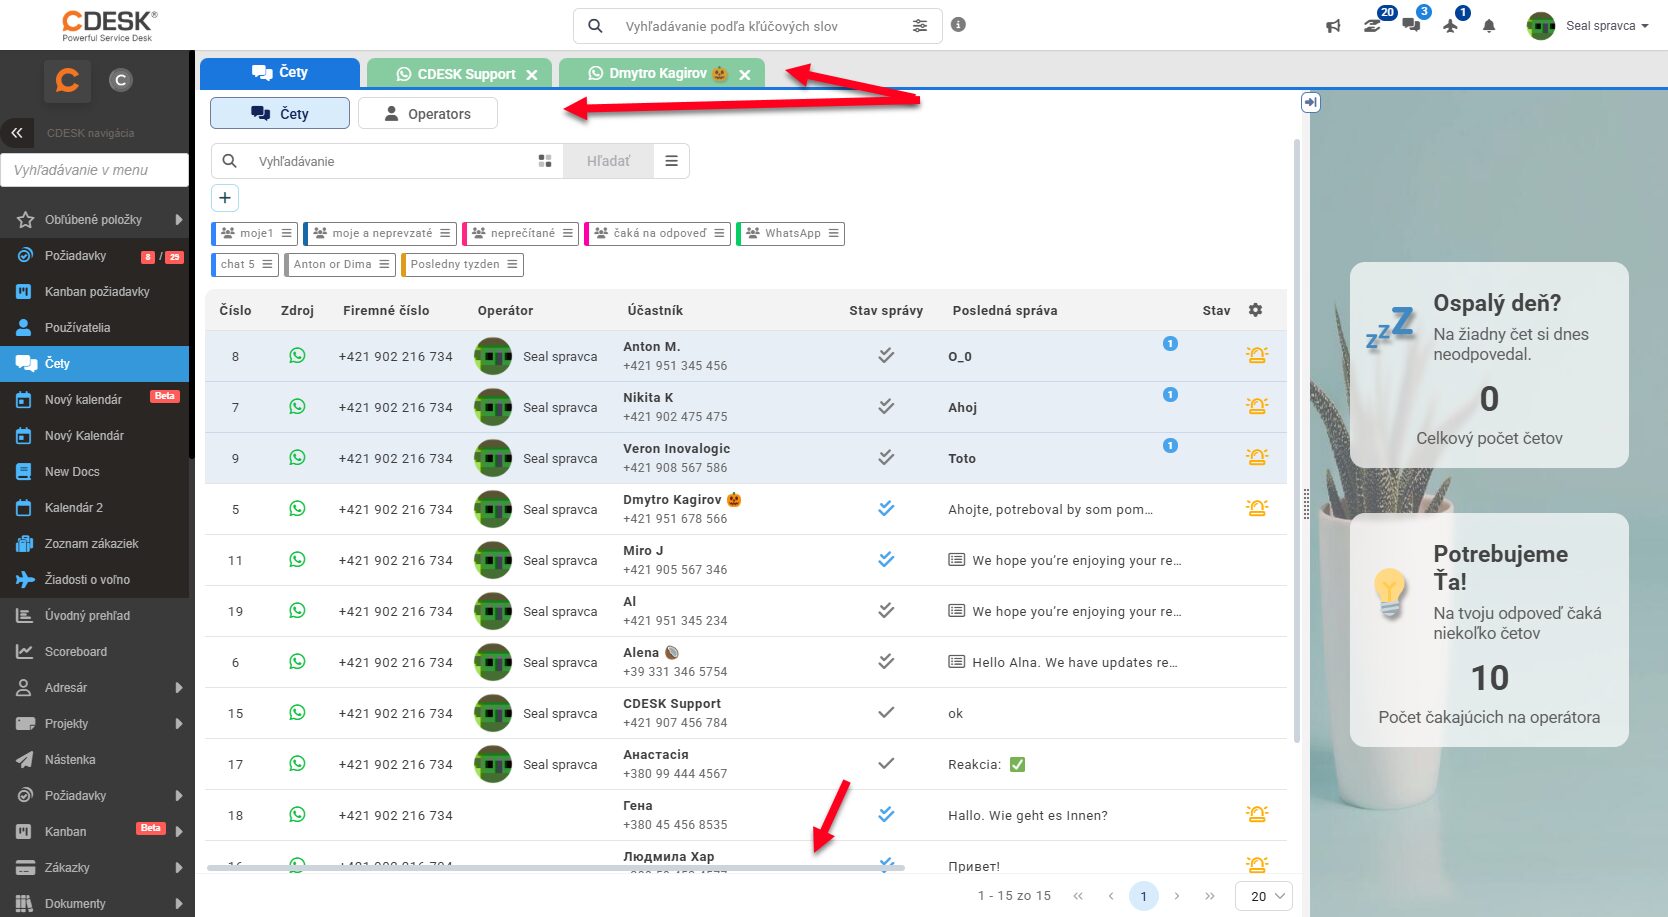
Number – Conversation ID.
Source – The chat app that hosted the conversation. Currently, only WhatsApp is available.
Business Number – The number to which the customer sent messages.
Operator – The last account/operator who replied to the conversation.
Participant – The customer.
Message Status – Can be “Read” (two full checkmarks), “Sent” (one gray checkmark), “Delivered” (two grey checkmarks), or “In Progress” (this status appears only briefly until the message is delivered to the customer).
Last Message – Displays the last message in the conversation. If there are unread messages from the customer, a number in a circle will appear next to the message, indicating how many unread messages are in the conversation.
Last Message Date – The date when the last message in the conversation was received.
Conversation Status – This column highlights conversations where the customer has not received a response from the operator. In such cases, a lighthouse symbol appears here.
Message Direction – Incoming or Outgoing message.
Creation Date – The date when the first message in the conversation was received.
To search for a specific conversation, use the search field at the top. The icon [grid-view fa−solid fa−grid−2] next to the search field contains a list of searchable columns. You can also save filters. Currently, filtering is only available in the “Chats” tab; this feature is not accessible in the “Operators” tab.
In the top-left section, there are several tabs. The Chats (dark blue) tab serves as a quick return to the conversation list. Next to it, tabs for open conversations will appear. Below this tab, there are additional ones. The Chats (light blue) tab displays the table of conversations described above. The Operators tab contains a list of operators, their permissions, IDs, and login status. In this table, you can also add or remove columns.
Conversation Detail
You can enter a conversation in several ways. The last message and the last message date function as hyperlinks to the conversation, or you can switch by double-clicking anywhere in the row of the selected conversation.
The conversation detail is divided into 3 sections – left, middle, and right.
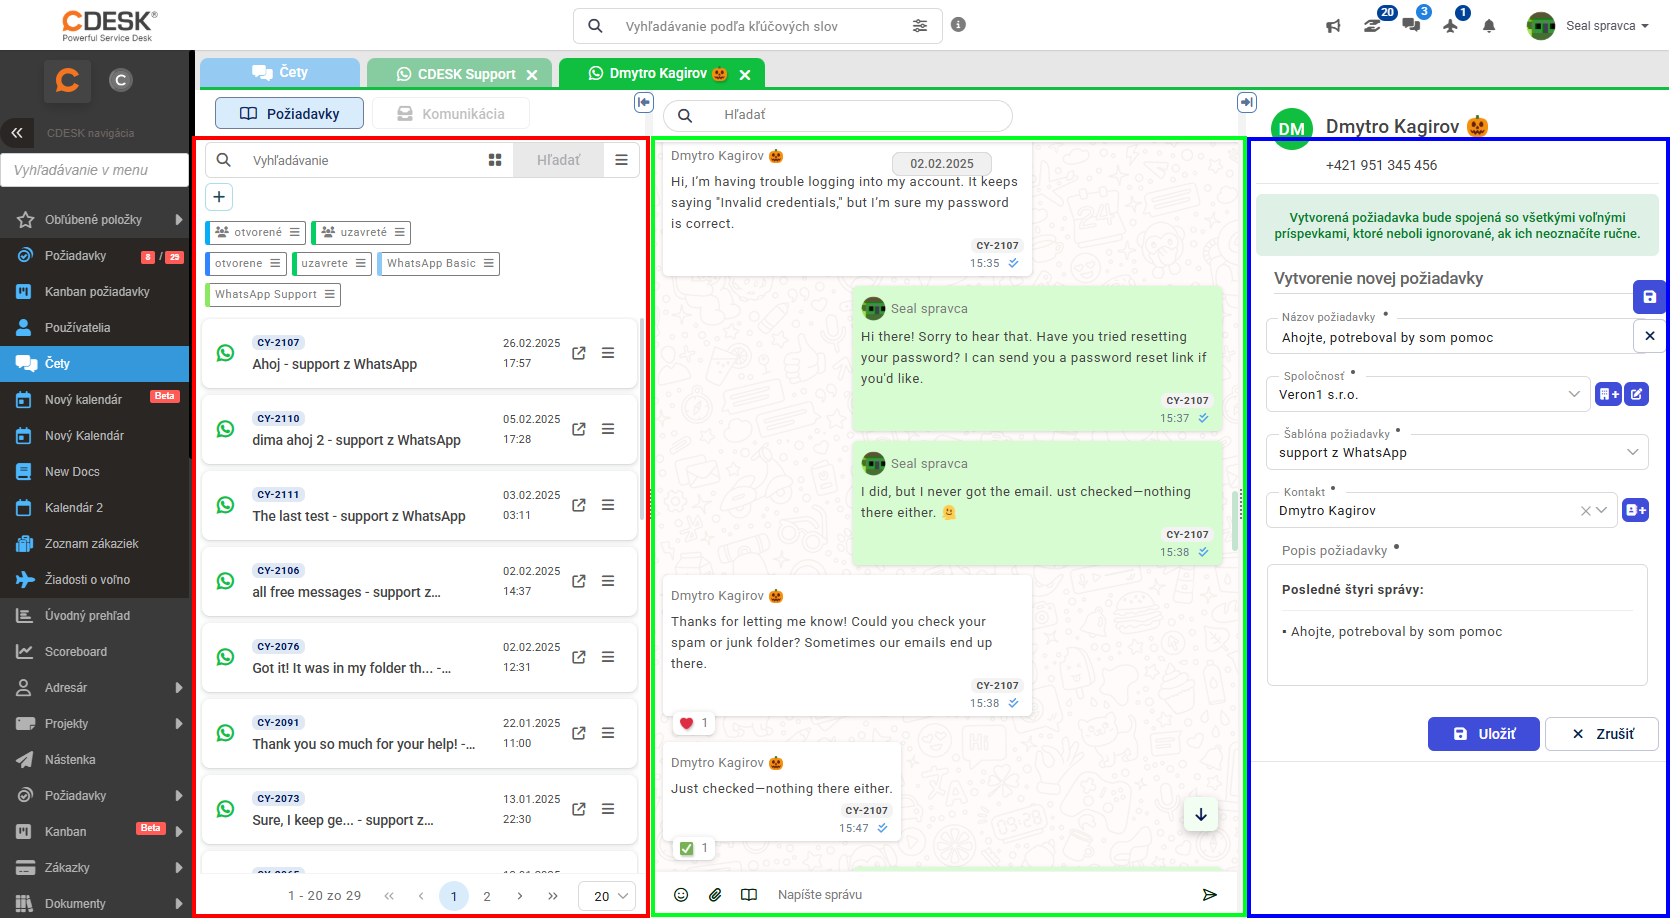
The left section is the space for requests created from the conversation. These are displayed with a code and request name. It also includes the option to filter and search requests.
The middle section displays the conversation content and a field for writing messages. Below the last message from the customer, there are two options that can be selected:
- No response needed– Checking this option will remove the lighthouse symbol in the Conversation Status column, which highlights unanswered messages in the chat.
- Add to the selected request– This checkbox appears only if a request is selected in the left section. Checking it means the last message will be linked to the request and will display the code of the selected request. This way, when the operator reviews the conversation later, it will be clear which messages relate to which requests.
Each message has its own action menu, which can be accessed by hovering over the message and clicking the menu button.
The right section is used to create requests and contains the same fields as the standard request creation interface. The basis for the request in this case is the customer’s message. You can create a request immediately after the first message by clicking “New Request”. A standard form will appear, where you need to enter the request name, company, request template, contact, and request description, which is automatically filled with the customer’s last message. Save the request afterward.

Selecting a request in the left section displays its details in the right section. Here, you can assign tags from the tag list, edit fields, add/remove attachments, and add discussion posts.
Sending Messages and Templates
V
Using the WhatsApp Business API is subject to restrictions when conversing with customers. For WhatsApp Business API, the so-called 24-hour rule applies. An operator can respond to a customer’s message only within this time window. After it expires, initiating a conversation with a regular message is not possible.
An exception to this rule is templates (WhatsApp Business templates), standardized messages that can be sent to customers even after the standard 24-hour response window has passed. Templates can include information about deliveries, ongoing payments, or upcoming branch visits. They also serve as a limited way for businesses to remind customers.
Creating and configuring templates takes place in the Meta Business Suite interface, and templates must be approved by WhatsApp. When creating a template, you can choose:
- Basic Template
- Customized Template – Here, you work with variables like {{user name}} or {{date}}, but you can also create arbitrary variables.
To use a WhatsApp Business template in CDESK, click on the book icon ![]() next to the message box. Here, you can also add emoji or attachments.
next to the message box. Here, you can also add emoji or attachments.