SLA
The list of SLAs (Service Level Agreement) is available in the main menu, provided the Requests module is enabled in Global settings->Requests->Requests. With the requests module enabled, the option to use SLAs is also made available in other parts of the system, described in more detail in the section Using SLA on this page.
SLA settings
If you are only just starting to use the CDESK system, we recommend adjusting the preset Global SLA to suit the needs of your company. From the list of SLAs, accessible from the main menu, you can open an SLA by double-clicking, or using the context menu  Edit. Making changes to an SLA is only permitted to users with the appropriate permission set in Permissions and access->Users.
Name* – enter the name under which the selected SLA will be displayed in forms
Note – here you can add a comment to the SLA, which will help you navigate more easily among the SLAs in use, if you have several of them created
Working times
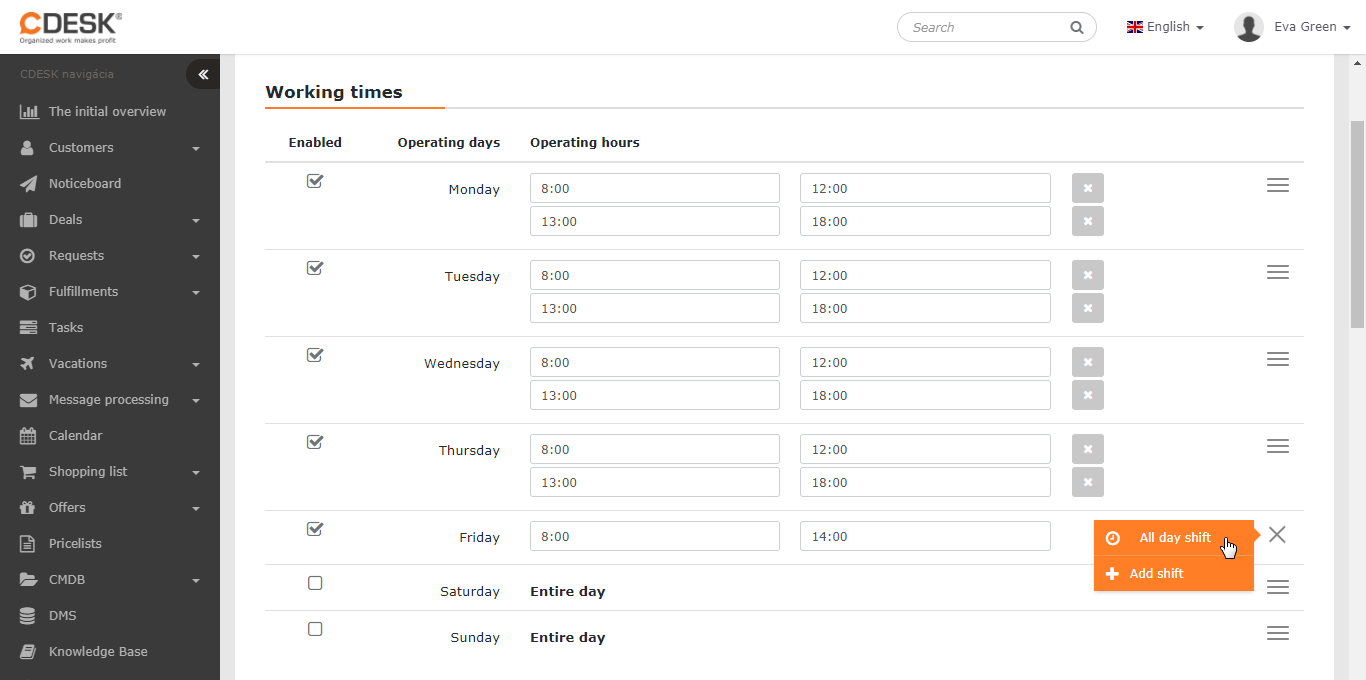
In this section you define on which working days and at what times the SLA will be in use. For the global SLA we recommend using the standard working hours customary in your company. If you need to make changes to a user-created SLA, untick the Use global SLA option  .
.
For each day you have two shifts available, which allow you to account for a possible break between shifts. The number of shifts is not limited to two; you can add more using the context menu Add shift. Unwanted shifts can be removed by clicking on ×. For round-the-clock operation, you can use the context menu All-day shift to change the working time to the whole day.
Holidays
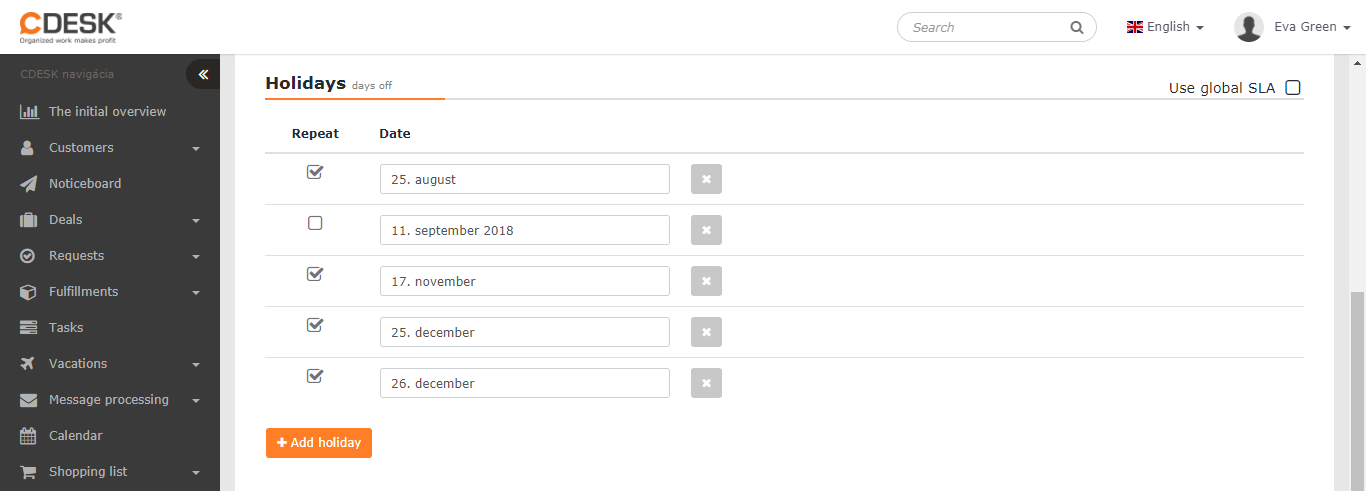
In this section you have the option to add non-working days during which the SLA will not be in use. If you need to make changes to a user-created SLA, untick the Use global SLA option .
You add a day off by clicking on Add holiday. In the new row, select the date of the non-working day, and if it recurs every year, tick the option in the Repeat column. You remove a holiday by clicking on × in the relevant row.
Priorities
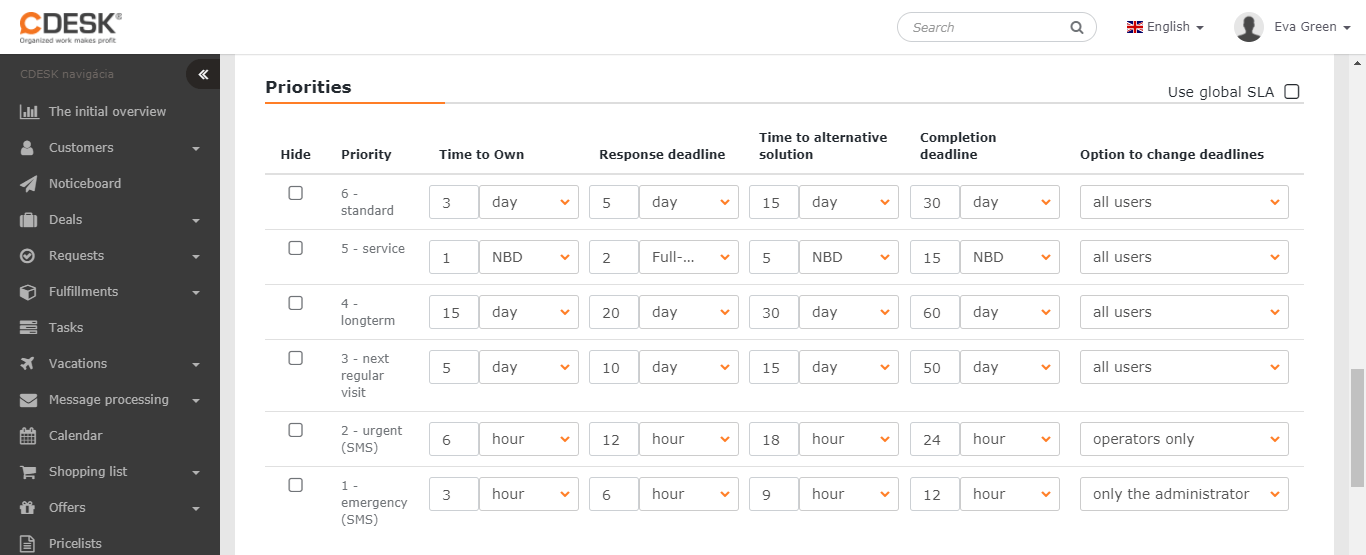
A list of all priorities enabled in Global settings->Requests->Requests, where it is also possible to edit the priorities’ names. If you need to make changes to a user-created SLA, untick the Use global SLA option.
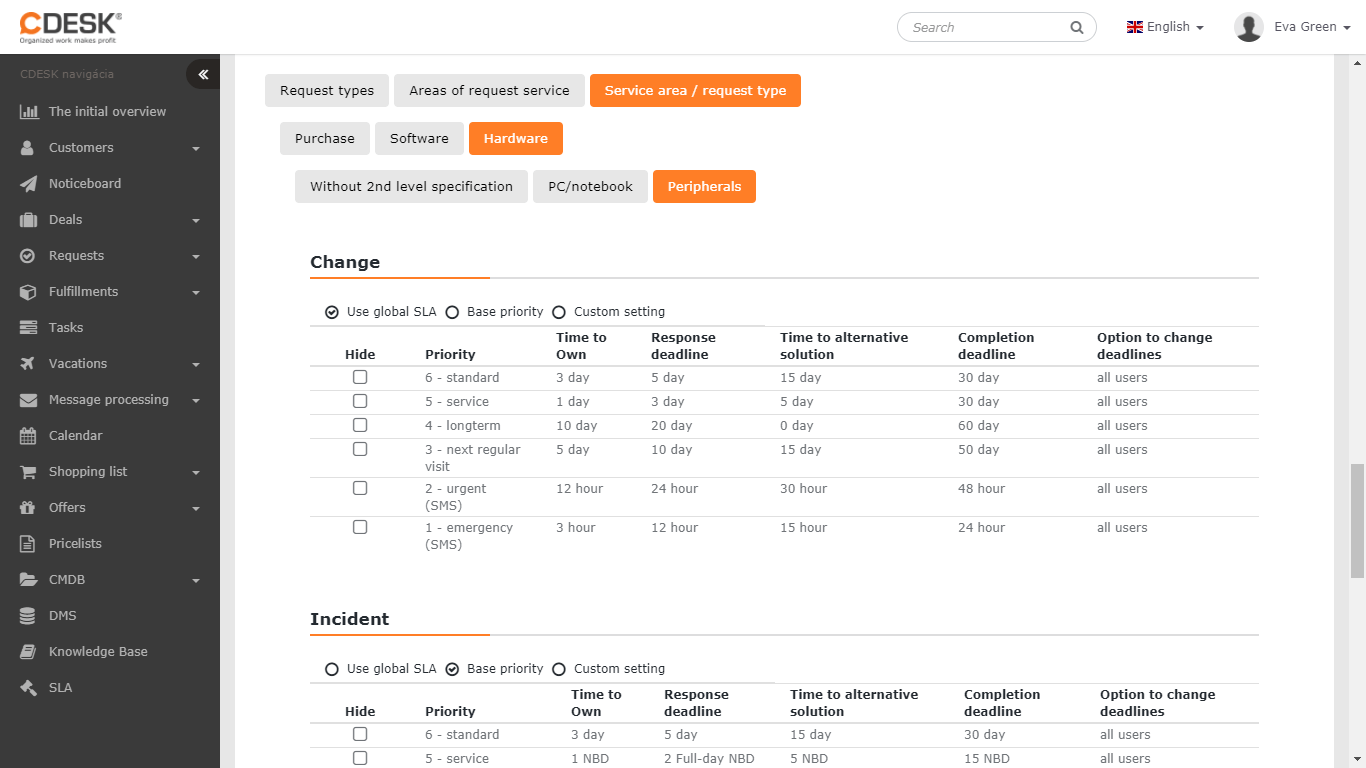
Hide – by ticking  in this column, you disable the selection of the marked priorities in the request form using this SLA.
The following columns are for setting deadlines:
Assignee assignment deadline – Time to Own (TTO) – is the deadline by which a request assigned to an assignee group should be assigned to a specific assignee. The column is displayed if the Entering the assignee assignment deadline option is enabled in Global settings->Requests->Requests
Response deadline – Response time (RT) – is the deadline by which the request must be responded to (for example by a change of status, or by adding a post to the discussion)
Alternative solution deadline – Time to Alternative Solution (TTAS) – is the deadline by which an alternative solution must be provided to the customer. The column is displayed if the Entering the alternative solution deadline option is enabled in Global settings->Requests->Requests
Completion deadline – Time to Resolve (TTR) – is the deadline by which the request must be resolved
You set the individual deadlines for each priority separately. There are several time units to choose from – here is their list including an explanation (as an example we use an SLA with an eight-hour working time of 9:00 – 17:00 and a request entered on 1 Nov at 16:00):
- hour – the deadline is set by the chosen number of hours within the set working times (5 hours = completion deadline 2 Nov by 13:00)
- day – the deadline is set by 24 hours within the chosen working days. If the final deadline falls outside working hours, the deadline is set to the start of the working time of the next working day (1 day = 24 hours = completion deadline 4 Nov by 16:00)
- NBD – Next Business Day – the deadline is set to the end of the working time of the following working day (1 NBD = completion deadline 2 Nov by 17:00)
- All-day NBD – the deadline is set to the end of the following working day (1 WNBD = completion deadline 2 Nov by 23:59)
Option to change deadlines – in this column you set who has permission to change the deadline in a request to one other than that defined in the SLA:
- all users – the deadlines in the request can be edited by everyone, including customers (customer and easyclick account)
- operators only – the deadlines in the request can be changed only by users assigned to the operator group (you can read more about assigning users to permission groups in the article Groups or Users)
- administrator only – the deadlines in the request may be edited only by users with administrator rights
SLA combinations
The basic SLA priorities can be combined with:
- Request types – the option is available if request types are enabled in Global settings->Requests->Requests
- Request service areas – the option is available if request service areas are enabled in Global settings->Requests->Requests
- Service areas / Request types – the option is available if both service areas and request types are enabled
For each of the listed combinations it is possible to choose the priority settings:
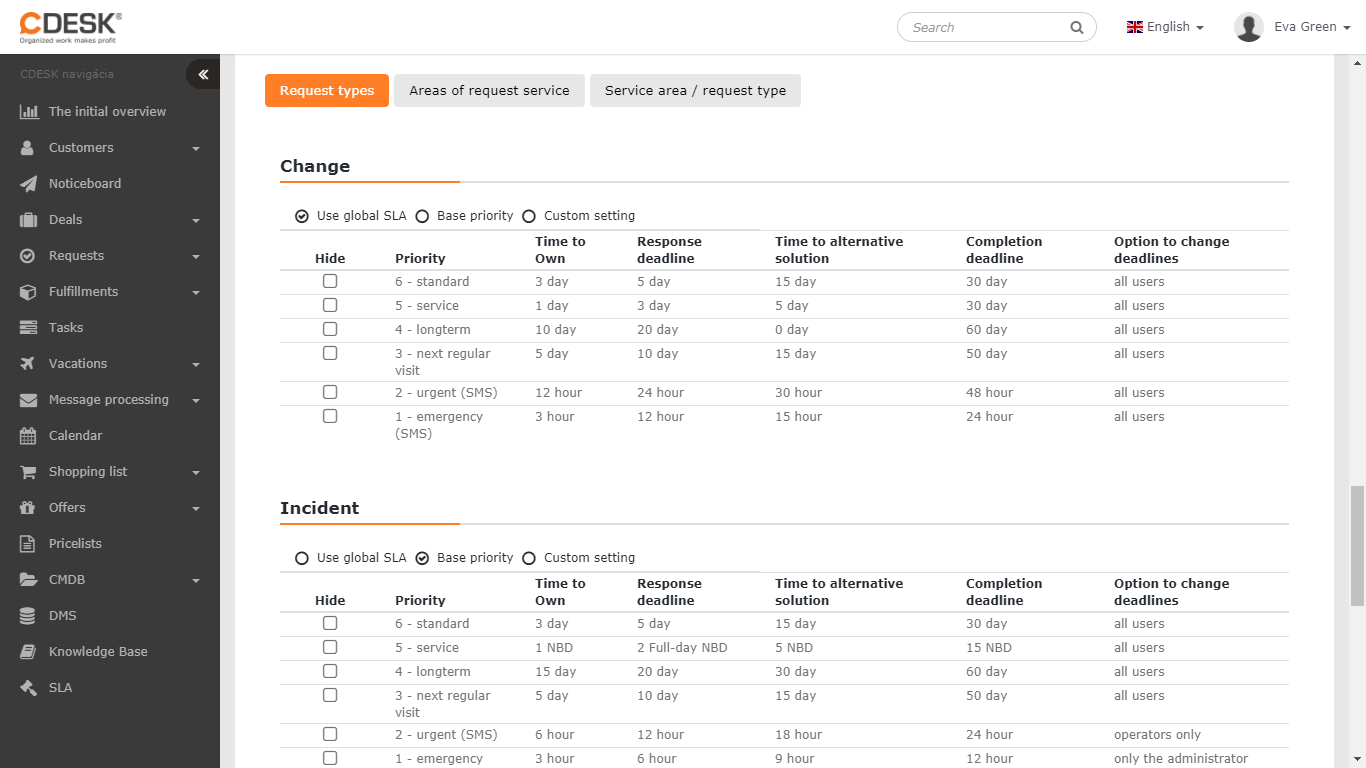
- Use global SLA – for the selected combination, the settings defined in the global SLA are used. This option is only available in a user-created SLA.
- Basic priority – for the selected combination, the priority settings set in the edited SLA are used
- Custom setting – for the selected combination it is possible to set custom priorities, which may differ from both the basic priorities and the priorities of the global SLA (if you are editing an SLA other than the global one)
Request types
By selecting the combination of priorities by request types, you display all enabled request types in Global settings->Requests->Requests. SLA priority deadlines can be set for each request type separately.
Request service areas
By selecting the combination of priorities by service areas, the selection of all enabled service areas in Global settings->Requests->Requests becomes available, together with their second level (if it is enabled). SLA priority deadlines can be set for each service area and its second level separately.

Service areas / Request types
By selecting the combination of priorities by service areas and request type at the same time, it is possible to set SLA priority deadlines for all enabled request types for each enabled service area and its second level separately. In practice this means that you select a request service area (possibly also its second level), under which the settings for each request type are made available separately.
Creating a new SLA
Adding new SLAs is only allowed to users with the appropriate permission set in Permissions and access->Users.
It is possible to create a new SLA:
- in the list of SLAs, by clicking the +New SLA button – the form of a new SLA opens with values pre-filled according to the global SLA. To be able to edit the pre-filled values, untick the Use global SLA
 option for the individual sections
 - by making a copy of one of the existing SLAs – from the list of SLAs select the one whose settings you wish to copy, then click Make a copy at the bottom of the form
- in the settings of a customer, contract, CMDB object, or computer, by clicking +Add SLA located below the SLA assignment. You can read more about assigning SLAs in the section Using SLA.
Using SLA
In the CDESK system it is possible to define and use an SLA for each entity that appears in requests. The default SLA is the global SLA, however a custom SLA can be assigned to each entity. More about the options for assigning a custom SLA, as well as the prioritisation of SLA use in a request, is described below in the sections Applying SLA and Hierarchy of SLA use in a request.
Applying SLA
In the CDESK system, SLAs are used by the following entities:
Customer – by default uses the global SLA. You apply a user-defined SLA to a customer in the customer settings in Customers and contacts->List of customers, on the SLA tab.
If the customer uses custom service area settings on the CDESK settings tab, a custom SLA is created for them automatically, with no option to change it (changing the SLA is possible only after setting the service areas according to the global settings)
Branch – by default inherits the SLA from the parent object – the customer. To apply a user-defined SLA to a branch, find and open the relevant branch in CMDB->CI List under the main group from the Branches category, and in the SLA section select the required SLA
Location – by default inherits the SLA from the parent object – the branch. If the branch is not defined, the SLA according to the customer settings is used. To apply a user-defined SLA to a location, find and open the relevant location in CMDB->CI List under the main group from the Locations category, and in the SLA section select the required SLA
Object – by default inherits the SLA from the parent object – the location. If the location is not defined, the SLA of the nearest parent object is used (branch>customer). An object can be understood as:
- objects in CMDB from the Devices category – to apply a custom SLA to an object, find and open the relevant location in CMDB->CI List under the main group from the Devices category, and in the SLA section select the required SLA
- items from the catalogue of operated services – applying a user-defined SLA to an operated service is possible when creating a contract for that service. After the contract is activated, changing the SLA is only possible by means of an amendment to the contract. You can find more about contracts in the separate article Contracts
- registered computers – when using the CM IT monitoring functionality – you apply the SLA to a computer after finding it and opening the record in CMDB->CI List under the main group CM IT Monitoring, on the SLA tab
The list of objects to which the SLA is applied is on the Assigned to objects tab in the detail of the selected SLA (only for a user-created SLA)
Hierarchy of SLA use in a request
When entering a request into which several different applied SLAs enter, the following applies:
- SLA applied to an object (items in CMDB from the Devices, Catalogue of operated services, Computers categories) – sits highest in the SLA hierarchy. This SLA is used in the request, regardless of the other applied SLAs entering the request. If more objects with different SLAs are assigned to a request, a collision of object SLAs occurs and the request submitter must select which object’s SLA will be used for the entire request – this choice cannot be changed after the request is saved.
- SLA applied to a location – in the hierarchy it sits above the SLA applied to a branch, and replaces all the lower-mentioned SLAs entering the request.
- SLA applied to a branch – in the hierarchy it sits in the middle – it replaces the global SLA and the SLA applied to the customer.
- SLA applied to a customer – if a custom or user-defined SLA is applied to a customer, it replaces the Global SLA
- Global SLA – sits lowest in the SLA hierarchy. If any of the above-mentioned SLA applications enter the request, it will be replaced by them.